Introduction
This document describes how to get started and prepare a RADKit environment for remote troubleshooting a Cisco HyperFlex environment.
Background Information
The main purpose of this document is to explain how to prepare your environment for usage by TAC to leverage RADKit for troubleshooting.
What is RADKit?
RADKit is a network-wide orchestrator. Experience a radical new way of addressing your equipment, boost your Cisco Services, and expand your capabilities.
More information on RADKit can be found here: https://radkit.cisco.com/
Why RADKit for HX?
Cisco HyperFlex consists out of several components: Fabric Interconnects, UCS Servers, ESXi, vCenter, and SCVMs. In a lot of cases, information from different devices needs to be collected and correlated. While troubleshooting, new information may be required over time and doing this over a (long) WebEx session or by fetching (large) support bundles through Intersight is not always the most effective way. Using RADKit, a TAC engineer can request the required information during the troubleshooting process, from the various devices and services, in a secure and controlled way.
RADKit vs. Intersight
Intersight remains the primary connectivity method for HyperFlex clusters, providing numerous benefits such as automatic log gathering, telemetry, and proactive monitoring of your environment for hardware and other known alerts.
Although a lot of HX clusters are Intersight-connected, Intersight is currently mainly intended for the deployment, maintenance and monitoring of your HyperFlex clusters. Intersight does allow the ability to collect support bundles and telemetry information, which is typically a good starting point for troubleshooting. For live troubleshooting, where in a classic scenario, a TAC engineer would utilize a WebEx session, RADKit comes in place. It does not replace Intersight but adds a different approach to troubleshooting, either using an interactive session or leveraging programmatic request-response sequences.
High-level Overview
Connectivity Diagram
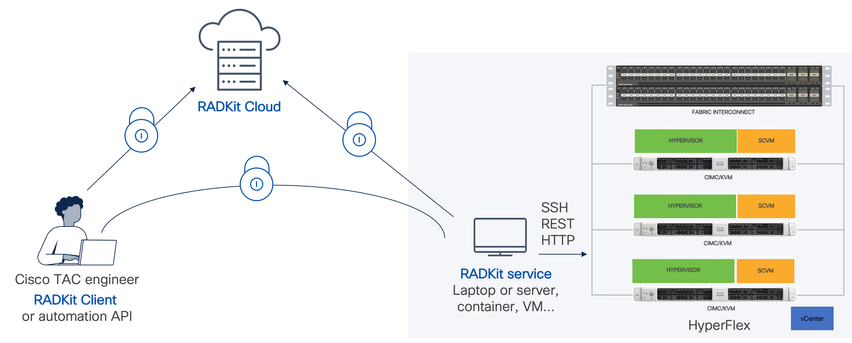
Components
- RADKit Service: On-premise RADkit service component, which is used as a secure gateway to your HX environment. As a customer, you retain full control over which devices are accessible and who can access them at which time. This service can be hosted on any Linux, MacOS or Windows machine.
- RADKit Client: Front-end used by the TAC engineer to get access to your environment, using programmatic troubleshooting and monitoring, automated retrieval, and analysis of device outputs using Cisco-internal tools or direct interaction with the devices through CLI.
- RADKit Cloud: Provides secure transport between the Client and Service.
Preparation
Overview of Steps to Follow
These steps are required before a TAC engineer can leverage RADKit to connect and troubleshoot your HX environment:
- Download and install the RADkit service. It can be installed on any Linux, MacOS, or Windows machine.
- Start the RADKit service and do the initial setup (bootstrap). Create a super admin account to further manage the RADKit service through a web interface.
- Enroll your RADKit service with the RADKit cloud. Register your RADKit service with the RADKit cloud and generate a service ID to identify your environment.
- Add devices and endpoints. Provide a list of devices and store credentials for devices that might need to be accessed.
A more detailed/generic explanation of these steps can be found here: https://radkit.cisco.com/docs/pages/one_page_setup.html
Step 1. Download and Install the RADKit Service
The details in this step may be a bit different, depending on which OS you are using to install the RADKit service but in general, the process is very similar. Download the latest release for your OS from here: https://radkit.cisco.com/downloads/release/.
Run the installer for your system and follow the prompts until the installation is complete:
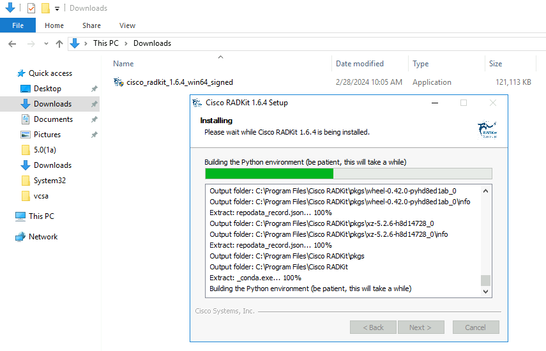
Once all RADKit components are installed, you can continue to the next step where you go through the initial setup.
Step 2. Start the RADKit Service and do the Initial Setup (Bootstrap)
In this step, create a superadmin account to further manage the RADKit service through a web interface.
Locate RADKit Service in your Start Menu (on Windows) or Applications folder (on macOS) and start it:
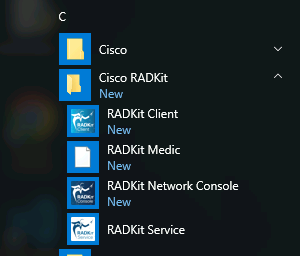
The very first time you start it, it can take a little while for RADKit Service to start (about 10 to 30 seconds depending on the speed of your system). Subsequent runs will be much faster.
After startup is complete, in the RADKit Service dialog, once the status changes to not yet bootstrapped press Configure RADKit :
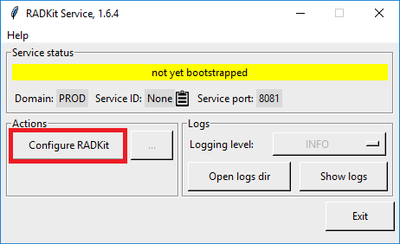
This opens your web browser and take you to the RADKit Service WebUI, a web-based management interface that allows you to manage RADKit Service.
It is expected to get a certificate warning, which you can skip, when connecting to this URL as it is using a self-signed certificate.
As a superadmin user does not exist yet, the WebUI will request you to create a password for this user:
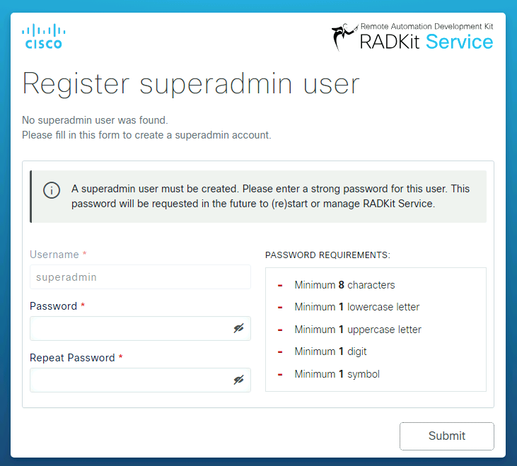
Select a password that complies with the password strength requirements displayed on the right.
The password for this account will be used to protect secrets such as private keys and device credentials; if you lose it, all secrets will be lost and RADKit Service will need to be reinitialized, so choose it carefully and write it down in a secure location. It can be changed later as needed.
After creating the superadmin account, use it to log in to the WebUI:
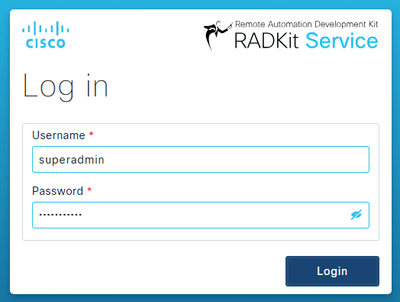
Once the superadmin account has been created and you have successfully logged in to the WebUI, you can continue to the next step where your RADKit service is registered with the RADKit cloud component.
Step 3. Enroll your RADKit Service with RADKit Cloud
In this step, register your RADKit service with RADKit cloud and generate a service-ID to identify your environment.
After logging in to the WebUI with the superadmin user (see step 2), navigate to the connectivity screen:
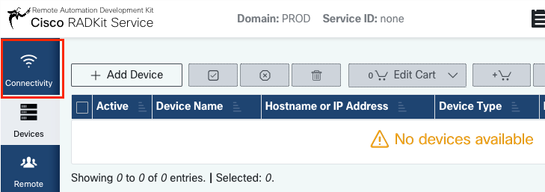
In case you require a proxy to connect to the internet, please refer to the detailed setup instructions available here: https://radkit.cisco.com/docs/pages/one_page_setup.html
Now you need to enroll the Service to let it connect to RADKit Cloud. This is done by logging in via the Service WebUI using your Cisco.com (CCO) account. Click Enroll with SSO to proceed:
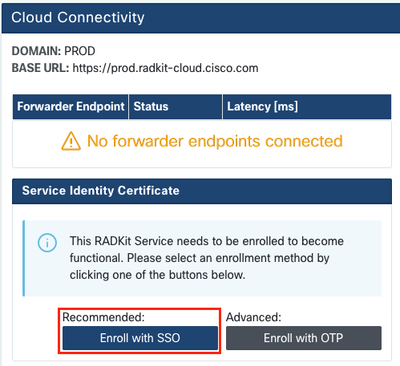
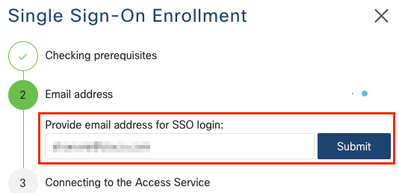
Enter the email address corresponding to your Cisco.com (CCO) account in the email address field on Step 2. and click Submit as shown in the image:
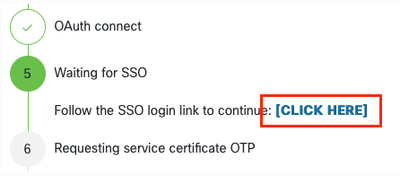
After RADKit Service connects to RADKit Cloud for authorization, it shows you a [CLICK HERE] link that takes you to the Cisco SSO server for authentication. Click the link to proceed; it will open in a new browser tab/window. Ensure to use the same email address to log in to SSO, as the one you entered in the step mentioned previously:
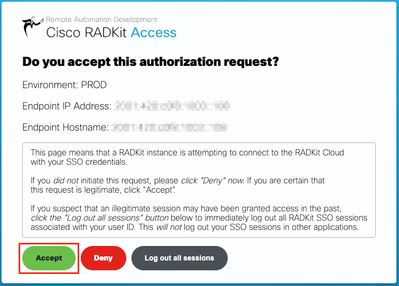
After SSO authentication is complete (or straight away, if you were already authenticated) you are taken to a RADKit Access confirmation page. Read the information that is on the page and click Accept to authorize RADKit Service to enrol with your CCO account as the owner.
You then get to a screen that says Authentication result: Success .
Do not click the Log out all sessions button; instead, simply close the SSO tab/window and return to the RADKit Service WebUI.
This shows Service enrolled with the identity: … . The unique identifier that follows is your RADKit Service ID, also known as the Service Serial Number. In the example screenshot, the Service ID is axt9-kplb-5dwc yours will be different.
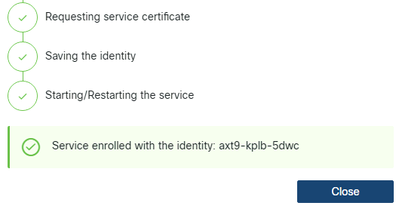
Click Close to close the dialog and return to the Connectivity screen.
After refreshing the WebUI, your service ID is displayed on top of the RADKit GUI, together with the connectivity status as seen here:

Whenever a TAC engineer needs to access any of the devices in your environment, they require this service ID to identify your RADKit service.
Now that a connectiveity is established with the RADKit Cloud component and generated a service ID while doing so, in the next step, add the devices that can be reached through RADKit.
Step 4. Add Devices and Endpoints
In this step, add the devices and their credentials for the devices that can be accessed through RADKit. For HyperFlex, this means that ideally, these devices and their credentials need to be added:
|
Device
|
Device Type
|
Management Protocols
|
Credentials
|
Forwarded TCP ports
|
Remarks
|
|
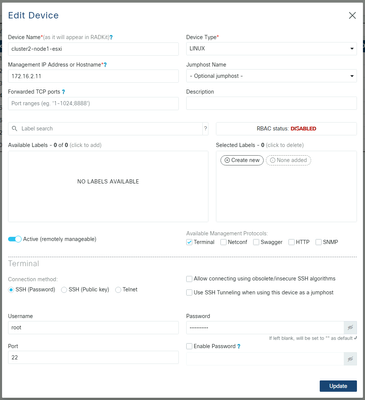
Hypervisor (ESXi hosts)
|
Linux
|
Terminal (SSH)
|
root
|
|
|
|
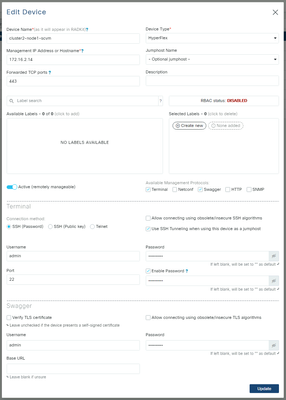
Storage Controller (SCVM)
|
HyperFlex
|
Terminal (SSH)Swagger
|
admin
root (enable)
|
443
|
Enter the root password in the enable password field. This will be used when a consent token is required. For Swagger: uncheck "Verify TLS Certificate" and leave the Base URL field empty
|
|
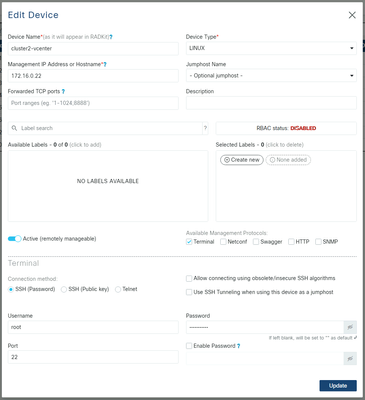
vCenter
|
Linux
|
Terminal (SSH)
|
root
|
|
|
|
UCSM
|
Generic
|
Terminal (SSH)
|
admin
|
|
|
|
Installer (optional)
|
Linux
|
Terminal (SSH)
|
root
|
443
|
|
|
CIMC (only for edge clusters)
|
Generic
|
Terminal (SSH)
|
admin
|
|
|
|
Witness (only for stretched clusters)
|
Linux
|
Terminal (SSH)
|
root
|
|
|
|
Intersight CVA/PCA (optional)
|
Linux
|
Terminal (SSH)
|
admin
|
443
|
|
It is important to add the devices only by using their IP-address and not their hostname, as this is required to corelate the devices that belong in the same cluster.
To add these devices, in the RADKit WebUI, navigate to the Devices screen:
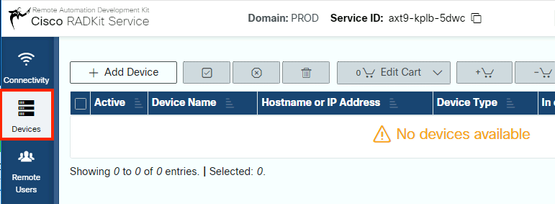
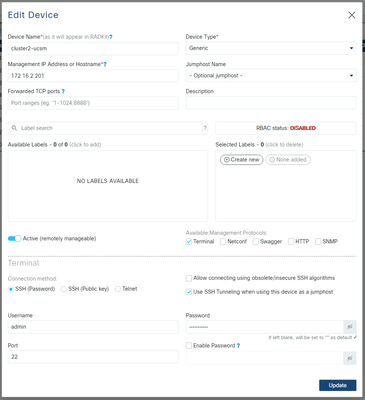
For each of the devices listed above, create a new entry by clicking Add Device . Enter the IP address, select the device type, and provide details depending on each device type for all of the nodes in your cluster. When done, click Add & closeto go back to the Devices screen, or Add & continue to add another device.
Here you can find example entries and their configuration for each device type:
Example for ESXi hosts:
Example for storage controllers:
Example for vCenter:
Example for UCSM:
Using RADKit on a TAC SR
If all preparation is done and you would like to provide access to your devices to a TAC engineer, you can go through these steps.
An engineer needs your RADKit service ID and access to your environment or selected devices (when using RBAC) for the time that is required.
1. Provide RADKit Service ID
If you have not yet opened a TAC case, you have the opportunity to mention Use RADKit for data collection in the Support Case Manager on Cisco.com:
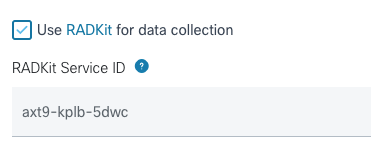
In case you already have an open service request, you can add the RADKit Service ID in Support Case Manager with the Customer Contact Information section:

Or simply mention your ID to the TAC engineer who is working on your case.
2. Add Remote User
Before any user can work with your devices, you need to provide explicit access and configure a timeframe for which this access remains valid. To do so, in the RADKit WebUI, navigate to the Remote Users screen and create a new remote user by clicking Add User.
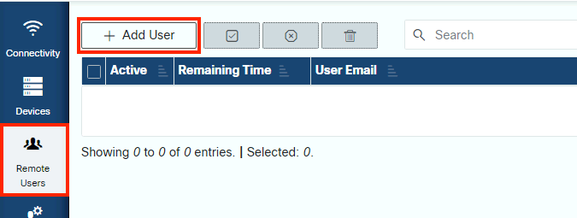
Enter the TAC Engineer’s @cisco.com email address (be careful about typos). Ensure to pay attention to the Activate this user checkbox and the Time slice or Manual settings.
While the user is active, they have access to the configured devices through RADKit Service, provided that those devices are enabled and that the RBAC policy allows them to.
The time slice represents the amount of time after which the user will be automatically deactivated; in other words, a time slice represents a time-bound troubleshooting session. The user’s session can be extended up to the duration of the time slice for that user. If you prefer to manually activate/deactivate users, select Manual instead.
Users can always be manually activated/deactivated, regardless of their having a time slice configured or not. When a user gets deactivated, all their sessions through RADKit Service are instantly disconnected.
When done, click Add & close to go back to the Remote Users screen.
Related Information


 Feedback