Introduction
This document describes how to troubleshoot common Intersight Health Check failures for Hyperflex clusters.
Prerequisites
Requirements
Cisco recommends that you have knowledge of these topics:
- Basic understanding Network Time Protocol (NTP) and Domain Name System (DNS).
- Basic understanding of Linux command line.
- Basic understanding of VMware ESXi.
- Basic understanding of VI text editor.
- Hyperflex Cluster Operations.
Components Used
The information in this document is based on:
Hyperflex Data Platform (HXDP) 5.0.(2a) and higher
The information in this document was created from the devices in a specific lab environment. All of the devices used in this document started with a cleared (default) configuration. If your network is live, ensure that you understand the potential impact of any command.
Background Information
Cisco Intersight offers the capability to run a series of tests on a Hyperflex cluster to ensure the cluster health is in optimal condition for day-to-day operations and maintenance tasks.
Starting with HX 5.0(2a), Hyperflex introduces a diag user account with escalated privileges for troubleshooting in the Hyperflex command line. Connect to Hyperflex Cluster Management IP (CMIP) using SSH as an administrative user and then switch to diag user.
 HyperFlex StorageController 5.0(2d)
admin@192.168.202.30's password:
This is a Restricted shell.
Type '?' or 'help' to get the list of allowed commands.
hxshell:~$ su diag
Password:
 ____             __             _____ _       _     _             _____
| ___|           / /_      _    | ____(_) __ _| |__ | |_          |_   _|_      _____
|___ \   _____  | '_ \   _| |_  |  _| | |/ _` | '_ \| __|  _____    | | \ \ /\ / / _ \
 ___) | |_____| | (_) | |_   _| | |___| | (_| | | | | |_  |_____|   | |  \ V  V / (_) |
|____/           \___/    |_|   |_____|_|\__, |_| |_|\__|           |_|   \_/\_/ \___/
                                         |___/

Enter the output of above expression: 5
Valid captcha
diag#
Troubleshoot
Fix ESXi VIB Check "Some of the VIBs Installed are Using Deprecated vmkAPIs"
When upgrading to ESXi 7.0 and above, Intersight ensures the ESXi hosts in a Hyperflex cluster do not have drivers that are built with dependencies on older vmkapi versions. VMware provides a list of the impacted vSphere Installation Bundles (VIBs) and describes this problem in this article: KB 78389
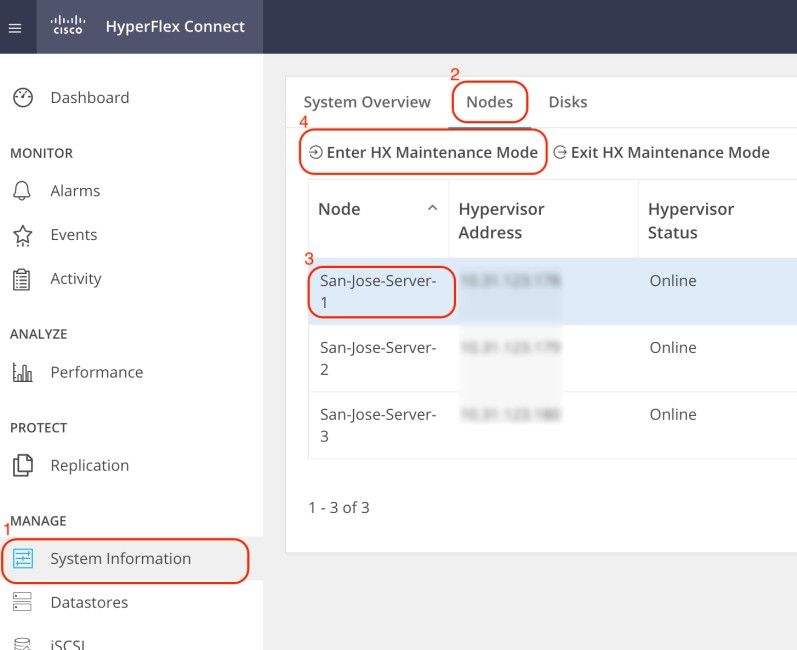
Log in to Hyperflex Connect web User Interface (UI), and navigate to System Information. Click Nodes and select the Hyperflex (HX) node. Then, click Enter HX Maintenance Mode.

Use an SSH client to connect to the management IP address of the ESXi host. Then, confirm the VIBs on the ESXi host with this command:
esxcli software vib list
Remove the VIB with this command:
esxcli software vib remove -n driver_VIB_name
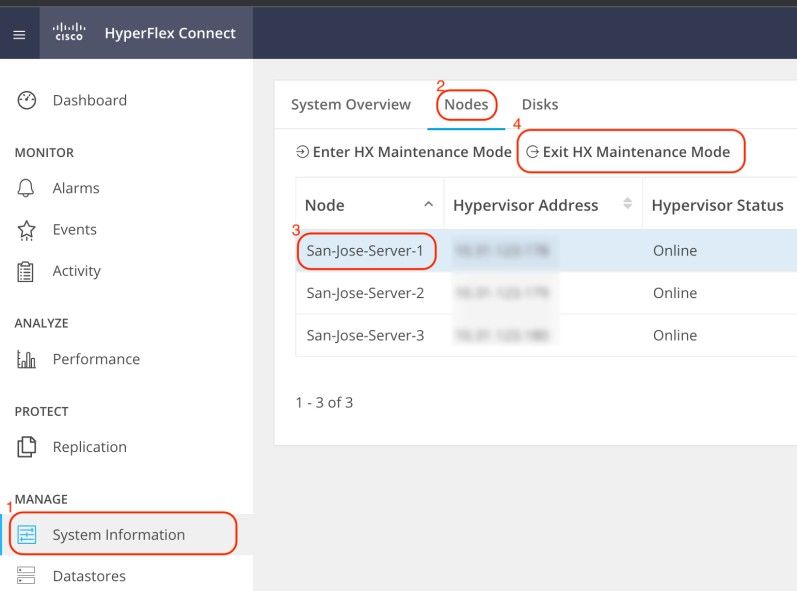
Reboot the ESXi host. When it comes back online, from HX Connect, select the HX node and click Exit HX Maintenance Mode.

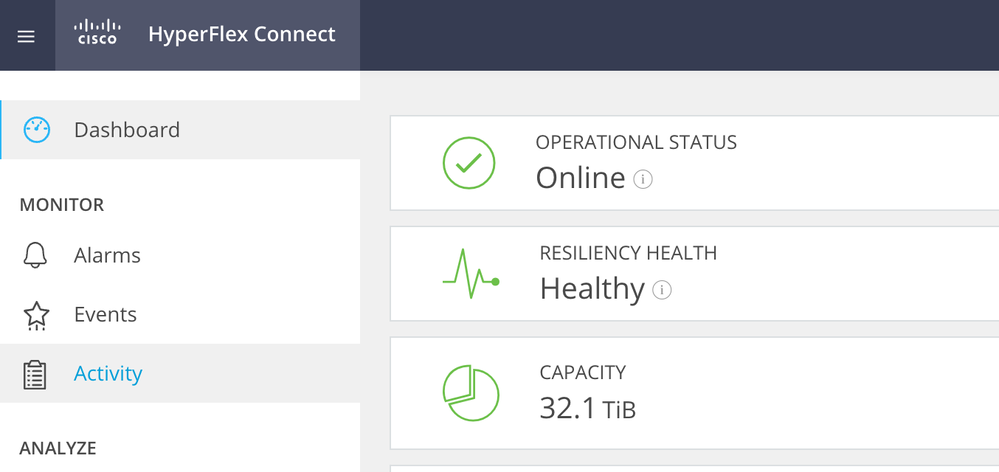
Wait for the HX cluster to become Healthy. Then, perform the same steps for the other nodes in the cluster.
Fix vMotion Enabled "VMotion is Disabled on the ESXi Host"
This check ensures vMotion is enabled on all ESXi hosts in the HX cluster. From vCenter, each ESXi host must have a virtual switch (vSwitch) as well as a vmkernel interface for vMotion.

Connect to Hyperflex Cluster Management IP (CMIP) using SSH as an administrative user and then run this command:
hx_post_install
Select option 1to configure vMotion:
admin@SpringpathController:~$ hx_post_install

Select hx_post_install workflow-

1. New/Existing Cluster
2. Expanded Cluster (for non-edge clusters)
3. Generate Certificate

Note: Workflow No.3 is mandatory to have unique SSL certificate in the cluster. By Generating this certificate, it will replace your current certificate. If you're performing cluster expansion, then this option is not required.

Selection: 1
Logging in to controller HX-01-cmip.example.com
HX CVM admin password:
Getting ESX hosts from HX cluster...
vCenter URL: 192.168.202.35
Enter vCenter username (user@domain): administrator@vsphere.local
vCenter Password:
Found datacenter HX-Clusters
Found cluster HX-01

post_install to be run for the following hosts:
HX-01-esxi-01.example.com
HX-01-esxi-02.example.com
HX-01-esxi-03.example.com

Enter ESX root password:

Enter vSphere license key? (y/n) n

Enable HA/DRS on cluster? (y/n) y
Successfully completed configuring cluster HA.

Disable SSH warning? (y/n) y

Add vmotion interfaces? (y/n) y
Netmask for vMotion: 255.255.254.0
VLAN ID: (0-4096) 208
vMotion MTU is set to use jumbo frames (9000 bytes). Do you want to change to 1500 bytes? (y/n) y
vMotion IP for HX-01-esxi-01.example.com: 192.168.208.17
Adding vmotion-208 to HX-01-esxi-01.example.com
Adding vmkernel to HX-01-esxi-01.example.com
vMotion IP for HX-01-esxi-02.example.com: 192.168.208.18
Adding vmotion-208 to HX-01-esxi-02.example.com
Adding vmkernel to HX-01-esxi-02.example.com
vMotion IP for HX-01-esxi-03.example.com: 192.168.208.19
Adding vmotion-208 to HX-01-esxi-03.example.com
Adding vmkernel to HX-01-esxi-03.example.com

Note: For Edge clusters deployed with HX Installer, hx_post_install script needs to be run from the HX Installer CLI.
Fix vCenter Connectivity Check "vCenter Connectivity Check Failed"
Connect to Hyperflex Cluster Management IP (CMIP) using SSH as an administrative user and switch to diag user. Ensure the HX cluster is registered to vCenter with this command:
diag# hxcli vcenter info
  Cluster Name            : San_Jose
  vCenter Datacenter Name : MX-HX
  vCenter Datacenter ID   : datacenter-3
  vCenter Cluster Name    : San_Jose
  vCenter Cluster ID      : domain-c8140
  vCenter URL             : 10.31.123.186
vCenter URL must display the IP address or Fully Qualified Domain Name (FQDN) of the vCenter server. If it does not display the correct information, reregister the HX cluster with vCenter with this command:
diag# stcli cluster reregister --vcenter-datacenter MX-HX --vcenter-cluster San_Jose --vcenter-url 10.31.123.186 --vcenter-user administrator@vsphere.local
Reregister StorFS cluster with a new vCenter ...
Enter NEW vCenter Administrator password:
Cluster reregistration with new vCenter succeeded
Ensure there is connectivity between HX CMIP and vCenter with these commands:
diag# nc -uvz 10.31.123.186 80
Connection to 10.31.123.186 80 port [udp/http] succeeded!

diag# nc -uvz 10.31.123.186 443
Connection to 10.31.123.186 443 port [udp/https] succeeded!
Fix Cleaner Status Check "Cleaner Check Failed"
Connect to Hyperflex CMIP using SSH as an administrative user and then switch to diag user. Run this command to identify the node where the cleaner service is not running:
diag# stcli cleaner info
{ 'type': 'node', 'id': '7e83a6b2-a227-844b-87fb-f6e78e6a59be', 'name': '172.16.1.6' }: ONLINE
{ 'type': 'node', 'id': '8c83099e-b1e0-6549-a279-33da70d09343', 'name': '172.16.1.8' }: ONLINE
{ 'type': 'node', 'id': 'a697a21f-9311-3745-95b4-5d418bdc4ae0', 'name': '172.16.1.7' }: OFFLINE
In this case, 172.16.1.7 is the IP address of the Storage Controller Virtual Machine (SCVM) where the cleaner is not running. Connect to the management IP address of each SCVM in the cluster using SSH and then look for the IP address of eth1 with this command:
diag# ifconfig eth1
eth1      Link encap:Ethernet  HWaddr 00:0c:29:38:2c:a7
          inet addr:172.16.1.7  Bcast:172.16.255.255  Mask:255.255.0.0
          UP BROADCAST RUNNING MULTICAST  MTU:9000  Metric:1
          RX packets:1036633674 errors:0 dropped:1881 overruns:0 frame:0
          TX packets:983950879 errors:0 dropped:0 overruns:0 carrier:0
          collisions:0 txqueuelen:1000
          RX bytes:723797691421 (723.7 GB)  TX bytes:698522491473 (698.5 GB)
Start the cleaner service on the affected node with this command:
diag# sysmtool --ns cleaner --cmd start
Fix NTP Service Status "NTPD Service Status is DOWN"
Connect to HX CMIP using SSH as an administrative user and then switch to diag user. Run this command to confirm NTP service is stopped.
diag# service ntp status
 * NTP server is not running
If NTP service is not running, then run this command to start the NTP service.
diag# priv service ntp start
 * Starting NTP server
   ...done.
Fix NTP Server Reachability "NTP Servers Reachability Check Failed"
Connect to HX CMIP using SSH as an administrative user and then switch to diag user. Ensure the HX cluster has reachable NTP server(s) configured. Run this command to show the NTP configuration in the cluster.
diag# stcli services ntp show
10.31.123.226
Ensure there is network connectivity between each SCVM in the HX cluster and the NTP server on port 123.
diag# nc -uvz 10.31.123.226 123
Connection to 10.31.123.226 123 port [udp/ntp] succeeded!
In case the NTP server configured in the cluster is not in use anymore, you can configure a different NTP server in the cluster.
stcli services ntp set NTP-IP-Address

Warning: stcli services ntp set overwrites the current NTP configuration in the cluster.
Fix DNS Server Reachability "DNS Reachability Check Failed"
Connect to HX CMIP using SSH as an administrative user and then switch to diag user. Ensure the HX cluster has reachable DNS server(s) configured. Run this command to show the DNS configuration in the cluster.
diag# stcli services dns show
10.31.123.226
Ensure there is network connectivity between each SCVM in the HX cluster and the DNS server on port 53.
diag# nc -uvz 10.31.123.226 53
Connection to 10.31.123.226 53 port [udp/domain] succeeded!
In case the DNS server configured in the cluster is not in use anymore, you can configure a different DNS server in the cluster.
stcli services dns set DNS-IP-Adrress

Warning: stcli services dns set overwrites the current DNS configuration in the cluster.
Fix Controller VM Version "Controller VM Version Value is Missing from the Settings File on the ESXi Host"
This check ensures each SCVM includes guestinfo.stctlvm.version = "3.0.6-3" in the configuration file.
Log into HX Connect and ensure the cluster is healthy.

Connect to each ESXi host in the cluster using SSH with the root account. Then, run this command
[root@San-Jose-Server-1:~] grep guestinfo /vmfs/volumes/SpringpathDS-FCH2119V1NH/stCtlVM-FCH2119V1NH/stCtlVM-FCH2119V1NH.vmx
guestinfo.stctlvm.version = "3.0.6-3"
guestinfo.stctlvm.configrdm = "False"
guestinfo.stctlvm.hardware.model = "HXAF240C-M4SX"
guestinfo.stctlvm.role = "storage"

Caution: The datastore name and SCVM name can be different on your cluster. You can type Spring, then press the Tab key to autocomplete the datastore name. For the SCVM name, you can type stCtl, then press the Tab key to autocomplete the SCVM name.
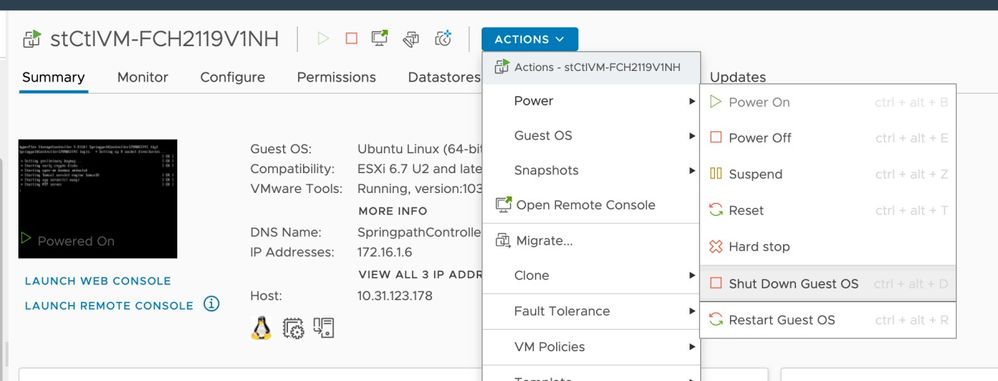
If the configuration file of the SCVM does not include guestinfo.stctlvm.version = "3.0.6-3" log into vCenter and select the SCVM. Click Actions, navigate to Power and select Shut Down Guest OS to power off the SCVM gracefully.

From ESXi Command Line Interface (CLI), create a backup of the SCVM configuration file with this command:
cp /vmfs/volumes/SpringpathDS-FCH2119V1NH/stCtlVM-FCH2119V1NH/stCtlVM-FCH2119V1NH.vmx /vmfs/volumes/SpringpathDS-FCH2119V1NH/stCtlVM-FCH2119V1NH/stCtlVM-FCH2119V1NH.vmx.bak
Then, run this command to open the configuration file of the SCVM:
[root@San-Jose-Server-1:~] vi /vmfs/volumes/SpringpathDS-FCH2119V1NH/stCtlVM-FCH2119V1NH/stCtlVM-FCH2119V1NH.vmx
Press the I key to edit the file, then navigate to the end of the file and add this line:
guestinfo.stctlvm.version = "3.0.6-3"
Press the ESC key and type :wq to save the changes.
Identify the Virtual Machine ID (VMID) of the SCVM with the command vim-cmd vmsvc/getallvms and reload the configuration file of the SCVM:
[root@San-Jose-Server-1:~] vim-cmd vmsvc/getallvms
Vmid          Name                                               File                                             Guest OS         Version                                                                                                                                                                                                                                        Annotation
1      stCtlVM-FCH2119V1NH   [SpringpathDS-FCH2119V1NH] stCtlVM-FCH2119V1NH/stCtlVM-FCH2119V1NH.vmx          ubuntu64Guest         vmx-15
[root@San-Jose-Server-1:~] vim-cmd vmsvc/reload 1
Reload and power on the SCVM with these commands:
[root@San-Jose-Server-1:~] vim-cmd vmsvc/reload 1
[root@San-Jose-Server-1:~] vim-cmd vmsvc/power.on 1

Warning: In this example, the VMID is 1.
You must wait for the HX cluster to be healthy again before moving onto the next SCVM.
Repeat the same procedure on the affected SCVMs one at a time.
Finally, log into each SCVM using SSH and switch to diag user account. Restart stMgr one node at a time with this command:
diag# priv restart stMgr
stMgr start/running, process 22030
Before moving onto the next SCVM, ensure stMgr is fully operational with this command:
diag# stcli about
Waiting for stmgr management server on port 9333 to get ready . .
productVersion: 5.0.2d-42558
instanceUuid: EXAMPLE
serialNumber: EXAMPLE,EXAMPLE,EXAMPLE
locale: English (United States)
apiVersion: 0.1
name: HyperFlex StorageController
fullName:  HyperFlex StorageController 5.0.2d
serviceType: stMgr
build: 5.0.2d-42558 (internal)
modelNumber: HXAF240C-M4SX
displayVersion: 5.0(2d)
Related Information

Caution: In this example, the VMID is 1.


 Feedback