Introduction
This document describes the configuration of the Key Management Interoperability Protocol (KMIP) on standalone rack servers.
Prerequisites
Requirements
Cisco recommends that you have knowledge of these topics:
- Cisco Integrated Management Controller (CIMC)
- Self-encrypting drive (SED)
- KMIP
Components Used
The information in this document is based on these software and hardware versions:
- UCSC-C220-M4S, CIMC Version: 4.1(1h)
- SED Drives
- 800GB Enterprise performance SAS SED SSD (10 FWPD) - MTFDJAK800MBS
- Drive Part ID: UCS-SD800GBEK9
- Vendor: MICRON
- Model: S650DC-800FIPS
- Vormetric as third-party key manager
The information in this document was created from the devices in a specific lab environment. All of the devices used in this document started with a cleared (default) configuration. If your network is live, ensure that you understand the potential impact of any command.
Background Information
The KMIP is an extensible communication protocol that defines message formats for the manipulation of cryptographic keys on a key management server. This facilitates data encryption because simplifies encryption key management.
SED Drives
A SED is a hard disk drive (HDD) or solid-state drive (SSD) with an encryption circuit built into the drive. It transparently encrypts all data written to the media and, when unlocked, transparently decrypts all data read from the media.
In a SED, the encryption keys themselves never leave the confines of the SED hardware and therefore are safe from OS-level attacks.
SED drives workflow:
 1. SED drive flow
The password to unlock the drive can be obtained locally with Local Key Management configuration where the user's responsibility is to remember the key information. It can also be obtained with Remote Key Management where the security key is created and fetched from a KMIP server and the user's responsibility is to configure the KMIP server in CIMC.
Configure
Create a Client Private Key and Client Certificate
These commands are to be entered on a Linux machine with the OpenSSL package, not in the Cisco IMC. Ensure that the Common Name is the same in the Root CA certificate and in the Client certificate.
Note: Ensure that the Cisco IMC time is set to the current time.
1. Create a 2048-bit RSA key.
openssl genrsa –out client_private.pem 2048
2. Create a self-signed certificate with the key already created.
openssl req -new -x509 -key client_private.pem -out client.pem -days 365
3. Refer to the KMIP vendor documentation for details about the obtention of the Root CA certificate.
Note: Vormetric requires that the common name in the RootCa certificate match the hostname of the Vormetric host.
Note: You must have an account to have access to the configuration guides for the KMIP vendors:
SafeNet
Vormetric
Configure KMIP Server on the CIMC
1. Navigate to Admin > Security Management > Secure Key Management.
A clear configuration shows Export/Delete
buttons grayed out, only Download buttons are active.
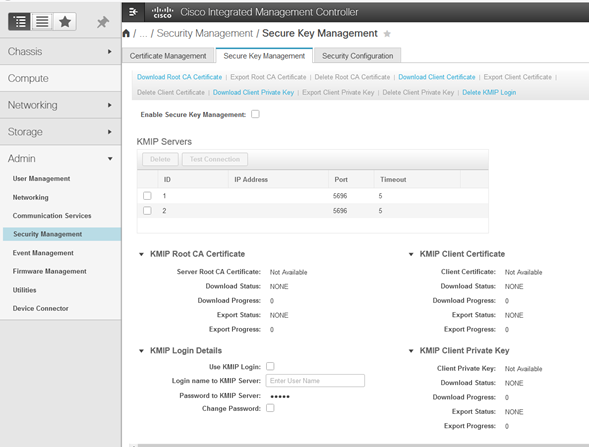
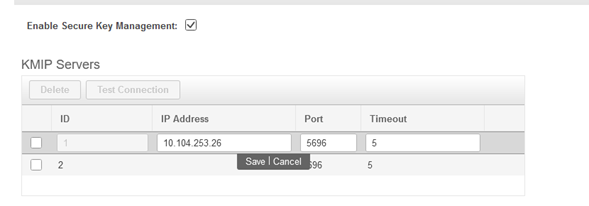
2. Click on the IP address and set the IP for the KMIP server, ensure that you are able to reach it and in case the default port is used nothing else needs to be changed, then save the changes.
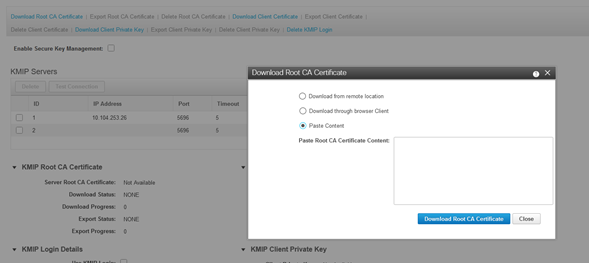
3. Download the certificates and private key to the server. You can download the .pem file or just paste the content.
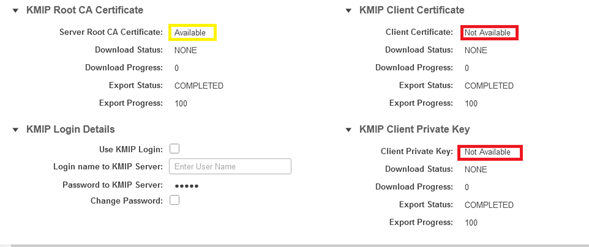
4. When you upload the certificates, you see that certificates show as Available, for the missing certificates that are not uploaded you see Not Available.
You can only test the connection when all certificates and private keys have been successfully downloaded to the CIMC.
5. (optional) Once you have all the certificates, you can optionally add the user and password for the KMIP server, this configuration is only supported for SafeNet as a third party KMIP server.
6. Test the connection and if the certificates are correct and you are able to reach the KMIP server through the configured port, you see a successful connection.
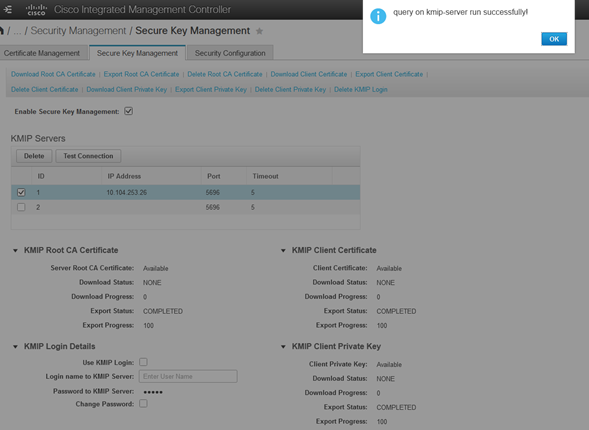
7. Once our connection with KMIP is successful, you can enable remote key management.
Navigate to Networking > Modular Raid Controller > Controller Info.
Select Enable Drive Security and then Remote Key Management.
Note: If previously Local Key Management was enabled, you are asked for the current key in order to change for remote management
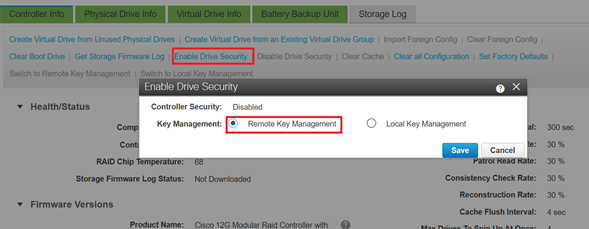
Verify
Use this section in order to confirm that your configuration works properly.
From the CLI you can verify the configuration.
1. Verify if KMIP is enabled.
C-Series-12# scope kmip
C-Series-12 /kmip # show detail
    Enabled: yes
2. Verify the IP address, port, and timeout.
C-Series-12 /kmip # show kmip-server
Server number Server domain name or IP address Port   Timeout
------------- -------------------------------- ------ ------
1             10.104.253.26                    5696   5
2                                              5696   5
3. Verify if the certificates are available.
C-Series-12 /kmip # show kmip-client-certificate
    KMIP Client Certificate Available: 1
C-Series-12 /kmip # show kmip-client-private-key
     KMIP Client Private Key Available: 1
C-Series-12 /kmip # show kmip-root-ca-certificate
    KMIP Root CA Certificate Available: 1
4. Verify log in details.
C-Series-12 /kmip # show kmip-login
Use KMIP Login             Login name to KMIP server  Password to KMIP server
-------------------------- -------------------------- --------------------
no                                                    ******
5. Test the connection.
C-Series-12 /kmip #
C-Series-12 /kmip # scope kmip-server 1
C-Series-12 /kmip/kmip-server # test-connectivity
Result of test-connectivity: query on kmip-server run successfully!
Troubleshoot
There is currently no specific troubleshooting information available for this configuration.
If the test connection with the KMIP server is not successful, ensure you can ping the server.

Ensure that port 5696 is opened on the CIMC and the KMIP server. You can install an NMAP version on our PC, as this command is not available on CIMC.
You can install NMAP on your local machine, to test if the port is opened; under the directory where the file was installed, use this command:
nmap <ipAddress> -p <port>
The output shows an open port for KMIP service:

The output shows a closed port for KMIP service:

Related Information


 Feedback