Campaign Manager Configurations
Available Languages
Download Options
Bias-Free Language
The documentation set for this product strives to use bias-free language. For the purposes of this documentation set, bias-free is defined as language that does not imply discrimination based on age, disability, gender, racial identity, ethnic identity, sexual orientation, socioeconomic status, and intersectionality. Exceptions may be present in the documentation due to language that is hardcoded in the user interfaces of the product software, language used based on RFP documentation, or language that is used by a referenced third-party product. Learn more about how Cisco is using Inclusive Language.
Contents
Introduction
This article descrives Webex Contact Center's Campaign Manager Configurations. It depends on how voice campaigns are set up at your enterprise, you either initiate outdial campaign calls yourself or the system initiates outdial calls for you. In a Preview Campaign, you request an outdial contact card from Webex Contact Center when you are in an Idle state. When you accept the contact card, Webex Contact Center places the outbound call. If the contact center has communicated previously with the person you are calling, a history of those calls appears in the right panel of the Agent Desktop. In a Progressive Campaign, anytime you are in the Available state, the system pushes an outdial call to you. If the contact center has communicated previously with the person you are calling, a history of those calls appears in the right panel of the Agent Desktop.
Requirements
Cisco recommends that you have knowledge of the following topics:
- Webex Contact Center Entry Point configurations.
- Webex Contact Center's Campaign Manage basics.
- Basic knowledge of Outbound Campaigns
Note: This document is targeted towards customers and partners who have deployed Webex Contact Center to their network infrastructure.
Outbound Entry Point Configuration for Preview Campaign
Properly configured Outbound Entry Point (Outbound EP) is a prerequisite for Preview Campaign. Before you work on Preview Campaign configuration, ensure that agents are able to make simple outbound calls using Dialpad on the Agent Desktop Application (ADA). If agents can not place outdial calls ADA please refer below steps to ensure the agents' configurations are correct.
Step 1. In order for the agent to be able to place outbound calls from ADA, the user account needs to be assigned to the Agent Profile which has properly configured Outbound Entry Point (Outbound EP).
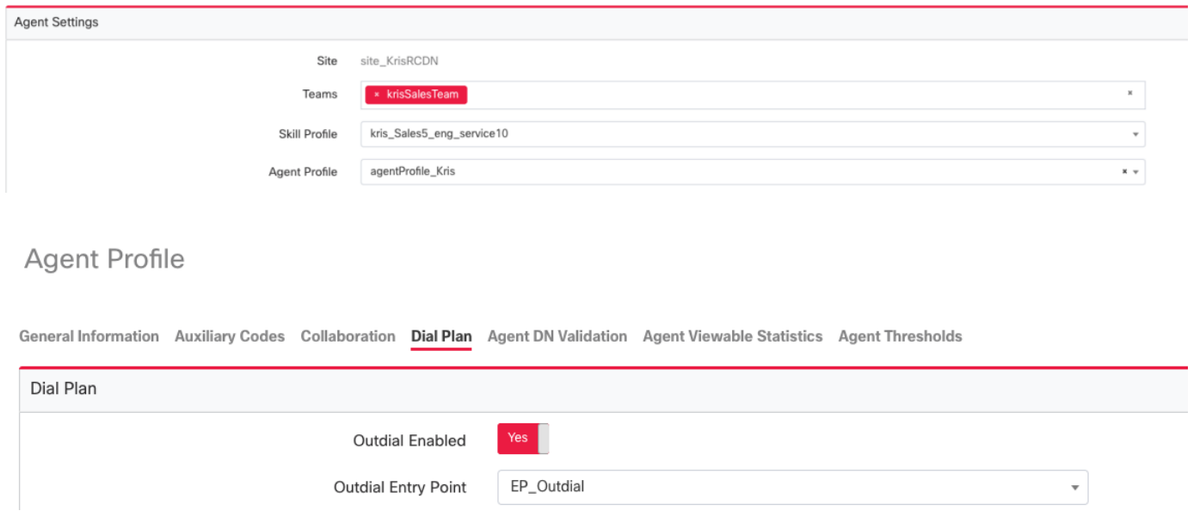
Step 2. Outbound EP Routing Strategy must be configured with OutdialEP control script.

Step 3. Outbound Queue Routing Strategy must be configured with the OutdialQ control script.

Note: Custom control script name for Entry Point and Queue may have different names for your Tenant.
Note: Any new Outdial Entry Point needs to be provisioned by Cisco TAC/SA teams to make it work.
Configure Preview Campaign
Step 1. Ensure that the Outdial EP is configured and assigned to the Agent Profile.
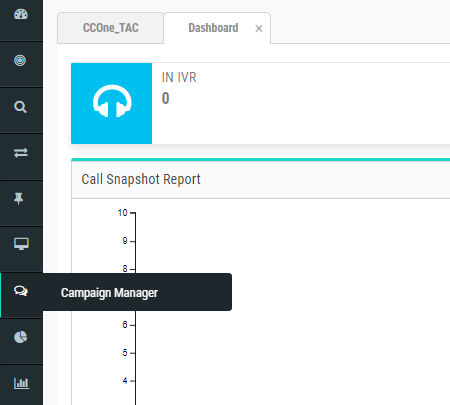
Step 2. Open Campaign Manager module from Webex Contact Center portal.
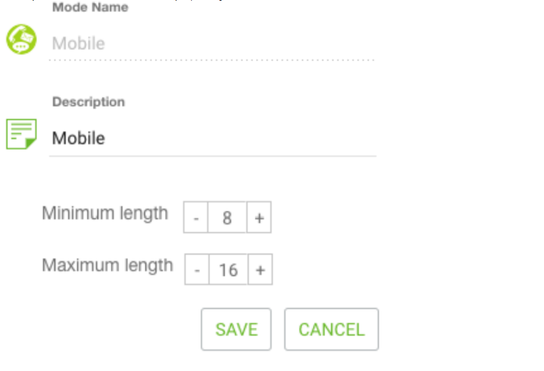
Step 3. Navigate System → Modes. Add a voice mode. This may be pre-configured for your Tenant.
Step 4. Navigate System → Time Zone. Enable Appropriate time Zone.
Step 5. Navigate System → Configure Business Outcome Group. By default, the wrap-up codes defined in the Webex Contact Center Provisioning module are added to Campaign Manager as Business Outcomes.
Click the Business Outcome icon as shown below.

The Business Outcome screen opens.
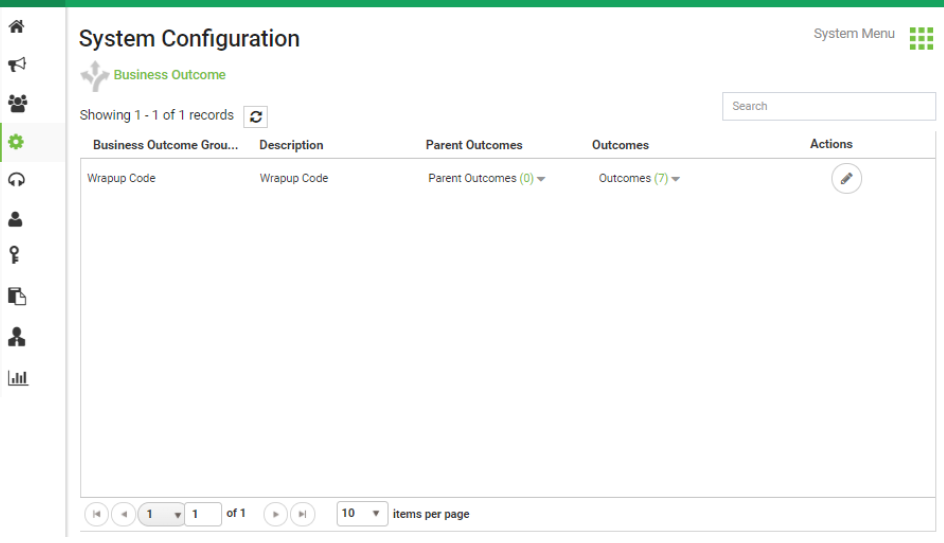
Click Edit in the Actions column and click the Next button on Business Outcome Group and Parent Outcomes Group wizard in order to navigate to the Outcomes wizard.
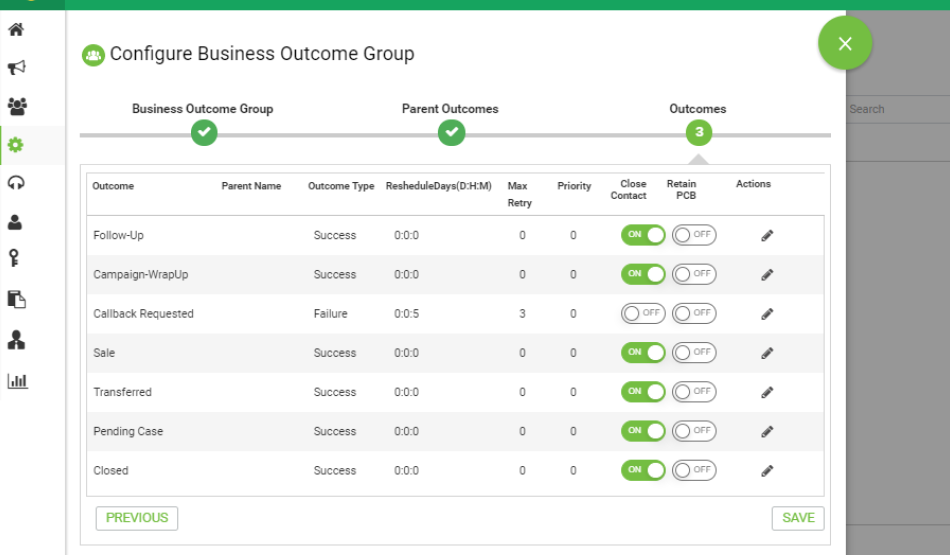
Step 6. Navigate Contact strategy → Add. Keep Type as Simple. Select the Mode which you created previously. Set telephony outcomes.


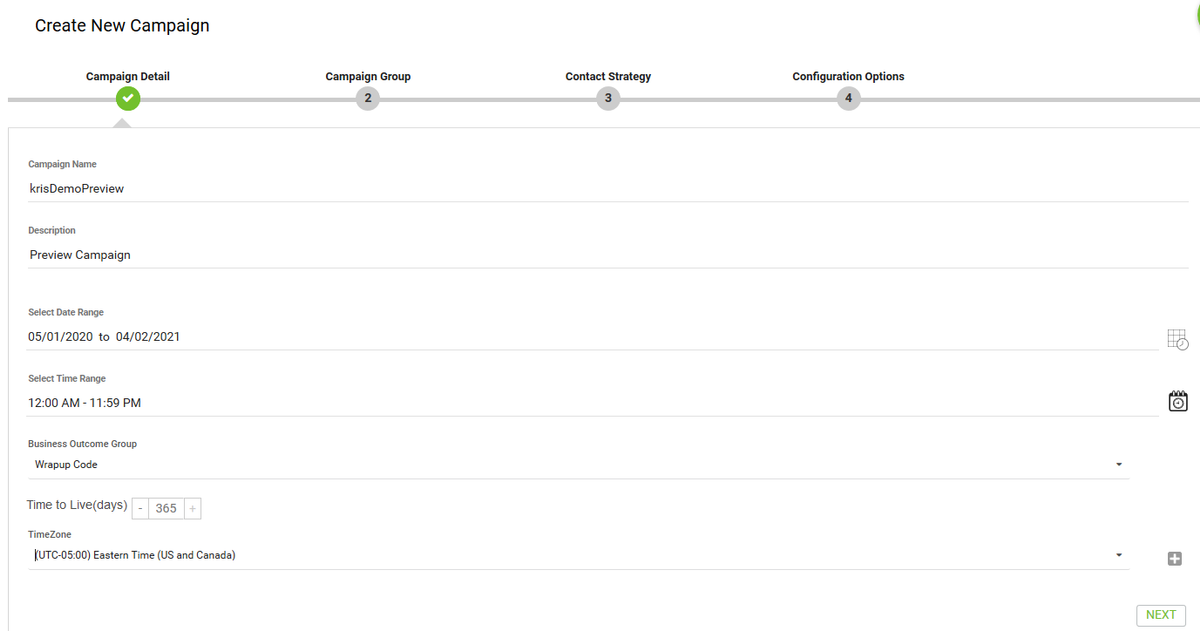
Step 7. Navigate Campaign → Add Campaign. Select Date/Time range to run the campaign, Select Time to Live and TimeZone.
Note: Business Outcome Group is a group of Wrap-up codes. Time to Live is how long the contacts in the campaign are valid.
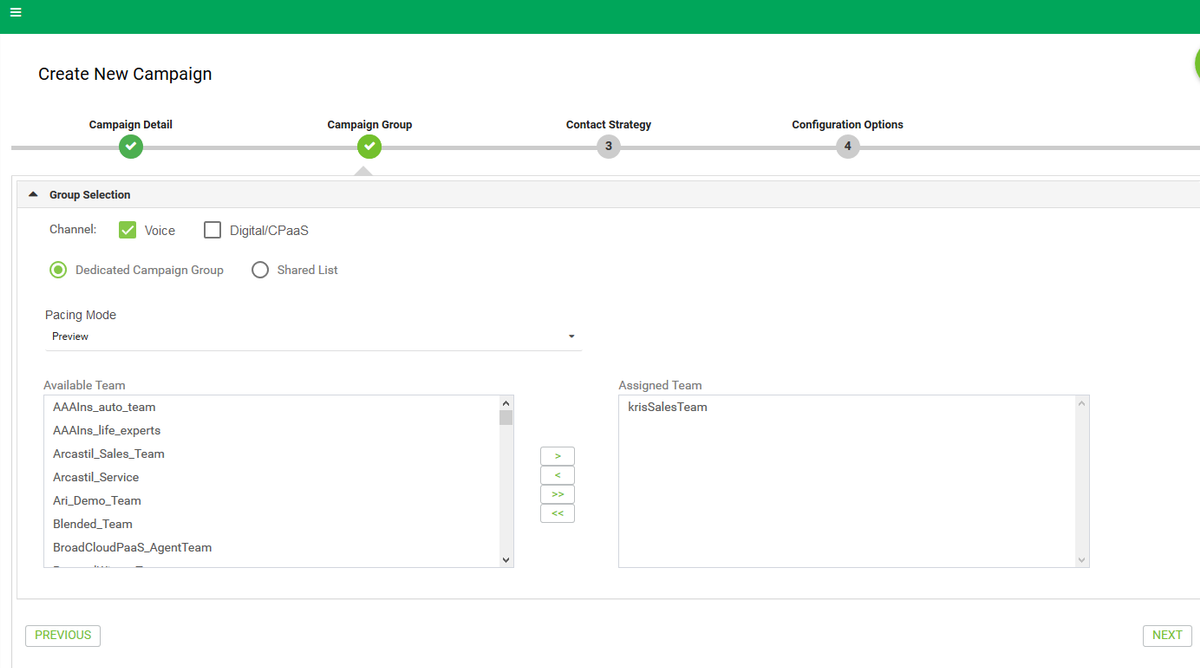
Step 8. Select mode Preview and do the team selection. The team must be the same as you configure for your agent.
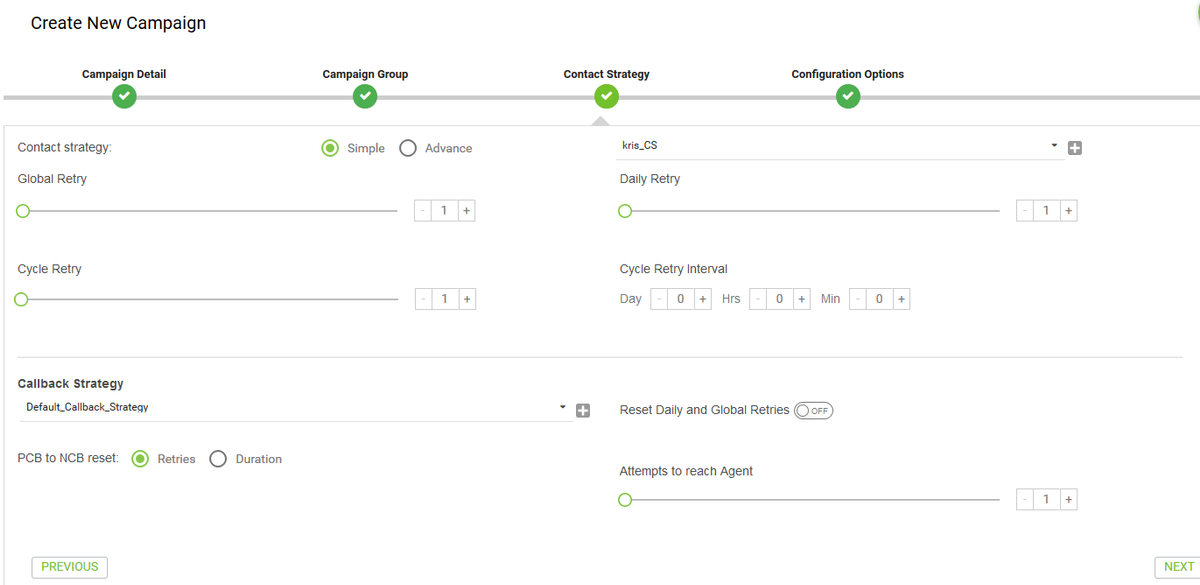
Step 9. Select Contact Strategy and callback strategy, Default_Callback_Strategy is recommended. Click Next to create the Campaign.
Step 10. Navigate Groups module and ensure Campaign Group is enabled and the newly created campaign is associated with it.

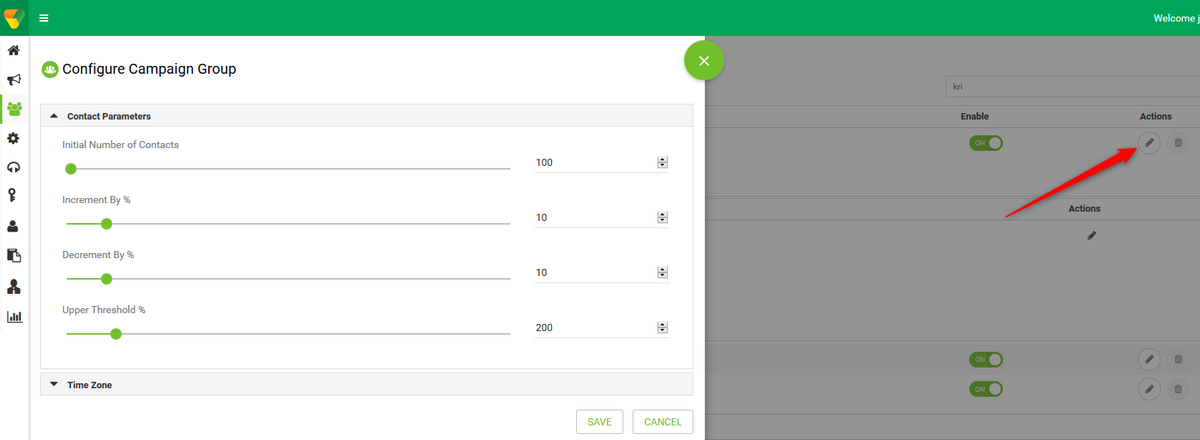
Step 11. Click on Edit the grope and configure contact parameters.
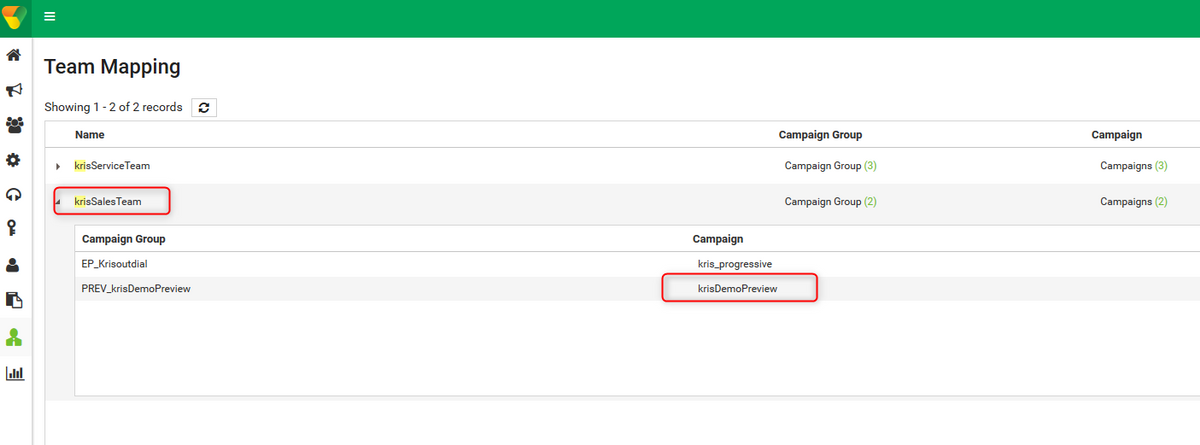
Step 12. Navigate Teams and ensure that the agent's team is associated with the Campaign.
Step 13. Create a sample contact file.

Step 14. Navigate the correct Campaign from the list → Edit → Contact List → add contact list → Upload Contacts.
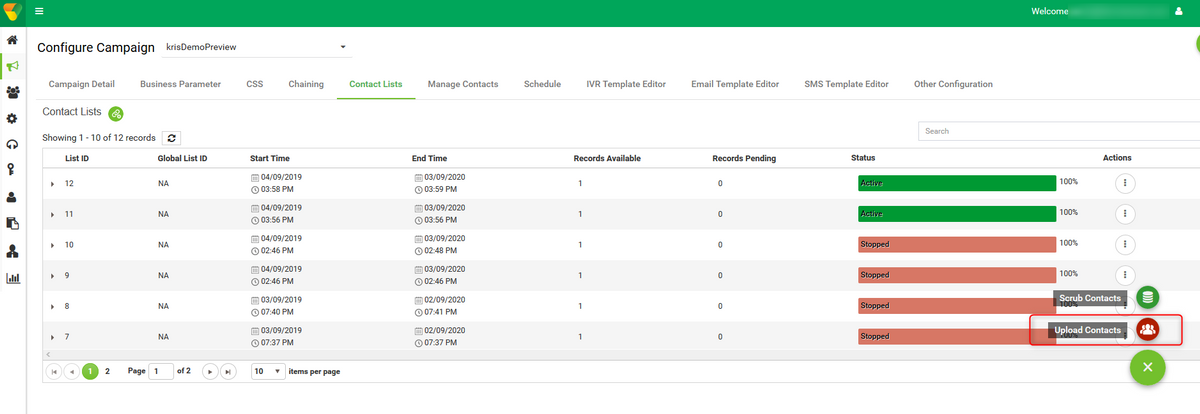
Step 15. Select the correct Delimiter as in the contact file (,). Chose the file.

Step 16. Select ZoneName as Campaign Specific TimeZone.

Step 17. Select the Number field from the file into the Mobile mode or other applicable modes such as home, office, etc.

Step 18 Click Refresh. The new contact list must appear in a couple of seconds.

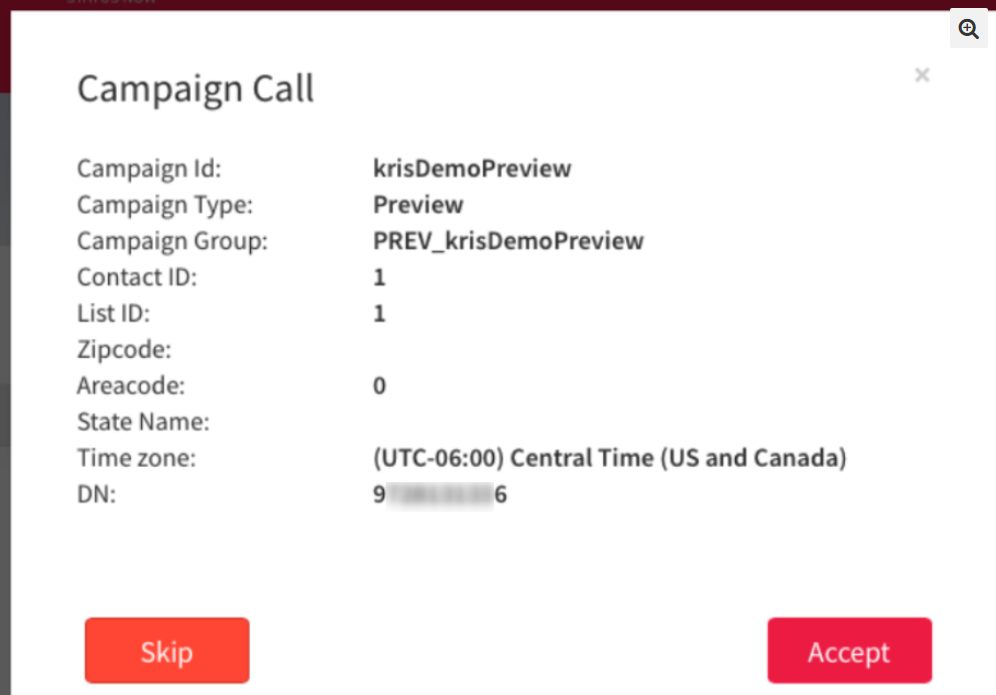
Step 19. In Agent Desktop Application change the Agent state to Idle and click on the Campaign Call option. The agent initiates the Campaign Call in Preview mode.

The call is presented to the agent. Accept or skip the call.
Callback Outdial Entry Point Configuration for Progressive Campaign
It’s a prerequisite to configure an Outdial Entry Point with voice Callback functionality to make Progressive Campaign work.
Note: Any new Outdial Entry Point needs to be provisioned by Cisco TAC/SA teams to make it work.
Step 1. Create an Outdial EP.
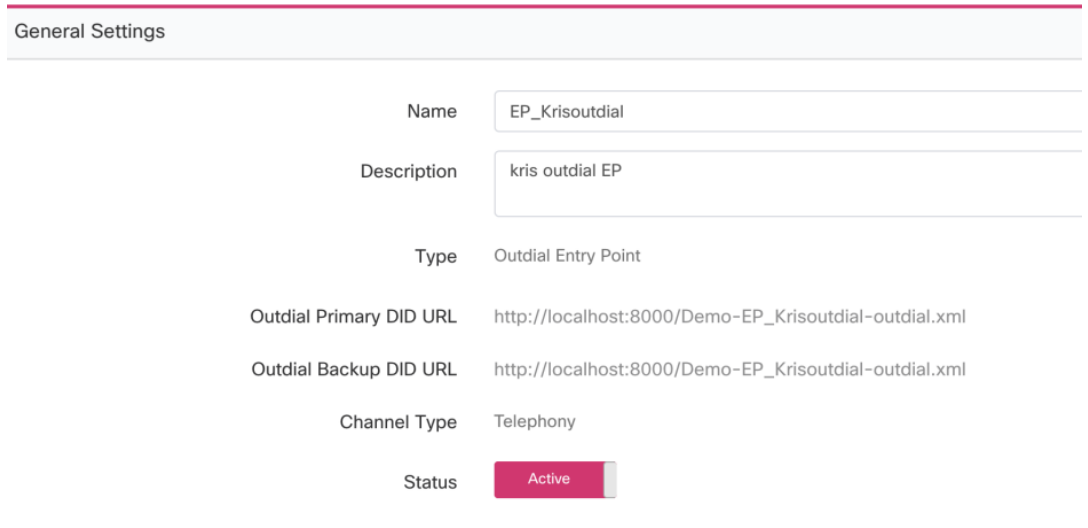
Step 2. Configure Routing Strategy for the Outbound EP. Select WebCallbackEP as the control script and choose the Outbound Queue.

Step 3. Configure the Outdial Queue Routing Strategy. Select WebcallbackQ control script. Add the Team which must handle the Progressive Campaign calls.

Note: PS engagement may be required to get WebCallbackEP.js and WebcallbackQ.js callback control scripts.
Configure Progressive Campaign
Step 1. Ensure that Outdial EP is configured and function correctly with Callback control script.
Step 2. Open Campaign Manager.
Step 3. Navigate System → Modes. Add voice mode. This may be pre-configured for your Tenant.
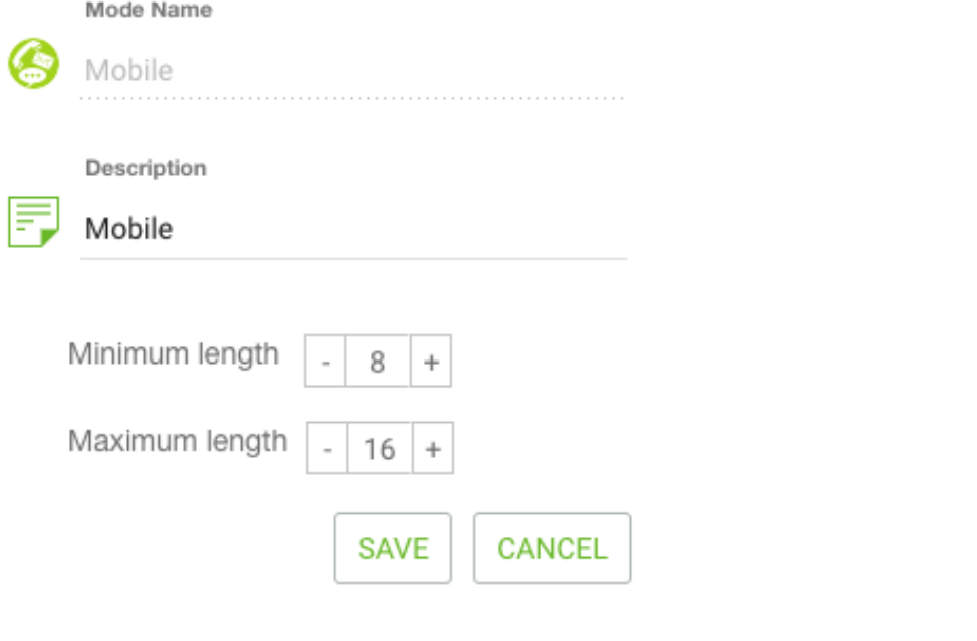
Step 4. Navigate System → Time Zone. Enable Appropriate time Zone.
Step 5. Navigate System → Configure Business Outcome Group. By default, the wrap-up codes defined in the Webex Contact Center Provisioning module are added in Campaign Manager as Business Outcomes. Click on Business Outcome icon. The Business Outcome screen opens.
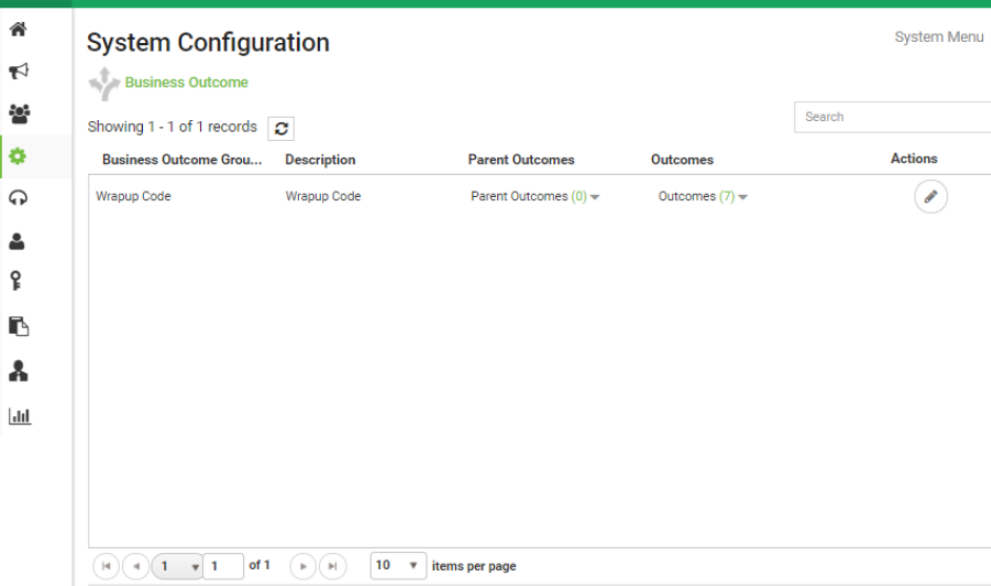
Click Edit in the Actions column and click the Next button on Business Outcome Group and Parent Outcomes Group wizard in order to navigate to the Outcomes wizard.
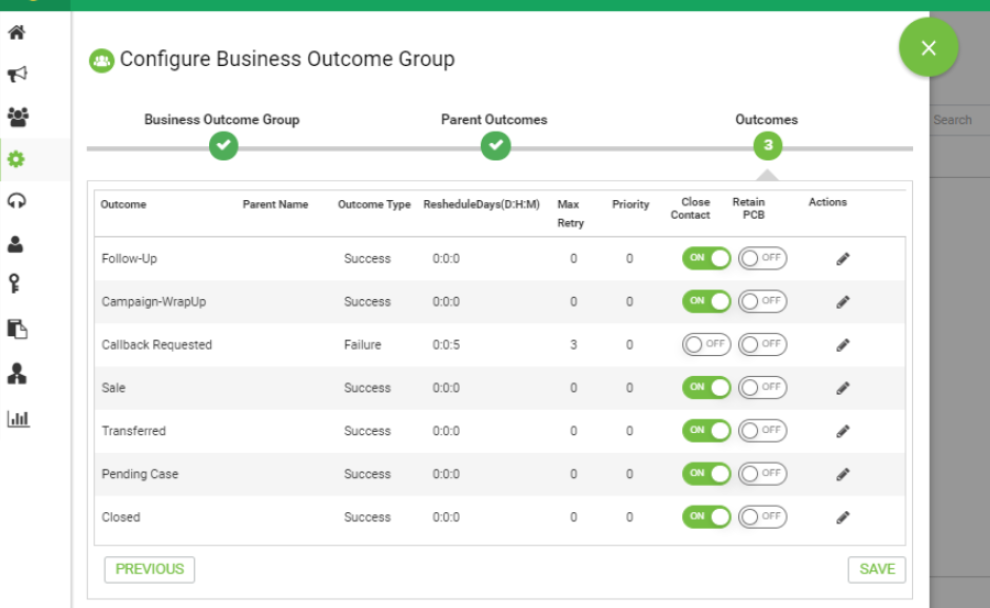
Step 6. Navigate Contact strategy → Add. Keep Type as Simple. Select the Mode which you created previously. Set telephony outcomes.


Step 7. Navigate Campaign → Add Campaign. Select Date/Time range to run the campaign. Select Time to Live and TimeZone.
Note: Business Outcome Group is a group of Wrap-up codes. Time to Live is how long the contacts in the campaign are valid.
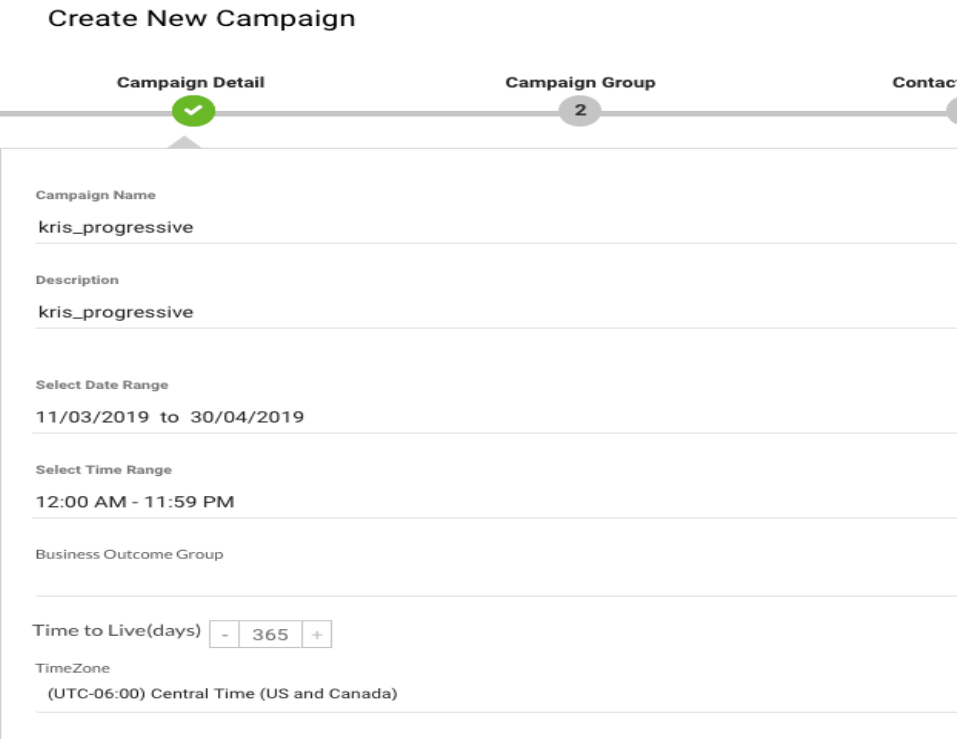
Select Voice Channel and Progressive Pacing Mode. Chose Outbound Entry Point which you created previously with Callback Control Script.

Select Contact Strategy and callback strategy.

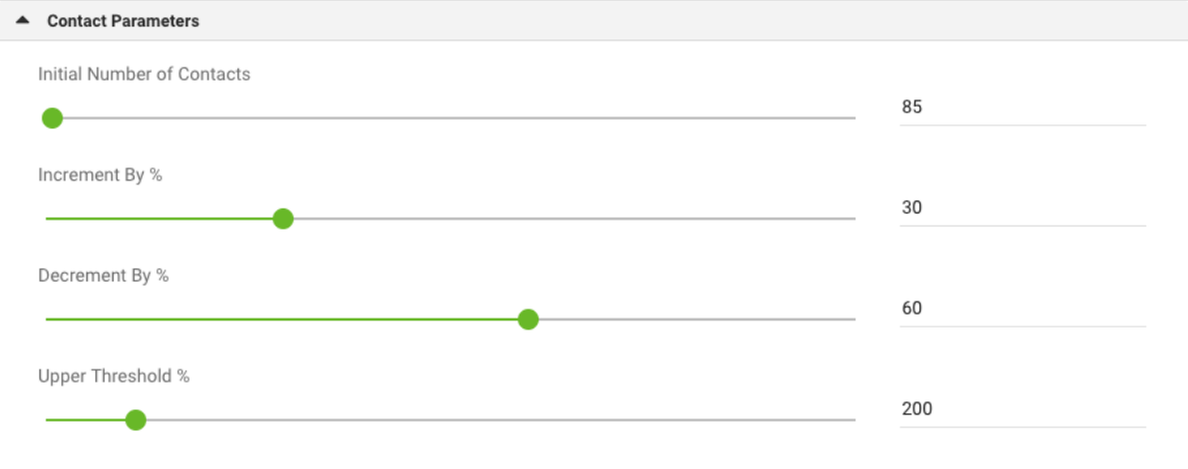
Step 8. Navigate Groups. Ensure that Campaign Group is enabled and the Progressive Campaign is associated with it.

Configure contact parameters.
Select correct timezone

Step 9. NavigateTeams. Map the Campaign with the correct team.


Step 10. Create a sample contact file.

11. Navigate Campaign → Edit → Contact List → add contact list → Upload Contacts.
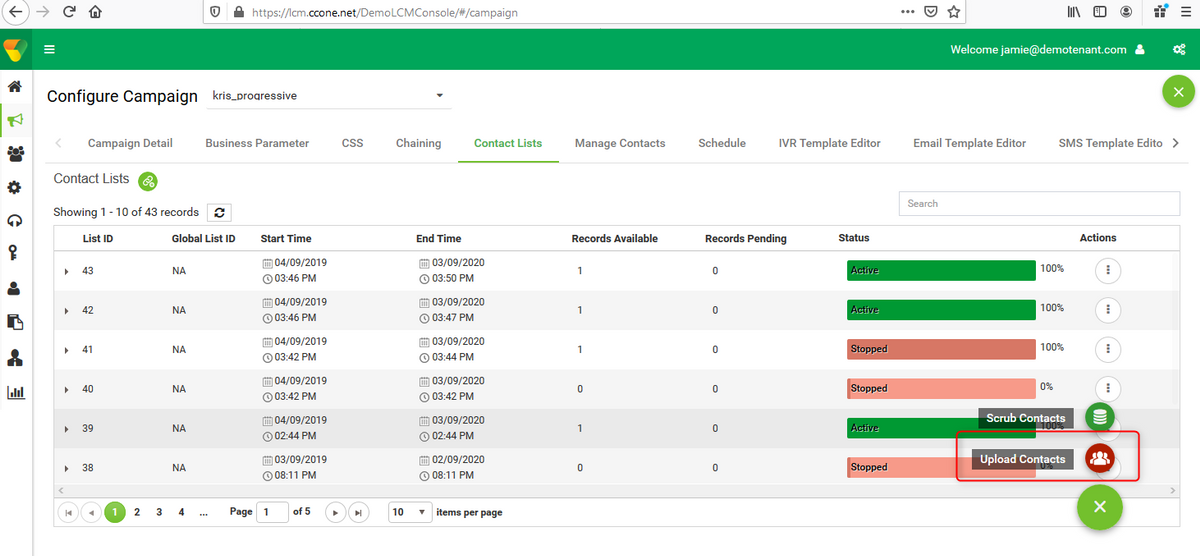
Select the correct Delimiter as in the contact file (,). Chose the file.

Select Zone name as Campaign specific Time zone

Select the Number field from the file into the Mobile mode or other applicable modes which could be home, office, etc.

Click Upload and Click Refresh. The new contact list must appear in a couple of seconds.
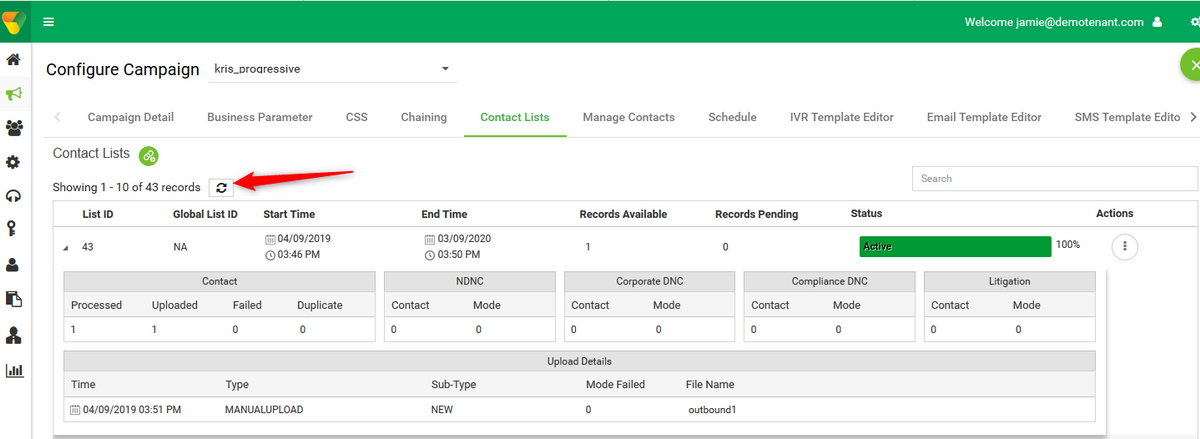
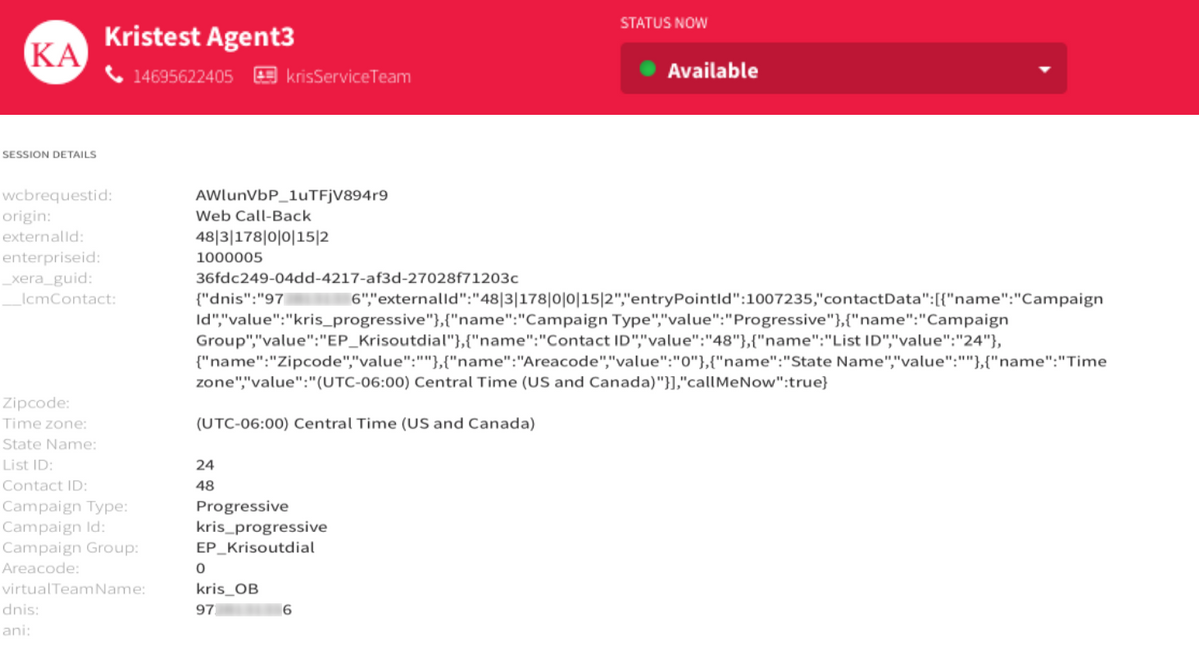
12. Open Agent Desktop Application and change the status to Available. The system automatically starts calling the numbers you uploaded in the contact list.
Contributed by Cisco Engineers
- Krishna TyagiCustomer Solutions Manager
- Mykola DanylchukCisco TAC
- Praveen AlampallyCisco TAC
Contact Cisco
- Open a Support Case

- (Requires a Cisco Service Contract)
 Feedback