Introduction
This document describes the steps configure secure JMX communication on Customer Voice Portal (CVP) version 12.0.
Contributed by Balakumar Manimaran, Cisco TAC Engineer.
Prerequisites
Requirements
Cisco recommends that you have knowledge of these topics:
Components Used
The information in this document is based on CVP version 12.0.
The information in this document was created from the devices in a specific lab environment. All of the devices used in this document started with a cleared (default) configuration. If your network is live, ensure that you understand the potential impact of any command.
Configure
Generate CA-Signed Certificate for Web Services Manager (WSM) Service in Call Server, VoiceXML (VXML) Server or Reporting Server
1. Log into the Call Server or VXML Server or Reporting Server or WSM Server. Retrieve the keystore password from the security.properties file from location,
C:\Cisco\CVP\conf

2. Delete the WSM certificate using command,
%CVP_HOME%\jre\bin\keytool.exe -storetype JCEKS -keystore %CVP_HOME%\conf\security\.keystore -delete -alias wsm_certificate

Enter the keystore password when prompted.
Note: Repeat Step 1 for Call Server, VXML Server, and Reporting Server.
3. Generate a Certificate Authority (CA) signed certificate for WSM server.
%CVP_HOME%\jre\bin\keytool.exe -storetype JCEKS -keystore %CVP_HOME%\conf\security\.keystore -genkeypair -alias wsm_certificate -v -keysize 2048 -keyalg RSA

Enter the details at the prompts and typeYesto confirm, as shown in the image;

Enter the keystore password when prompted.
Note: Document the Common Name (CN) name for future reference.
4. Generate the certificate request for the alias
%CVP_HOME%\jre\bin\keytool.exe -storetype JCEKS -keystore %CVP_HOME%\conf\security\.keystore -certreq -alias wsm_certificate -file %CVP_HOME%\conf\security\wsm_certificate

5. Sign the certificate on a CA.
Note: Follow the procedure to create a CA-signed certificate using the CA authority. Download the certificate and the root certificate of the CA authority.
6. Copy the root certificate and the CA-signed WSM certificate to location;
C:\Cisco\cvp\conf\security\.
7. Import the root certificate
%CVP_HOME%\jre\bin\keytool.exe -storetype JCEKS -keystore %CVP_HOME%\conf\security\.keystore -import -v -trustcacerts
-alias root -file  %CVP_HOME%\conf\security\<filename_of_root_cer>
Enter the keystore password when prompted, as shown in the image;


AtTrust this certificateprompt, typeYes ,as shown in the image;

8. Import the CA-signed WSM certificate
%CVP_HOME%\jre\bin\keytool.exe -storetype JCEKS -keystore %CVP_HOME%\conf\security\.keystore -import -v -trustcacerts
-alias wsm_certificate -file %CVP_HOME%\conf\security\<filename_of_your_signed_cert_from_CA>

9. Repeat Step 3, 4, and 8 for Call Server, VXML Server, and Reporting Server.
10.Configure WSM in CVP
Step 1.
Navigate to
c:\cisco\cvp\conf\jmx_wsm.conf
Add or update the file as shown and save it

Step 2.
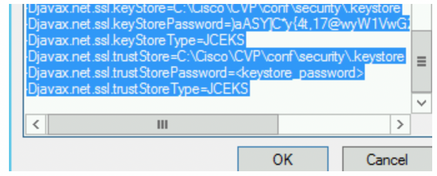
Run the regedit (rt. click start > run > type regedit) command
Append the following to the key Options at
HKEY_LOCAL_MACHINE\SOFTWARE\Wow6432Node\Apache Software Foundation\Procrun 2.0\WebServicesManager\Parameters\Java


11. Configure JMX of callserver in CVP
Navigate to
c:\cisco\cvp\conf\jmx_callserver.conf
Update the file as shown and save the file

12. Configure JMX of VXMLServer in CVP:
Step 1.
Go to
c:\cisco\cvp\conf\jmx_vxml.conf
Edit the file as shown in the image and save it;

Step 2.
Run the regedit command
Append the following to the key Options at
HKEY_LOCAL_MACHINE\SOFTWARE\Wow6432Node\Apache Software Foundation\Procrun 2.0\VXMLServer\Parameters\Java


Step 3.
Restart Cisco CVP WebServicesManager service.
Generate CA-Signed Client Certificate for WSM
Log into the Call Server or VXML Server or Reporting Server or WSM. Retrieve the keystore password from thesecurity.properties file
1. Generate a CA-signed certificate for client authentication
%CVP_HOME%\jre\bin\keytool.exe -storetype JCEKS -keystore %CVP_HOME%\conf\security\.keystore -genkeypair
 -alias <CN of Callserver WSM certificate> -v -keysize 2048 -keyalg RSA

Enter the details at the prompts and type Yes to confirm.
Enter the keystore password when prompted , as shown in the image;

2.Generate the certificate request for the alias
%CVP_HOME%\jre\bin\keytool.exe -storetype JCEKS -keystore %CVP_HOME%\conf\security\.keystore -certreq
-alias <CN of Callserver WSM certificate> -file %CVP_HOME%\conf\security\jmx_client.csr

3. Sign the certificiate on a CA
Note: Follow the procedure to create a CA-signed certificate using the CA authority. Download the certificate and the root certificate of the CA authority
4. Copy the root certificate and the CA-signed JMX Client certificate to location;
C:\Cisco\cvp\conf\security\
5. Import the CA-signed JMX Client , use command;
%CVP_HOME%\jre\bin\keytool.exe -storetype JCEKS -keystore %CVP_HOME%\conf\security\.keystore -import -v -trustcacerts
-alias <CN of Callserver WSM certificate> -file %CVP_HOME%\conf\security\<filename of CA-signed JMX Client certificate>

6.Restart Cisco CVP VXMLServer service.
Repeat the same procedure for Reporting Server.
Generate CA-Signed client certificate for Operations Console (OAMP)
Log into OAMP Server. Retrieve the keystore password from thesecurity.propertiesfile
1. Generate a CA-signed certificate for client authentication with callserver WSM
%CVP_HOME%\jre\bin\keytool.exe -storetype JCEKS -keystore %CVP_HOME%\conf\security\.keystore -genkeypair
-alias <CN of Callserver WSM certificate> -v -keysize 2048 -keyalg RSA

2.Generate the certificate request for the alias
%CVP_HOME%\jre\bin\keytool.exe -storetype JCEKS -keystore %CVP_HOME%\conf\security\.keystore -certreq
-alias <CN of Callserver WSM certificate> -file %CVP_HOME%\conf\security\jmx.csr

3.Sign the certificate on a CA . Follow the procedure to create a CA-signed certificate using the CA authority. Download the certificate and the root certificate of the CA authority
4.Copy the root certificate and CA-signed JMX Client certificate to C:\Cisoc\cvp\conf\security\
5.Import the root certificate , using this command;
%CVP_HOME%\jre\bin\keytool.exe -storetype JCEKS -keystore %CVP_HOME%\conf\security\.keystore -import -v -trustcacerts
-alias root -file %CVP_HOME%\conf\security\<filename_of_root_cert>
Enter the keystore password when prompted. AtTrust this certificateprompt, typeYes , as shown in the image,

6. Import the CA-signed JMX Client certificate of CVP
%CVP_HOME%\jre\bin\keytool.exe -storetype JCEKS -keystore %CVP_HOME%\conf\security\.keystore -import -v -trustcacerts
-alias <CN of Callserver WSM certificate> -file %CVP_HOME%\conf\security\<filename_of_your_signed_cert_from_CA>

7.Restart Cisco CVP OPSConsoleServer service.
8. Log into OAMP. To enable secure communication between OAMP and Call Server or VXML Server, navigate to . Check the Enable secure communication with the Ops console check box. Save and deploy both Call Server and VXML Server.

9. Run the regedit command.
HKEY_LOCAL_MACHINE\SOFTWARE\Wow6432Node\Apache Software Foundation\Procrun 2.0\OPSConsoleServer\Parameters\Java.
Append the following to the file sand save it
-Djavax.net.ssl.trustStore=C:\Cisco\CVP\conf\security\.keystore
-Djavax.net.ssl.trustStorePassword=<keystore_password>
-Djavax.net.ssl.trustStoreType=JCEK

Verify
Connect CVP Callserver , VXML server and Reporting server from the OAMP server , perform the operations like save&deploy or retrieve Database details(reporting server) or any Actions from OAMP to Call/vxml/reporting server.
Troubleshoot
There is currently no specific troubleshooting information available for this configuration.


 Feedback