Introduction
This document describes detailed steps for regenerating and exchanging SAML certificates in UCCE/PCCE, ensuring secure, clear processes.
Contributed by Nagarajan Paramasivam, Cisco TAC Engineer.
Prerequisites
Requirements
Cisco recommends that you know these topics:
- Packaged/Unified Contact Center Enterprise (PCCE/UCCE)
- Voice Operating System (VOS) Platform
- Certificate Management
- Security Assertion Markup Language (SAML)
- Secure Socket Layer (SSL)
- Active Directory Federation Services (AD FS)
- Single Sign-On (SSO)
Components Used
The information in this document is based on these components:
- Cisco Identity Service (Cisco IdS)
- Identity Provider (IdP) - Microsoft Windows ADFS

The information in this document was created from the devices in a specific lab environment. All of the devices used in this document started with a cleared (default) configuration. If your network is live, ensure that you understand the potential impact of any command.
Background Information
In UCCE/PCCE the Cisco Identity Service (Cisco IdS) provides authorization between the Identity Provider (IdP) and applications.
When you configure the Cisco IdS, you set up a metadata exchange between the Cisco IdS and the IdP. This exchange establishes a trust relationship that then allows applications to use the Cisco IdS for SSO. You establish the trust relationship by downloading a metadata file from the Cisco IdS and uploading it to the IdP.
The SAML certificate is similar to an SSL certificate and, like it, needs to be updated or changed when certain situations come up. When you regenerate or swap out the SAML certificate on the Cisco Identity Services (IdS) server, it can cause a break in the trusted connection with the Identity Provider (IdP). This break can lead to problems where clients or users who rely on Single Sign-On cannot get the authorization they need to access the system.
This document aims to cover a wide range of common situations where you must need to create a new SAML certificate on the Cisco IdS server. It also explains how to give this new certificate to the Identity Provider (IdP) so that the trust can be rebuilt. By doing this, clients and users can continue to use Single Sign-On without any issues. The goal is to make sure you have all the information you need to handle the certificate update process smoothly and without confusion.
Key Points to remember:
1. SAML certificate is generated by default during the Cisco IdS server installation with 3 years validity
2. SAML certificate is a self-signed certificate
3. SAML certificate is an SSL certificate that resides on the Cisco IDS publisher and subscriber
4. SAML certificate regeneration could be performed only in the Cisco IDS Publisher node
5. The available types of the secure hash algorithm for the SAML certificate is SHA-1 and SHA-256
6. SHA-1 algorithm is used on IdS 11.6 and in previous versions, the SHA-256 algorithm is used on IdS 12.0 and in later versions
7. Both Identity Provider (IdP) and Identity Service (IdS) must use same algorithm type.
8. Cisco IdS SAML certificate could be downloaded only from the Cisco IdS Publisher node (sp-<Cisco IdS_FQDN>.xml)
9. Please see this link to understand the UCCE/PCCE Single-Sign-On Configuration. UCCE 12.6.1 Features Guide
SAML Certificate Expired
The SAML certificate is generated with 3 years (1095 days) validity and it is required to renew the SAML certificate before the expiry. The expired SSL certificate is considered an invalid one and it breaks the certificate chain between the Cisco Identity Service (IdS) and Identity Provider (IdP).
Solution
1. Check the SAML Certificate Expiry date
2. Regenerate the SAML certificate
3. Download the sp.xml file
4. Retrieve the SAML certificate from the sp.xml file
5. Replace the old SAML certificate with the new SAML certificate in the IdP
6. Please see the Reference section for detailed steps

(Note: {Since only the SAML certificate changed, IdS metadata exchange to IdP is not required})
Secure Hash Algorithm Change in the Identity Provider (IdP)
Assume in an existing PCCE/UCCE environment with Single-Sign-On. Both IdP and Cisco IdS server has been configured with SHA-1 secure hash algorithm. Considering the weakness in the SHA-1 required to change the secure hash algorithm to SHA-256.
Solution
1. Change the secure hash algorithm in the AD FS Relying Trust Party (SHA-1 to SHA-256)
2. Change the secure hash algorithm in the IdS publisher under Keys and Certificate (SHA-1 to SHA-256)
3. Regenerate the SAML certificate in the IdS Publisher
4. Download the sp.xml file
5. Retrieve the SAML certificate from the sp.xml file
6. Replace the old SAML certificate with the new SAML certificate in the IdP
7. Please see the Reference section for detailed steps
Cisco IdS server IP address or hostname change - Co-Resident CUIC/LiveData/IdS Publisher or Standalone IdS Publisher rebuilt - Co-Resident CUIC/LiveData/IdS Subscriber or Standalone IdS Subscriber rebuilt
These situations occur infrequently, and it is strongly advised to start anew with the Single Sign-On (SSO) setup to ensure that SSO functionality in the production environment is restored promptly and efficiently. It is essential to prioritize this reconfiguration to minimize any disruption to the SSO services that users depend on.
Solution
1. Delete the existing Relying Trust Party from the AD FS
2. Upload the AD FS SSL certificate in the Cisco IdS server tomcat trust
3. Download the sp.xml file
4. Please see the Reference section and Features Guide for detailed steps
5. Configure the Relying Trust Party in the AD FS
6. Add the Claim Rules
7. Enable signed SAML assertion
8. Download AD FS Federation Metadata
9. Upload the Federation Metadata to the Cisco IdS server
10. Perform Test SSO
Reference
How to add Relying Trust Party in the ADFS or
How to enable signed SAML assertion
Please see this document for detailed steps: UCCE 12.6.1 Features Guide
How to upload the AD FS SSL certificate to the Cisco IdS tomcat trust
1. Download or retrieve the AD FS SSL certificate
2. Access the Cisco IdS Publisher OS Administration page
3. Login with the OS Administrator credential
4. Navigate to Security > Certificate Management
5. Click on Upload Certificate/Certificate Chain, and a pop-up window opens
6. Click on the Dropdown menu and select tomcat-trust on Certificate Purpose
7. Click Browse and select the AD FS SSL certificate
8. Click Upload

(Note: {The trust certificates are replicated to the Subscriber nodes. You do not need to upload on the Subscriber node.})
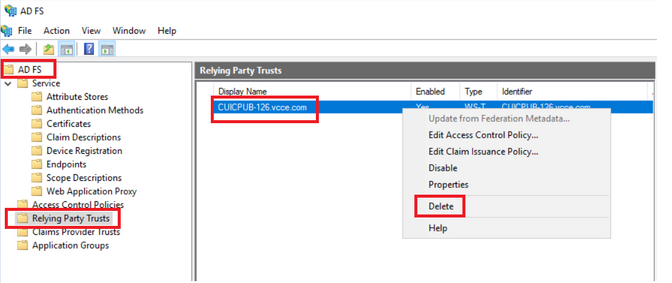
How to Delete the Relying Trust Party in the AD FS
1. Log in to the Identity Provider (IdP) server with the administrator-privileged credential
2. Open the Server Manager and Choose AD FS >Tools > AD FS Management
3. In the left side tree select the Relying Party Trusts under the AD FS
4. Right-click on the Cisco IdS server and select Delete
How to check or change the secure hash algorithm configured in the Identity Provider (IdP)
1. Log in to the Identity Provider (IdP) server with the administrator-privileged credential
2. Open the Server Manager and Choose AD FS >Tools > AD FS Management
3. In the left side tree select the Relying Party Trusts under the AD FS
4. Right-click on the Cisco IdS server and select properties
5. Navigate to the Advanced tab
6. Secure Hash Algorithm option displays the secure hash algorithm configured in the AD FS server.
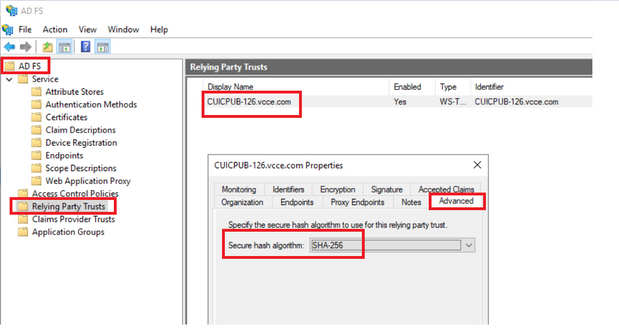
7. Click on the Drop down menu and select the desired secure hash algorithm.
How to check the Cisco IdS server SAML certificate Expiry date
1. Log in to the Cisco IdS server Publisher or Subscriber node with the application user credential
2. After successful Log on the page lands to Identity Service Management > Nodes
3. Displays the Cisco IdS Publisher and Subscriber node, status and SAML Certificate Expiry

-----------------------------------------------------------------------------------------------------------------
How to download the metadata of the Cisco IdS server
1. Log in to the Cisco IdS Publisher node with the application user credential
2. Click on the Settings Icon
3. Navigate to the IDS Trust tab
4. Click the Download link to download the metadata of the Cisco IdS cluster

How to retrieve the SAML certificate from the sp.xml file
1. Open the sp.xml file with a text editor
2. Copy the Raw Data between the header <ds:X509Certificate></ds:X509Certificate>

3. Open another text editor and paste the copied data
4. save the file .CER format
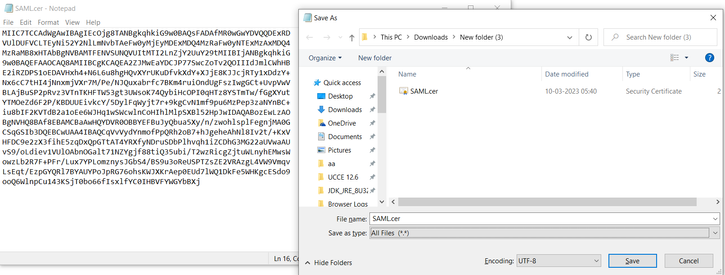
5. Open the certificate to review the certificate information
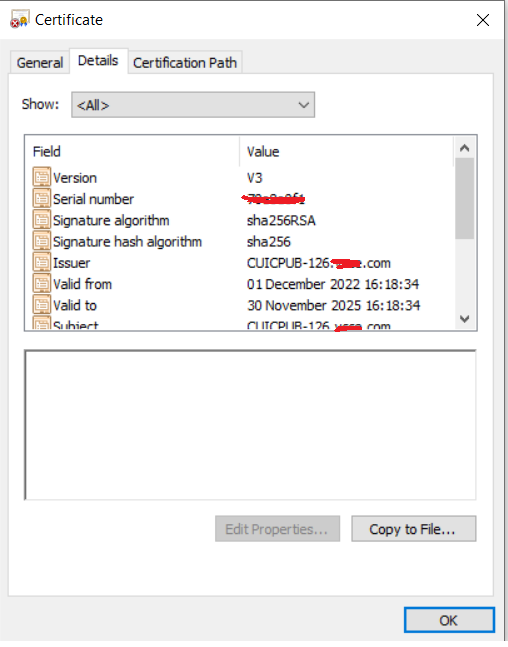
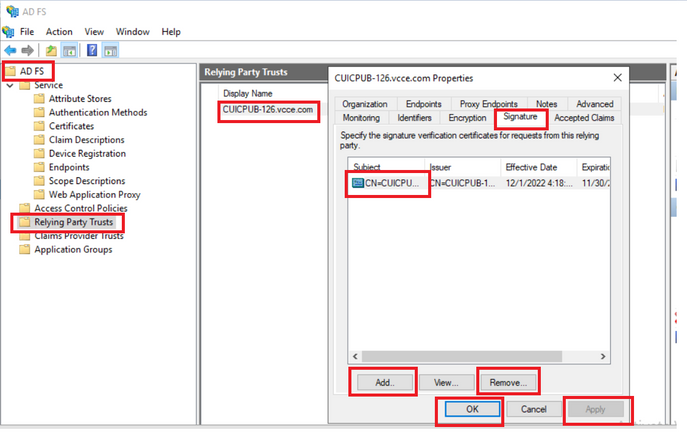
How to replace the SAML certificate in the AD FS
1. Copy the SAML certificate file to the AD FS server which is retrieved from the sp.xml
2. Open the Server Manager and Choose AD FS >Tools > AD FS Management
3. In the left side tree select the Relying Party Trusts under the AD FS
4. Right-click on the Cisco IdS server and select properties
5. Navigate to the Signature tab
6. Click Add and choose the newly generated SAML certificate
7. Select the old SAML certificate and click Remove
8. Apply and Save
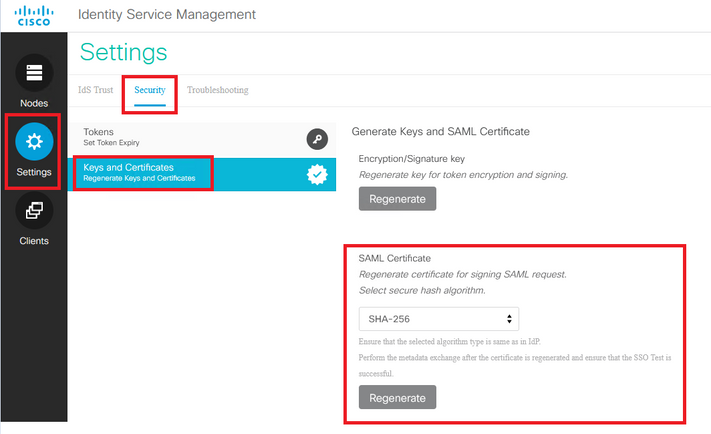
How to regenerate the SAML certificate in the Cisco IdS server
1. Log in to the Cisco IdS Publisher node with the application user credential
2. Click on the Settings Icon
3. Navigate to the Security tab
4. Select the Keys and Certificates option
5. click on the Regenerate button under the SAML certificate section (highlighted)
Test SSO
Whenever there is a change in the SAML certificate make sure the TEST SSO is successful in the Cisco IdS server and re-register all the applications from the CCEAdmin page.
1. Access the CCEAdmin page from the Principal AW server
2. Log in to the CCEAdmin portal with the admin-level privileges
3. Navigate to Overview > Features > Single-Sign-On
4. Click on the Register button under the Register with Cisco Identity Service
5. Perform Test SSO


 Feedback