Introduction
This document describes how to exchange self-signed certificates in the Unified Contact Center Enterprise (UCCE) solution.
Prerequisites
Requirements
Cisco recommends that you have knowledge of these topics:
- UCCE Release 12.5 (1)
- Customer Voice Portal (CVP) Release 12.5 (1)
- Cisco Virtualized Voice Browser (VVB)
Components Used
The information in this document is based on these software versions:
- UCCE 12.5 (1)
- CVP 12.5 (1)
- Cisco VVB 12.5
- CVP Operations Console (OAMP)
- CVP New OAMP (NOAMP)
The information in this document was created from the devices in a specific lab environment. All of the devices used in this document started with a cleared (default) configuration. If your network is live, ensure that you understand the potential impact of any command.
Background Information
In a UCCE solution, the configuration of new features which involves core applications such as ROGGERs, Peripheral Gateways (PG), Admin Workstations (AW)/Administration Data Servers (ADS), Finesse, Cisco Unified Intelligence Center (CUIC), and so on, is done through the Contact Center Enterprise (CCE) Admin page. For Interactive Voice Response (IVR) applications like CVP, Cisco VVB, and gateways, NOAMP controls the configuration of new features. From CCE 12.5 (1), due to security-management-compliance (SRC), all communications to CCE Admin and NOAMP are strictly done via secure HTTP protocol.
In order to achieve seamless secure communication between these applications in a self-signed certificate environment, the exchange of certificates between the servers becomes a must. The next section explains in detail the steps needed to exchange self-signed certificates between:
- CCE AW Servers and CCE Core Application Servers
- CVP OAMP Server and CVP Component Servers
Procedure
CCE AW Servers and CCE Core Application Servers
These are the components from which self-signed certificates are exported and components into which self-signed certificates must be imported.
CCE AW Servers: This server requires a certificate from:
- Windows platform: Router and Logger (ROGGER) {A/B}, Peripheral Gateway (PG) {A/B}, and all AW/ADS.
Note: IIS and Diagnostic Framework Portico (DFP) certificates are needed.
- VOS Platform: Finesse, CUIC, Live Data (LD), Identity Server (IDS), Cloud Connect, and other applicable servers are part of the inventory database.
The same applies to other AW servers in the solution.
Router\Logger Server: This server requires a certificate from:
- Windows platform: IIS certificate of all AW servers.
The steps needed to exchange the self-signed certificates for CCE effectively are divided into these sections:
Section 1. Certificate Exchange Between Router\Logger, PG, and AW Server.
Section 2. Certificate Exchange Between VOS Platform Application and AW Server.
Section 1. Certificate Exchange Between Router\Logger, PG, and AW Server
The steps needed to complete this exchange successfully are:
Step 1. Export IIS certificates from Router\Logger, PG, and all AW servers.
Step 2. Export DFP certificates from Router\Logger, PG, and all AW servers.
Step 3. Import IIS and DFP certificates from Router\Logger, PG, and AW to AW servers.
Step 4. Import IIS certificates to Router\Logger and PG from AW servers.
Caution: Before you begin, you must back up the keystore and open the command prompt as Administrator.
- Know the Java home path in order to ensure where the Java keytool is hosted. There are a couple of ways you can find the Java home path.
Option 1. CLI command: echo %JAVA_HOME%

Option 2. Manually via the Advanced system setting, as shown in the image.
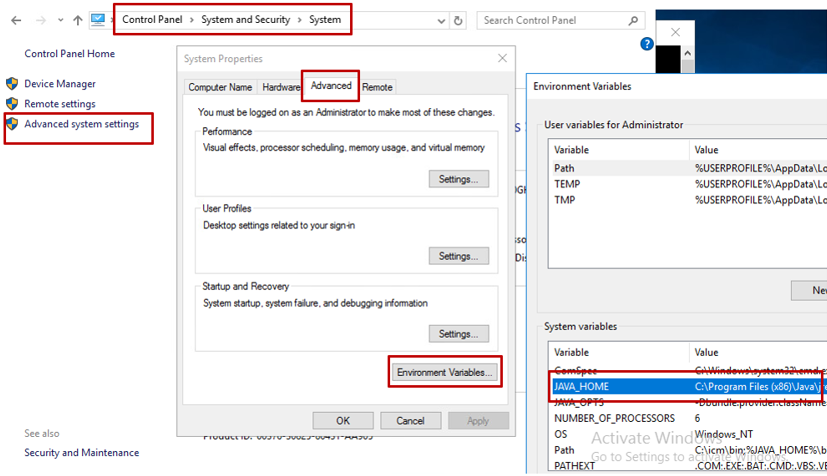
Note: On UCCE 12.5, the default path is C:\Program Files (x86)\Java\jre1.8.0_221\bin. However, if you have used the 12.5 (1a) installer or have 12.5 ES55 installed (mandatory OpenJDK ES), then use %CCE_JAVA_HOME% instead of %JAVA_HOME% since the datastore path has changed with OpenJDK. More information about OpenJDK migration in CCE and CVP can be found in these documents: Install and Migrate to OpenJDK in CCE 12.5(1) and Install and Migrate to OpenJDK in CVP 12.5(1).
- Backup the
cacerts file from the folder {JAVA_HOME}\lib\security. You can copy it to another location.
Step 1. Export IIS certificates from Router\Logger, PG, and all AW servers.
- On the AW server from a browser, navigate to the servers (ROGGERs, PG, other AW servers) URL:
https://{servername}.
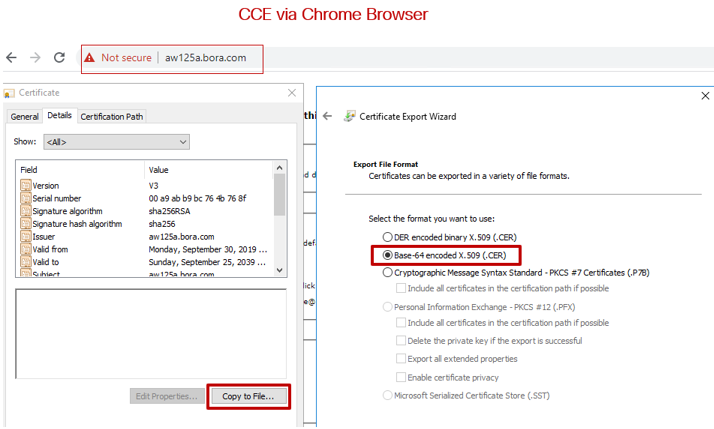
- Save the certificate to a temporary folder, for example,
c:\temp\certs and name the cert as ICM{svr}[ab].cer.
Note: Choose the option Base-64 encoded X.509 (.CER).
Step 2. Export DFP certificates from Router\Logger, PG, and all AW servers.
- On the AW server, open a browser, and navigate to the servers (Router, Logger or ROGGERs, PGs, AWs) DFP URL:
https://{servername}:7890/icm-dp/rest/DiagnosticPortal/GetProductVersion.
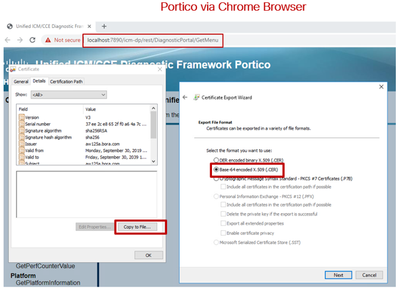
- Save the certificate to the folder example
c:\temp\certs and name the cert as dfp{svr}[ab].cer
Note: Choose the option Base-64 encoded X.509 (.CER).
Step 3. Import IIS and DFP certificates from Router\Logger, PG, and AW to AW servers.
Note: The example commands use the default keystore password of changeit. You must change this if you have modified the password on your system.
Command to import the IIS self-signed certificates into the AW server. The path to run the keytool is: %JAVA_HOME%\bin.
keytool -keystore ..\lib\security\cacerts -import -storepass changeit -alias {fqdn_of_server}_IIS -file c:\temp\certs\ ICM{svr}[ab].cer
Example: keytool -keystore ..\lib\security\cacerts -import -storepass changeit -alias myrgra.domain.com_IIS -file c:\temp\certs\ICMrgra.cer
Note: Import all the server certificates exported into all AW servers.
Command to import the DFP self-signed certificates into AW servers:
keytool -keystore ..\lib\security\cacerts -import -storepass changeit -alias {fqdn_of_server}_DFP -file c:\temp\certs\ dfp{svr}[ab].cer
Example: keytool -keystore ..\lib\security\cacerts -import -storepass changeit -alias myrgra.domain.com_DFP -file c:\temp\certs\dfprgra.cer
Note: Import all the server certificates exported into all AW servers.
Restart the Apache Tomcat service on the AW servers.
Step 4. Import IIS certificates to Router\Logger and PG from AW servers.
Command to import the AW IIS self-signed certificates into Router\Logger and PG servers:
keytool -keystore ..\lib\security\cacerts -import -storepass changeit -alias {fqdn_of_server}_IIS -file c:\temp\certs\ ICM{svr}[ab].cer
Example: keytool -keystore ..\lib\security\cacerts -import -storepass changeit -alias myawa.domain.com_IIS -file c:\temp\certs\ICMawa.cer
Note: Import all the AW IIS server certificates exported into Router\Logger and PG servers on the A and B sides.
Restart the Apache Tomcat service on the Router\Logger and PG servers.
Section 2. Certificate Exchange Between VOS Platform Applications and AW Server
The steps needed to complete this exchange successfully are:
Step 1. Export VOS Platform Application Server Certificates.
Step 2. Import VOS Platform Application Certificates to AW Server.
This process is applicable for all VOS applications such as:
- Finesse
- CUIC\LD\IDS
- Cloud Connect
Step 1. Export VOS Platform Application Server Certificates.
i. Navigate to the Cisco Unified Communications Operating System Administration page: https://{FQDN}:8443/cmplatform.
ii. Navigate to Security > Certificate Management and find the primary server certificates of the application in the tomcat-trust folder.
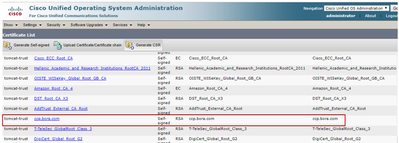
iii. Choose the certificate and click Download .PEM File in order to save it in a temporary folder on the AW server.
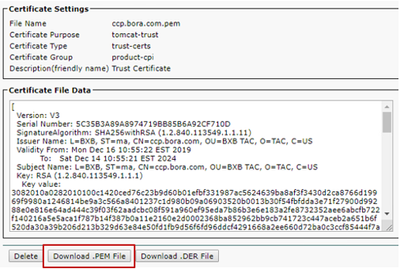
Note: Perform the same steps for the subscriber.
Step 2. Import VOS Platform Application to AW Server.
Path to run the Key tool: {JAVA_HOME}\bin
Command to import the self-signed certificates:
keytool -keystore ..\lib\security\cacerts -import -storepass changeit -alias {fqdn_of_vos} -file c:\temp\certs\vosapplicationX.pem
Restart the Apache Tomcat service on the AW servers.
Note: Perform the same task on other AW servers.
CVP OAMP Server and CVP Component Servers
These are the components from which self-signed certificates are exported and components into which self-signed certificates must be imported.
i. CVP OAMP server: This server requires a certificate from:
- Windows platform: Web Services Manager (WSM) certificate from CVP server and Reporting servers.
- VOS Platform: Cisco VVB for Customer Virtual Agent (CVA) integration, Cloud Connect server for Webex Experience Management (WXM) Integration.
ii. CVP Servers: This server requires a certificate from:
- Windows platform: WSM certificate from OAMP server.
- VOS Platform: Cloud Connect server for WXM Integration and Cisco VVB server.
iii. CVP Reporting servers: This server requires a certificate from:
- Windows platform: WSM certificate from OAMP server.
iv. Cisco VVB servers: This server requires a certificate from:
- Windows platform: VXML certificate from CVP server and Callserver certificate from CVP server.
The steps required to effectively exchange the self-signed certificates in the CVP environment are explained in these three sections.
Section 1. Certificate Exchange Between CVP OAMP Server and CVP Server and Reporting Servers.
Section 2. Certificate Exchange Between CVP OAMP Server and VOS Platform Applications.
Section 3. Certificate Exchange Between CVP Server and VVB Servers.
Section 1. Certificate Exchange Between CVP OAMP Server and CVP Server and Reporting Servers
The steps required to complete this exchange successfully are:
Step 1. Export the WSM certificate from the CVP server, Reporting server, and OAMP server.
Step 2. Import WSM certificates from the CVP server and Reporting server into the OAMP server.
Step 3. Import the CVP OAMP server WSM certificate into the CVP server and Reporting server.
Caution: Before you begin, you must accomplish this:
1. Open a command window as administrator.
2. In order to identify the keystore password, run the command, more %CVP_HOME%\conf\security.properties.
3. You need this password when running the keytool commands.
4. From the %CVP_HOME%\conf\security\ directory, run the command, copy .keystore backup.keystore.
Step 1. Export the WSM certificate from the CVP server, Reporting server, and OAMP server.
i. Export the WSM certificate from each server to a temporary location, and rename the certificate with a desired name. You can rename it as wsmX.crt. Replace X with the hostname of the server. For example, wsmcsa.crt, wsmcsb.crt, wsmrepa.crt, wsmrepb.crt, wsmoamp.crt.
Command to export the self-signed certificates:
%CVP_HOME%\jre\bin\keytool.exe -storetype JCEKS -keystore %CVP_HOME%\conf\security\.keystore -export -alias wsm_certificate -file %CVP_HOME%\conf\security\wsm.crt
ii. Copy the certificate from the path C:\Cisco\CVP\conf\security\wsm.crt from each server and rename it as wsmX.crt based on the server type.
Step 2. Import the WSM certificates from the CVP servers and Reporting servers into the OAMP server.
i. Copy the WSM certificate from each CVP server and Reporting server (wsmX.crt) to the %CVP_HOME%\conf\security directory on the OAMP server.
ii. Import these certificates with the command:
%CVP_HOME%\jre\bin\keytool.exe -storetype JCEKS -keystore %CVP_HOME%\conf\security\.keystore -import -alias {fqdn_of_cvp}_wsm -file %CVP_HOME%\conf\security\wsmcsX.crt
iii. Reboot the server.
Step 3. Import the WSM certificate from the CVP OAMP server into CVP servers and Reporting servers.
i. Copy the OAMP server WSM certificate (wsmoampX.crt) to the %CVP_HOME%\conf\security directory on all the CVP servers and Reporting servers.
ii. Import the certificates with the command:
%CVP_HOME%\jre\bin\keytool.exe -storetype JCEKS -keystore %CVP_HOME%\conf\security\.keystore -import -alias {fqdn_of_cvp}_wsm -file %CVP_HOME%\conf\security\wsmoampX.crt
iii. Reboot the servers.
Section 2. Certificate Exchange Between CVP OAMP Server and VOS Platform Applications
The steps required to complete this exchange successfully are:
Step 1. Export the application certificate from the VOS platform.
Step 2. Import the VOS application certificate into the OAMP server.
This process is applicable for VOS applications such as:
Step 1. Export the application certificate from the VOS platform.
i. Navigate to the Cisco Unified Communications Operating System Administration page: https://{FQDN}:8443/cmplatform.
ii. Navigate to Security > Certificate Management and find the primary server certificates of the application in the tomcat-trust folder.

iii. Choose the certificate and click Download .PEM File in order to save it in a temporary folder on the OAMP server.
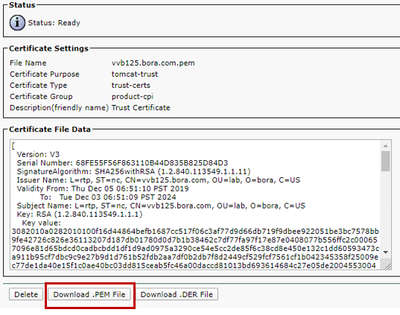
Step 2. Import the VOS application certificate into the OAMP server.
i. Copy the VOS certificate to the %CVP_HOME%\conf\security directory on the OAMP server.
ii. Import the certificates with the command:
%CVP_HOME%\jre\bin\keytool.exe -storetype JCEKS -keystore %CVP_HOME%\conf\security\.keystore -import -alias {fqdn_of_vos} -file %CVP_HOME%\conf\security\VOS.pem
iii. Reboot the server.
Section 3. Certificate Exchange Between CVP Server and VVB Servers
This is an optional step in order to secure the SIP communication between CVP and other Contact Center components. For more information, refer to the CVP Configuration Guide: CVP Configuration Guide - Security.
CVP Call Studio Web Service Integration
For detailed information about how to establish a secure communication for Web Services Element and Rest_Client element, refer to User Guide for Cisco Unified CVP VXML Server and Cisco Unified Call Studio Release 12.5(1) - Web Service Integration [Cisco Unified Customer Voice Portal] - Cisco.
Related Information


 Feedback