Configure CCE Virtual Agent Voice Cloud-based Connector
Available Languages
Download Options
Bias-Free Language
The documentation set for this product strives to use bias-free language. For the purposes of this documentation set, bias-free is defined as language that does not imply discrimination based on age, disability, gender, racial identity, ethnic identity, sexual orientation, socioeconomic status, and intersectionality. Exceptions may be present in the documentation due to language that is hardcoded in the user interfaces of the product software, language used based on RFP documentation, or language that is used by a referenced third-party product. Learn more about how Cisco is using Inclusive Language.
Contents
Introduction
This document describes how to configure Contact Center Enterprise (CCE) Virtual Agent Voice (VAV) Cloud-based Connector.
Contributed by Ramiro Amaya Cisco TAC Engineer, Anjum Jeelani, Adithya Udupa, and Raghu Guvvala, Cisco Engineers.
Prerequisites
Requirements
Cisco recommends that you have knowledge of these topics:
- Cisco Unified Contact Center Enterprise (UCCE) Release 12.6.2
- Cisco Package Contact Center Enterprise (PCCE) Release 12.6.2
- Customer Voice Portal (CVP)
- Virtual Voice Browser (VVB)
- Google Dialogflow CX
- Control Hub
Components Used
The information in this document is based on these software versions:
- PCCE Release 12.6.2
- CVP 12.6.2
- Cloud Connect 12.6.2
- Google Dialogflow CX
- Webex Control Hub
The information in this document was created from the devices in a specific lab environment. All of the devices used in this document started with a cleared (default) configuration. If your network is live, ensure that you understand the potential impact of any command.
Background
Virtual Agent–Voice (VAV) feature, which was referred to as Customer Virtual Assistant (CVA) in CCE 12.5(1) release, enables the interactive voice response (IVR) platform to integrate with cloud-based speech services.
This feature supports human-like interactions that enable you to resolve issues quickly and more efficiently within the IVR, thereby reducing the calls directed toward agents. This helps you interact with Virtual Agent first which offers you a self-service solution, without involving a physical Agent.
VVB uses one of these connectors to leverage AI services:
- Premise-based connector: VVB uses a native connector to connect to the Google Dialogflow service. This service is enabled through the Dialogflow ES or DialogflowCX elements of Cisco Unified Call Studio. VAV currently supports Google Dialogflow ES and CX services via premise-based connector.
- Cloud-based connector: VVB uses a cloud-based connector to connect to the Cisco CCAI service. This service is enabled through the Virtual Agent Voice element of Cisco Unified Call Studio. VAV currently supports Google Dialogflow CX service via cloud-based connector.
This document only covers the Cloud-based connector configuration.
Important Considerations
Consider this information before configuring VAV via cloud-based connector:
-
Supported codec is u-law.
-
Voice activity detection is done by Google.
- Port 443 and HTTP/2 must be enabled in the proxy and firewall.
-
Allowed list in your network must include these URLs:
- U2C (port 443): https://u2c-a.wbx2.com/u2c/api/v1/user/catalog - US
-
U2C (port 443): https://u2c-r.wbx2.com/u2c/api/v1/user/catalog - Asia
-
U2C (port 443): https://u2c-k.wbx2.com/u2c/api/v1/user/catalog - Europe
-
Orchestrator (port 443): https://insight-orchestrator.wxcc-us1.cisco.com
-
ID broker (port 443): https://idbroker.webex.com
-
WS Connector (port 443): https://wsconnector.wxcc-us1.cisco.com and https://wsconnector.prod-us1.rtmsprod.net
-
Allowed list in your network must also include these group of URLs:
Configure
These are the steps required to configure VAV via Cloud-base connector.

Step 1. Exchange Self-signed Certificates or implement CA-signed Certificates.
Step 2. Configure Proxy Server.
Step 3. Create a Google Project.
Step 4. Provision Google Project and Cloud Organization with Cisco.
Step 5. Create and Design a Dialogflow CX Agent.
Step 6. Create an Agent Conversation Profile.
Step 7. Configure CCAI in Webex Control Hub.
- Cloud Connect
- Connector
- Feature
Step 8. Configure CCAI in UCCE and PCCE (SPOG).
Step 9. Create and Design CVP Call Studio Application.
Exchange Self-signed Certificates or Implement CA-signed Certificates.
You need to implement CA-signed certificates or exchange self-signed certificates the CCE components related to the VAV for VAV feature to work. For PCCE certificate exchange or CA-signed are required on: AW, VVB and Cloud Connect. For UCCE certificates are required on: AW, VVB, NOAMP, and Cloud Connect. Review this document for UCCE Exchange certificates: Exchange Self-Signed Certificates in UCCE 12.6, for CA-signed implementation: Implement CA-Signed Certificates in 12.6, and for PCCE exchange certificate: Exchange Self-Signed Certificates in PCCE 12.6.
Configure Proxy Server
Proxy server is required if you do not have direct communication between VVB Speech Server (SS) and the Webex CCAI services.
To configure the proxy server use these commands:
set speechserver httpsProxy Host
set speechserver httpsProxy port
set speechserver httpsProxy nonProxyHosts
set speechserver httpsProxy Host
This command sets the proxy host for the Speech Server. It also asks for credentials, if required.
Command Syntax:
set speechserver httpsProxy host <hostname/ip>
Does proxy require Crendentials? [Y/N] y
Enter UserName: username
Enter Password: ****
Example:
admin:set speechserver httpsProxy host abc.com
Does proxy require Crendentials? [Y/N] y
Enter UserName: username
Enter Password: ****
Command successful.
set speechserver httpsProxy port
This command sets the proxy port for the Speech Server.
Command Syntax:
set speechserver httpsProxy port <portNumber>
Example:
admin:set speechserver httpsProxy port 80
Command successful.
This command sets the nonProxyHosts for the Speech Server. The traffic does not go via proxy to these hosts.
set speechserver httpsProxy nonProxyHosts
Command Syntax:
set speechserver httpsProxy nonProxyHosts <parameter>
Example:
admin:set speechserver httpsProxy nonProxyHosts <list of nonProxyHosts separated by commas>
Command successful.
The parameter can be a single host or mutiple hosts separated by commas
More information in this document: VVB Operations Guide
Note: You must stop and start Speech Server for the values to be reflected.
Syntax for stopping Speech Server: utils service stop Cisco Speech Server
Syntax for starting Speech Server: utils service start Cisco Speech Server
Create a Google Project - Provision the Project and the Organization
The integration of Google AI and CCE requires the creation of Google project and this project need to be provision by Cisco. In addition, and organization in the Cisco webex cloud needs to be created for you or Cisco partner. This document explains the steps required to create and provision the project and the organization.
Provision Google CCAI Hybrid Services with CCE
Create a Dialogflow CX Agent
VAV currently supports Google Dialogflow CX service via cloud-based connector.
A Dialogflow CX agent is a virtual agent that handles concurrent conversations with your end-users. Dialogflow translates end-user text or audio during a conversation to structured data that your apps and services can understand. You design and build a Dialogflow agent to handle the types of conversations required for your system. For more information about Dialogflow CX you can visit: Dialogflow CX basics.
Here are the steps to create a Dialogflow CX agent.
Step 1. Navigate to https://dialogflow.cloud.google.com/cx/projects and log in with the Google account you used when you created the project, and select the project.
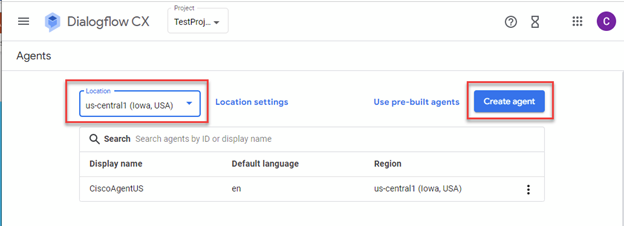
Step 2. Select the location and click Create agent.
Step 3. Add the name, select time zone and the language. Click Create.
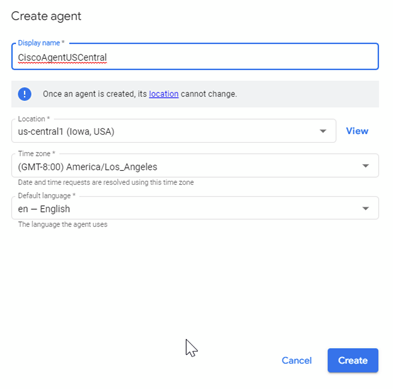
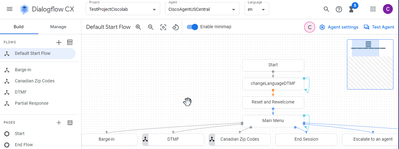
Step 4. The agent is created, and you see the Default Start Flow on the first page.

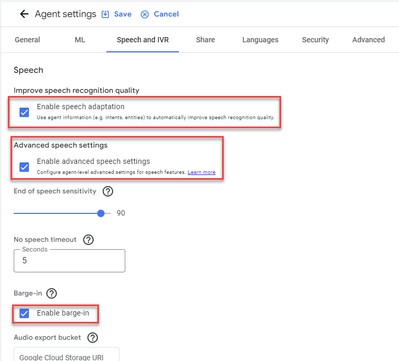
When you create an agent, the default flow is automatically created in the start page. To change the default settings after the agent is created, select the Agent settings.

In the Speech and IVR section, enable speech adaptation, advance speech settings and barge-in.
If you want to learn on how to setup a Dialogflow CX agent review these Google videos:
Introduction to pages and transitions in Dialogflow CX
Create a single-flow conversational agent
Import a Dialogflow CX Agent
You can import a Dialogfow CX agent, instead of building the agent from scratch. After you have created the agent, you can import a previously created and built Dialogflow CX agent. In this example, a Dialogflow CX agent created by Cisco Engineering team is used.
Step 1. On the Agent section, select View all agents.
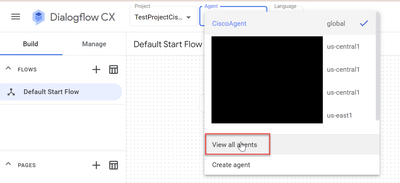
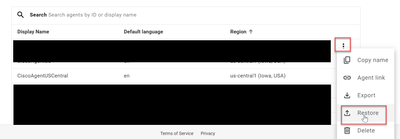
Step 2. Select the the agent that you created, and click Restore.
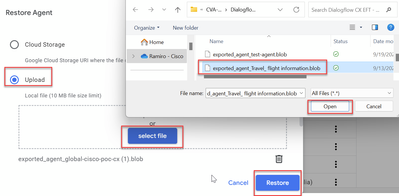
Step 3. On the Restore window, click Upload, then select the download file and click Restore.
Now, you see the agent imported.
You can download a Cisco Dialogflow CX agent sample (exported_agent_Travel_ flight information_VAV.blob) from: VAV Call Studio Application and Dialogflow CX Agent Sample
Create a Dialogflow CX Agent - Pre-built Agent
You can use Google pre-built agent templates in order to decrease the design time when building a Dialogflow CX agent.
Here are the steps to use a Pre-built agent.
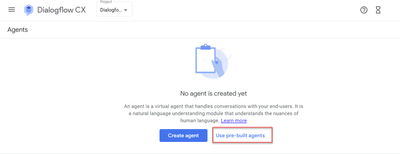
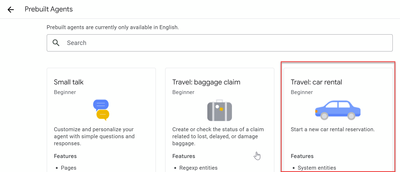
Step 1. On the Dialogflow CX page, select the project and then select Use pre-built agents.
Step 2. Select the Pre-built agent you want to use. In this example, the Travel: car rental agent is used.
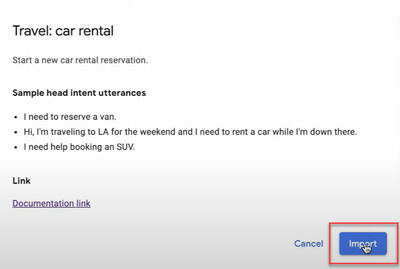
Step 3. Click Import.
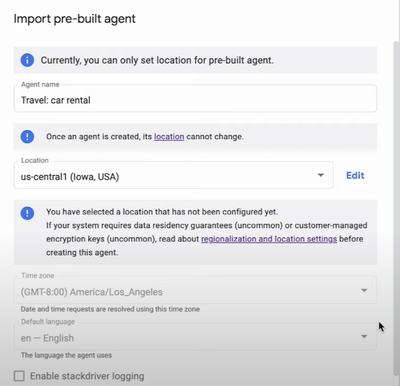
Step 4. Select the location. You see the new agent created.

More information on this Google video: Use Pre-built agent template to create a Dialogflow CX agent
Create an Agent Conversation Profile
An agent conversation profile is a a set of configuration parameters that define the behavior of the Dialogflow agent in a conversation with a caller.
Here are the steps to create an agent conversation profile.
Step 1. Log in to Google Agent Assist . Select Conversation profile and choose the project you previously have created with the Dialogflow CX agent.
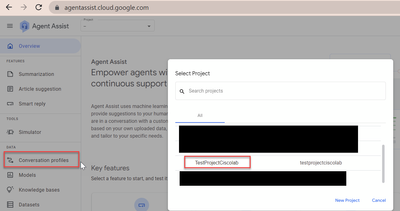
Step 2. Click Create.

Step 3. Ensure the Agent Assist URL uses the same location as the agent you want to create the conversation profile. In this example, you see that the URL is in location global.

The agent you previously created is on us-central1, so you have to replace the location to continue.

Step 4. Add the name and the language.
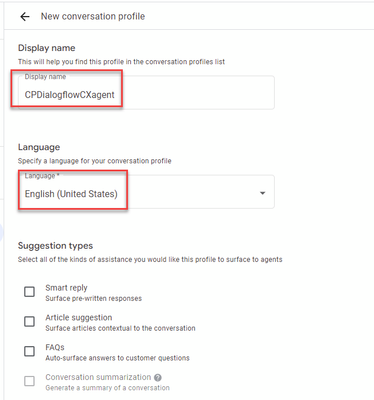
Step 5. Scroll-down and select Enable Virtual agent and then select the Dialogflow CX agent.
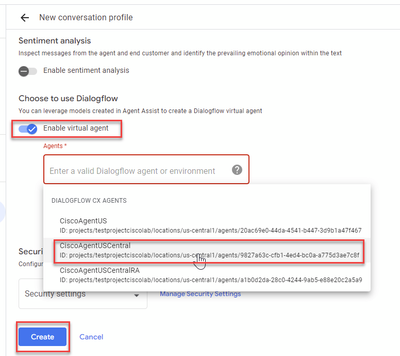
Now the conversation profile is created for the agent.
Configure CCAI in Webex Control Hub
Step 1. Ensure that the Cloud Connect publisher and subscriber are installed. For more information, see the Install Cloud Connect section in Cisco Unified Contact Center Enterprise Installation and Upgrade Guide 12.6.2.
Step 2. Log in to Webex Control Hub (admin.webex.com). Navigate to Contact Center and click Cloud Connect.
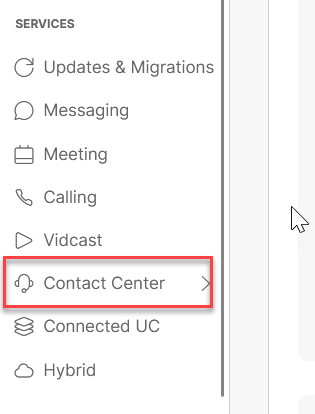
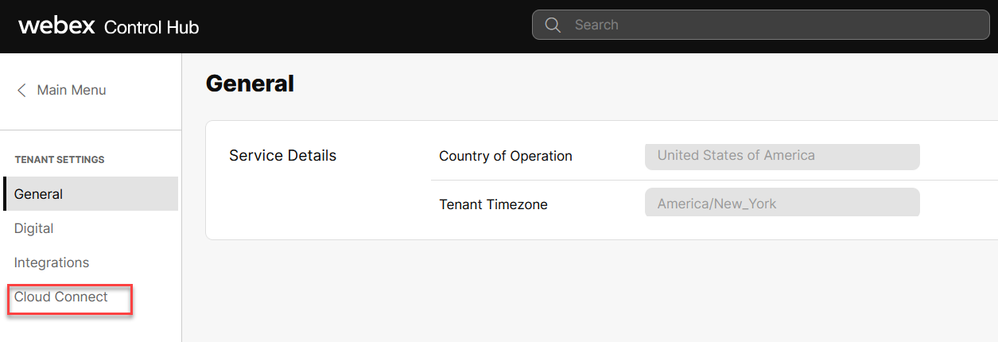
Step 3. On Cloud Connect window enter the name and the Fully Qualified Domain Name (FQDN) of Primary Cloud Connect and clock Register.
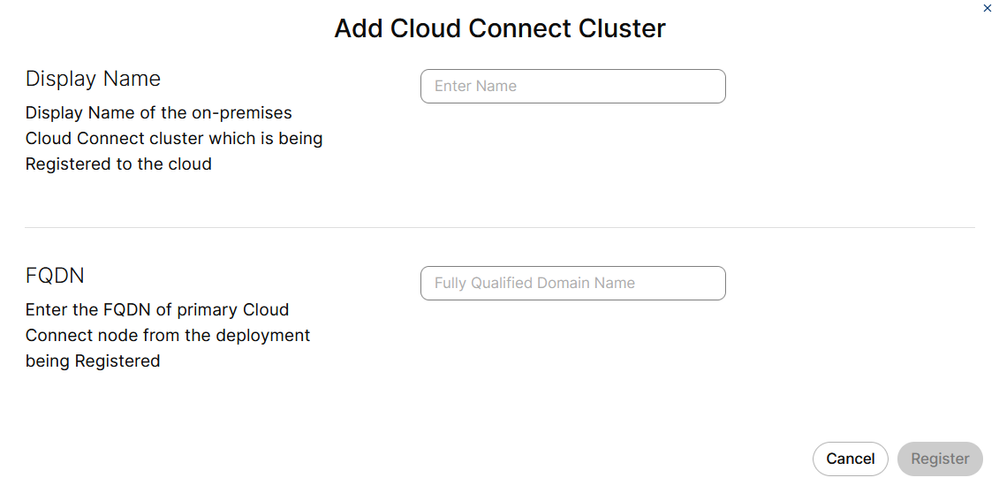
Note: When adding the Cloud Connect in Webex Control Hub, ensure that the Cloud Connect FQDN is accessible from the PC where the Control Hub is opened.
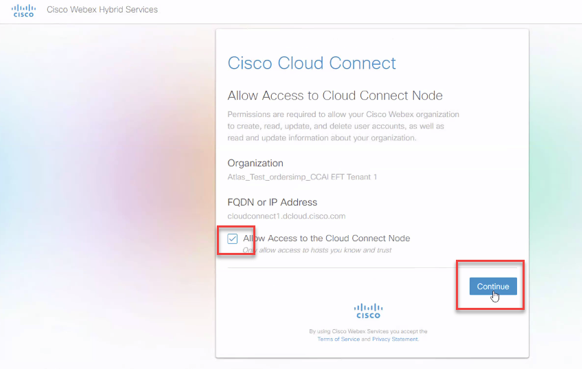
Step 4. Select Allow access to the Cloud Connect node and click Continue.
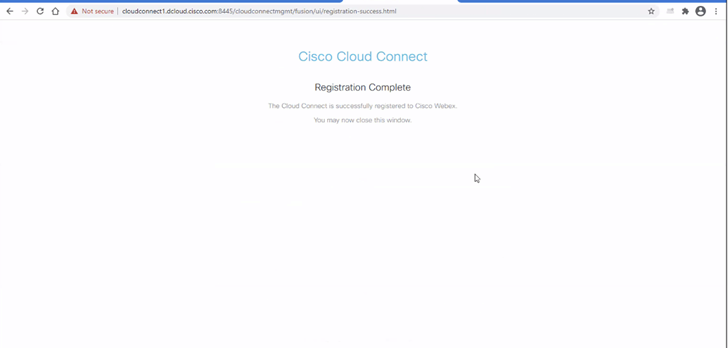
You see Cloud Connect registration completed.
Step 5. Add a Connector. On the Contact Center window select Integrations and then Connectors tab.
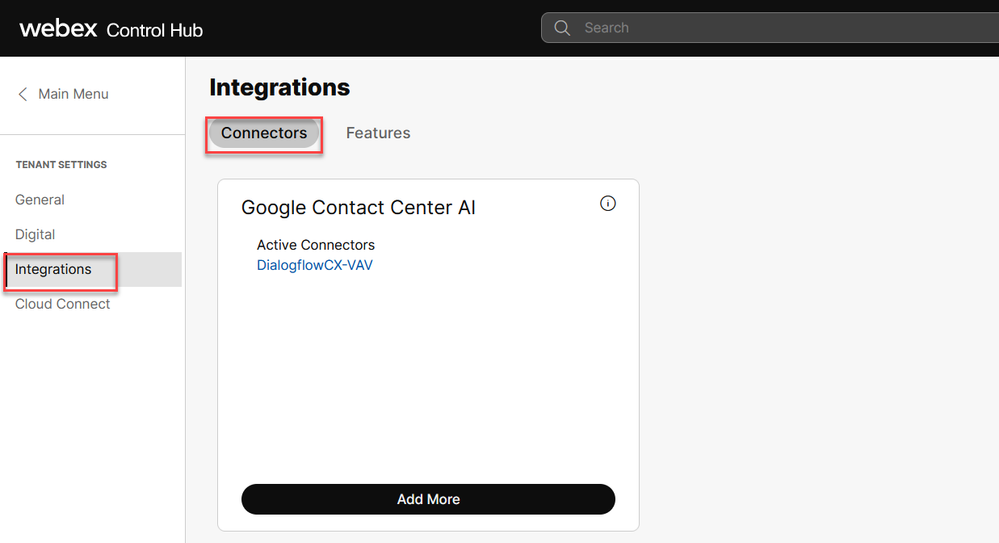
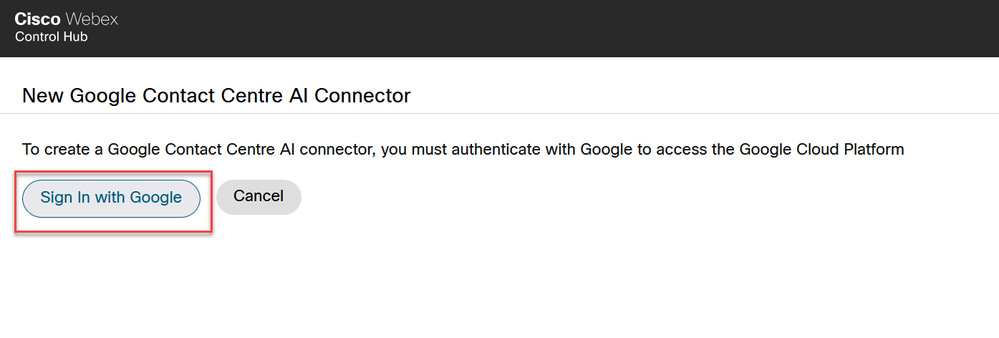
Step 6. If a connector is already added and you need to add one more, click on Add More. Sign in with Google and continue with the instructions.
Note: The user accout that you sign in with Google must have the owner role of the google project.
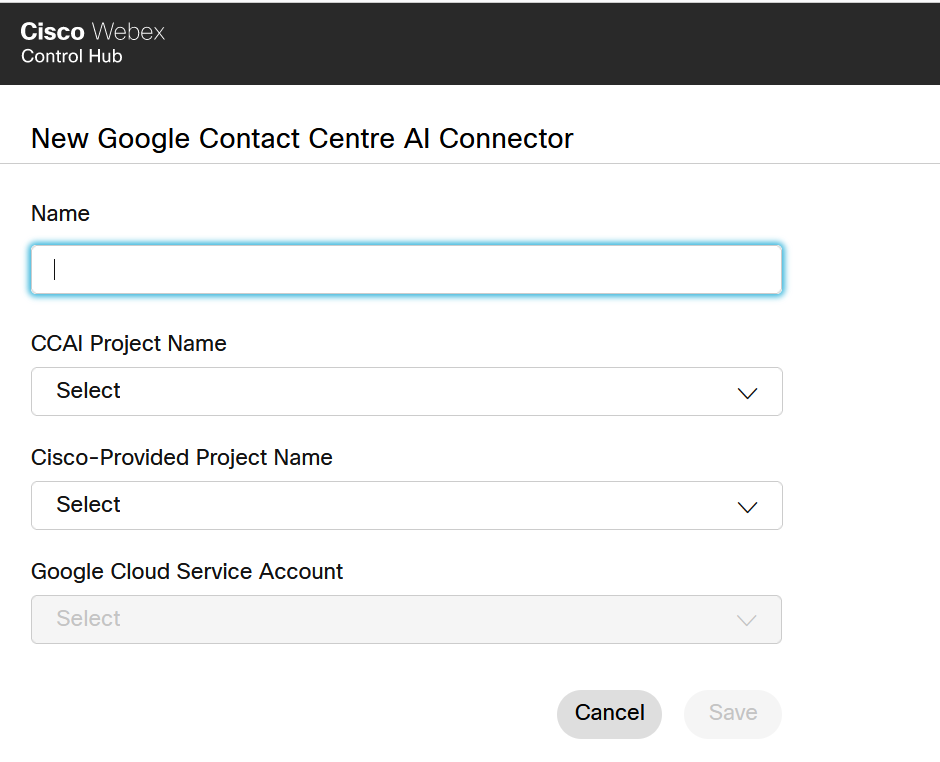
Step 7. Provide the Google Project, the Cisco Project and the Google Service Account provided by Cisco when provisioning the Google Project. Click Save.
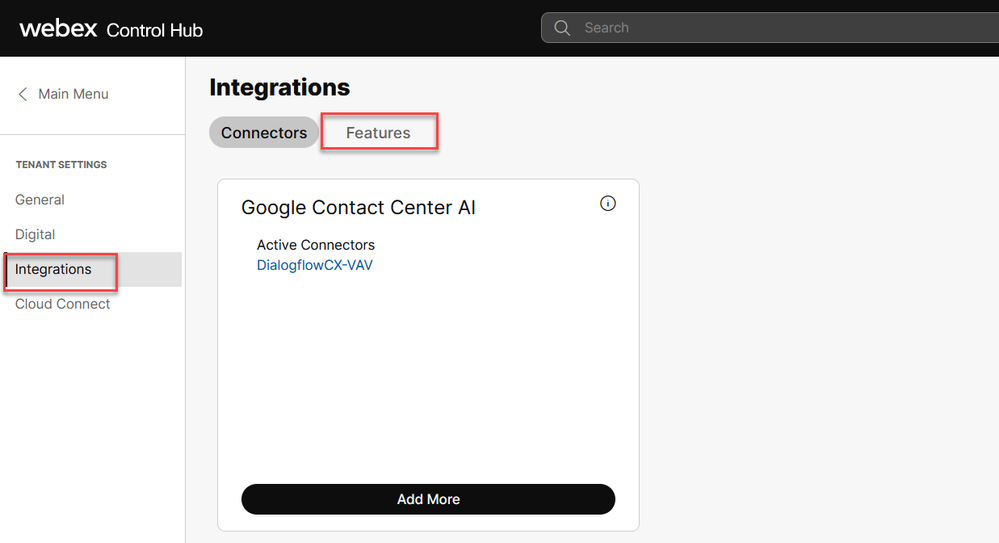
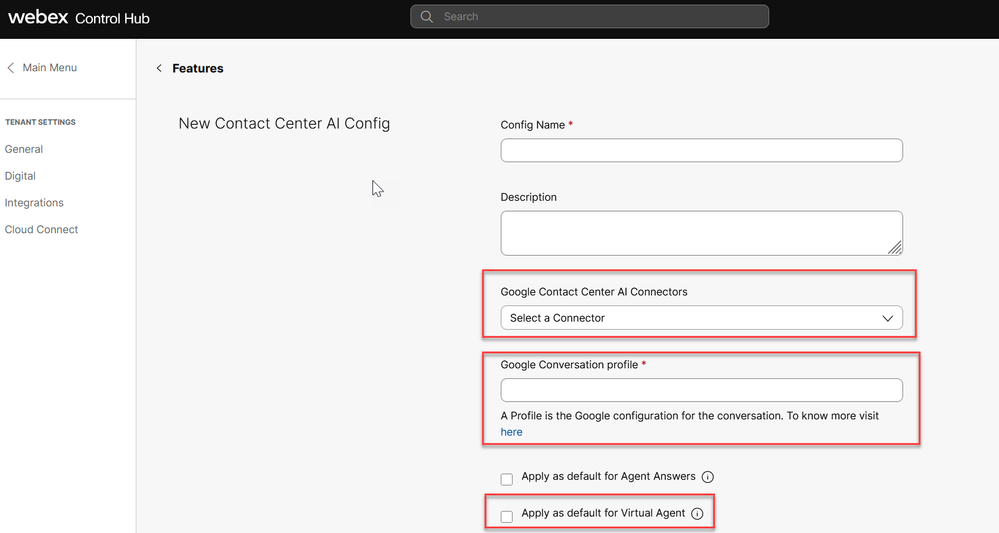
Step 8. Now add the features. On the Contact Center page, click Integrations and Features and then click New.
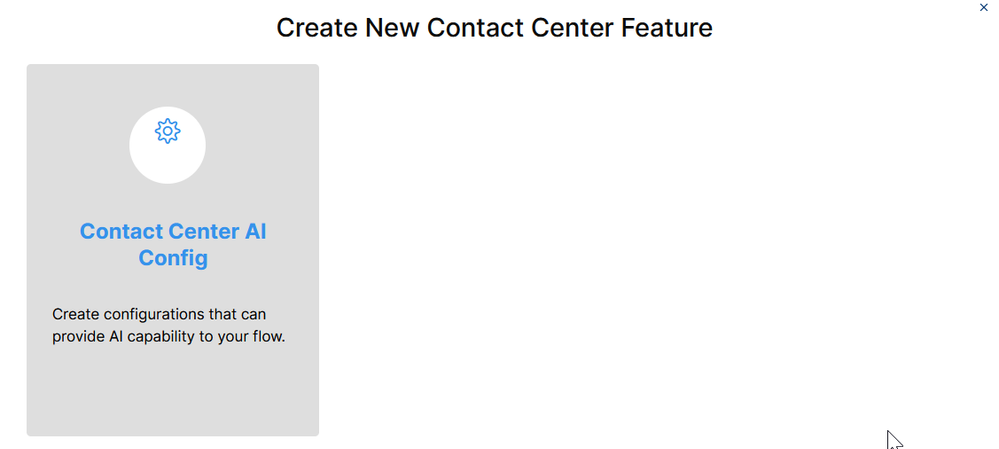
Step 9. You are now in the Create a New Contact Center Feature page. Click New. Contact Center AI Config.

Step 10. You are now in the Contact Center Feature page. Click Contact Center AI Config.
Step 11. Provide the feature information, select the connector already added and the Google agent conversation profile created.
Configure CCAI in UCCE and PCCE (SPOG)
PCCE Configuration
Step 1. On CCE AW, open Unified CCE Administration tool and navigate to Inventory.
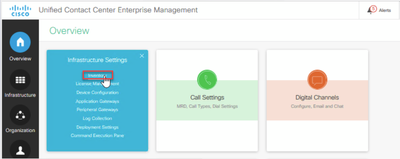
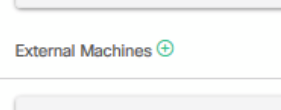
Step 2. Scroll-down and click on external machines.
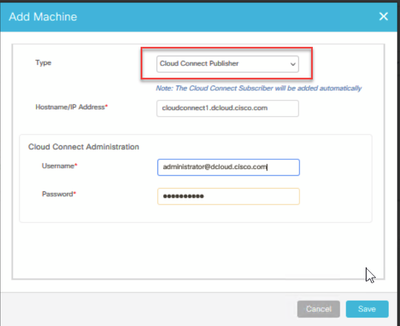
Step 3. Select Cloud Connect Publisher and provide the Fully Qualify Domain Name (FQDN), the username and password.
Cloud Connect is added and in sync.
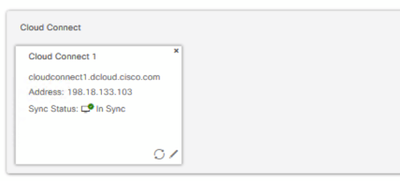
Note: Ensure that you have previously exchange certificates between CCE components or implement CA-signed certificates. Refer to these documents for PCCE certificate exchange and implementation: Exchange Self-Signed Certificates in PCCE 12.6. and Implement CA-Signed Certificates in 12.6.
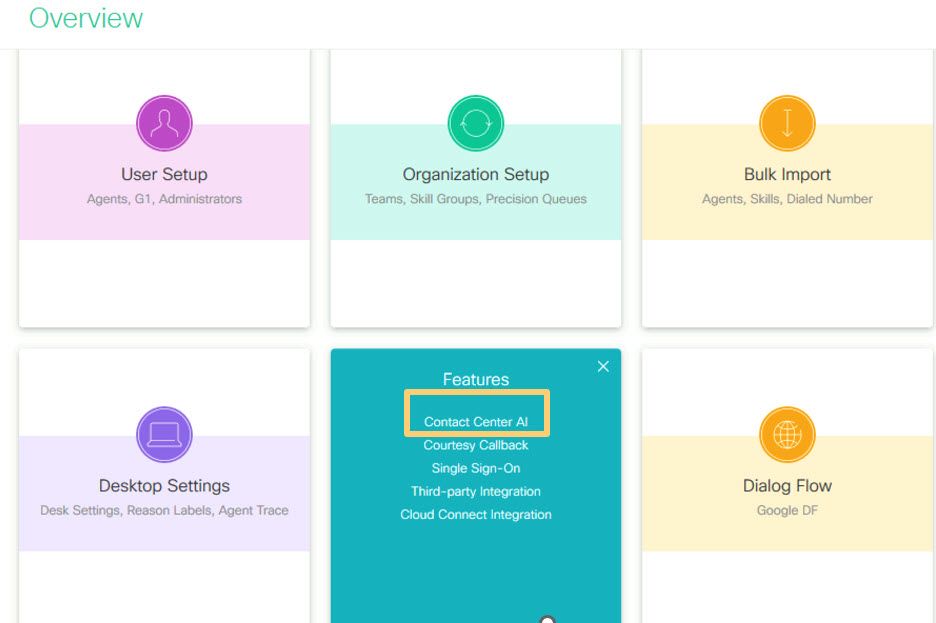
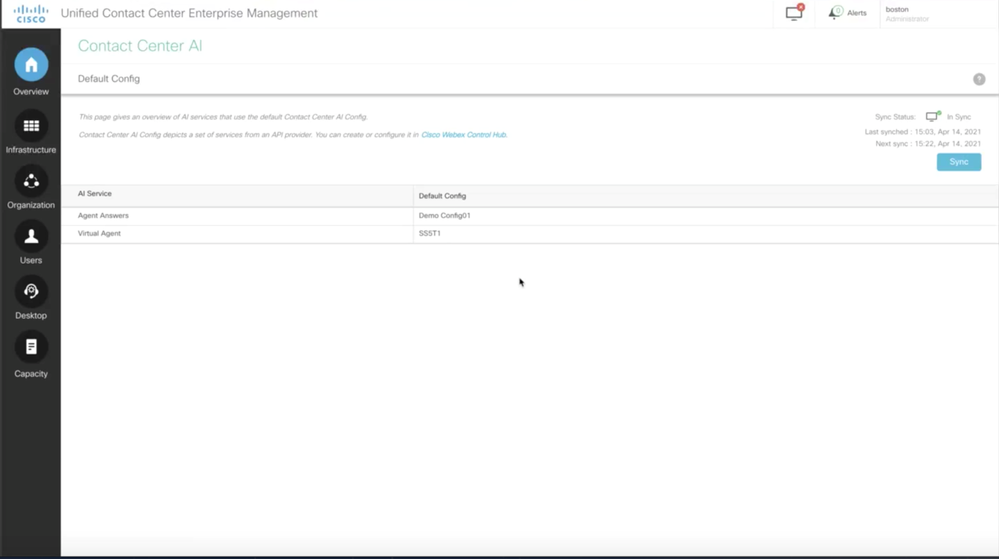
Step 4. Validate default configuration. View the default CCAI configuration (created as part of CCAI configuration in Webex Control Hub). If required, synchronize the configuration (using Sync option), in the CCE Admin.
Step 4a. On the CCE Admin, navigate to the features card, and select Contact Center AI.
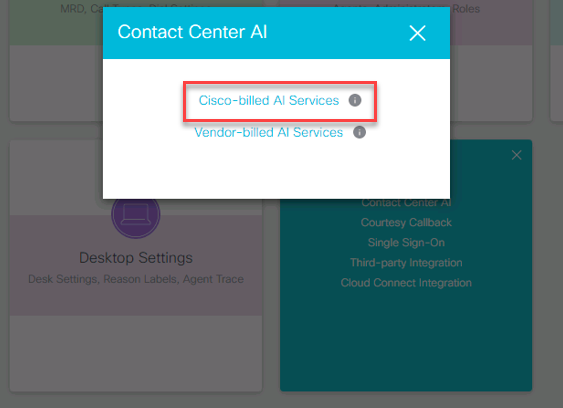
Step 4b. Select Cisco-billed AI Services
Step 4c. You see the default configuration for the virtual agent.
UCCE Configuration
Step 1. On CCE AW, open Unified CCE Administration tool and navigate to Inventory. Click New.
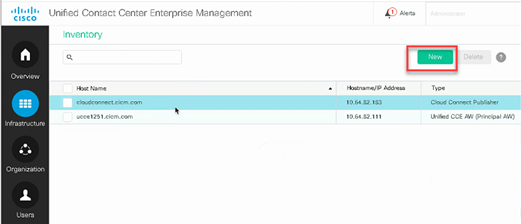
Step 2. Add Cloud Connect and provide the FQDN and credentials.
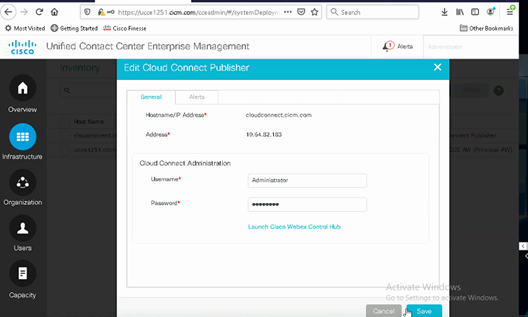
Note: Ensure that you have previously exchange certificates between CCE components or implement CA-signed certificates. Refer to these documents for UCCE certificate exchange and implementation: Exchange Self-Signed Certificates in UCCE 12.6, and implementation: Implement CA-Signed Certificates in 12.6.
Step 3. Configure Cloud Connect in the CVP Operations Console (OAMP). For details see the section Configure CVP Devices for Cloud Connect in the Administration Guide for Cisco Unified Customer Voice Portal.
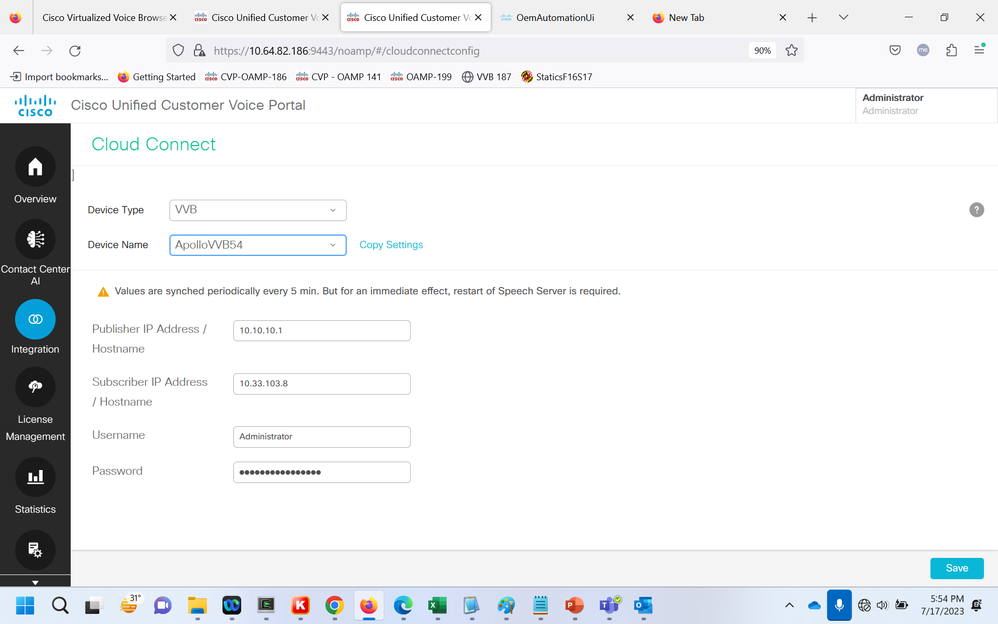
Step 4. Validate the Google CCAI default configuration. View the default CCAI configuration (created as part of the configuration of CCAI in Webex Control Hub). If required, synchronize the configuration (using Sync option), in the CVP Operations Console (NOAMP for Cisco Unified CCE).
Step 4a. On the CCE Admin, navigate to the features card, and select Contact Center AI.
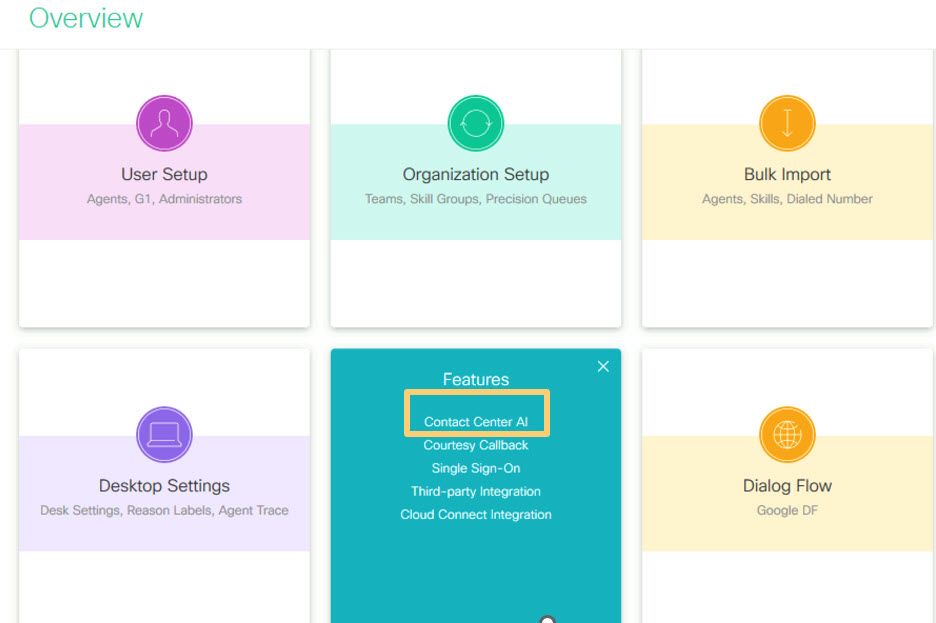
Step 4b. Select Cisco-billed AI Services.
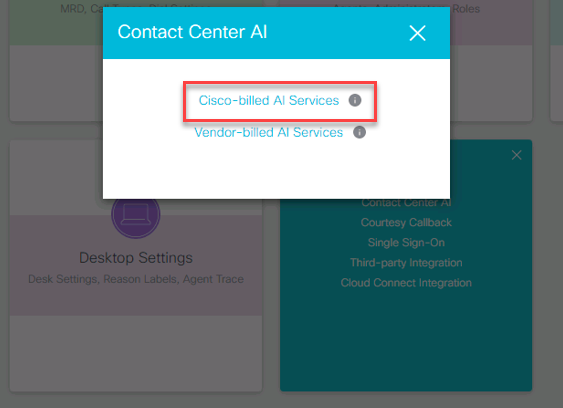
Step 4c. You see the default configuration for the virtual agent.
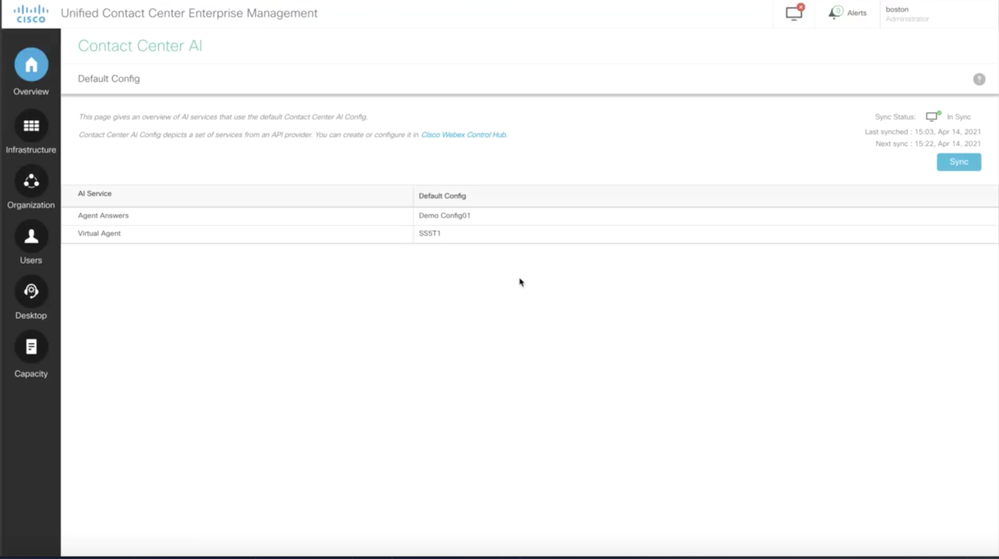
CVP Configuration
Step 1. On CVP Call Studio, open the call studio application. You can use a Cisco sample call studio application to test in a lab environment. You can download it from here: Call Studio VAV Sample Application.
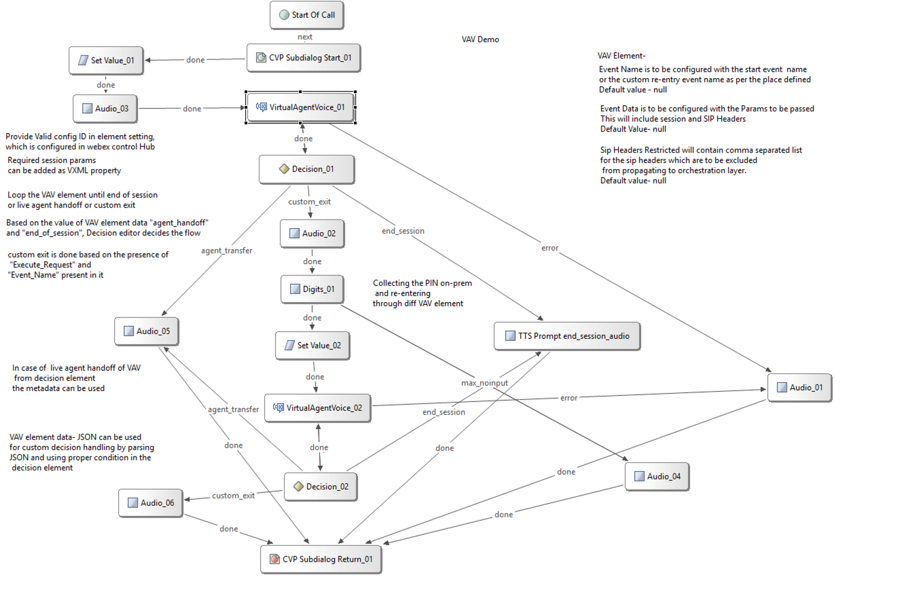
Step 2. Click the Virtual Agent Voice element and select the settings tab in order to open the element settings.
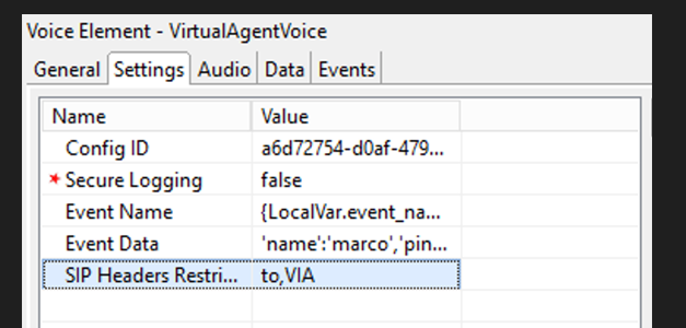
Step 3. On the Config ID copy the id from the Webex Control Hub CCAI feature that you creates. Leave it blank if you have selected a default virtual agent in the Webex Control Hub feature configuration.

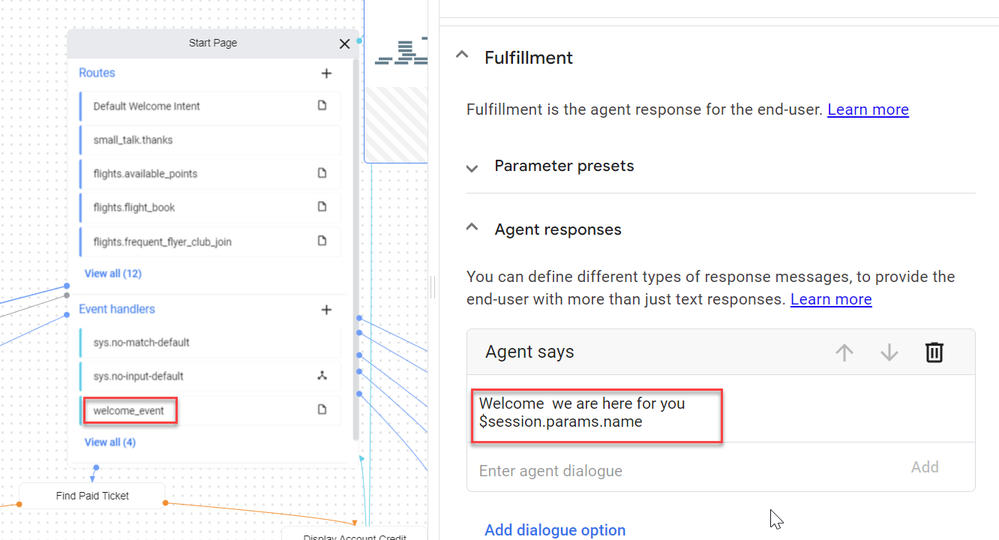
Step 4. In previous integration of Dialogflow CX with Cisco Contact Center, you were required to create a welcome event. This is still required in CCE 12.6.2 version if you are using an on-prem based connector. However, for Cloud-based connector you have the option to specify your own event and parameters passed to Google Dialogflow. Click on the Event Name, and specify the name of the event you are passing to Google Dialogflow. Ensure that you create this event in your Dialogflow CX agent.
In this example, the event name is passed as a local variable that was defined in a previous element.
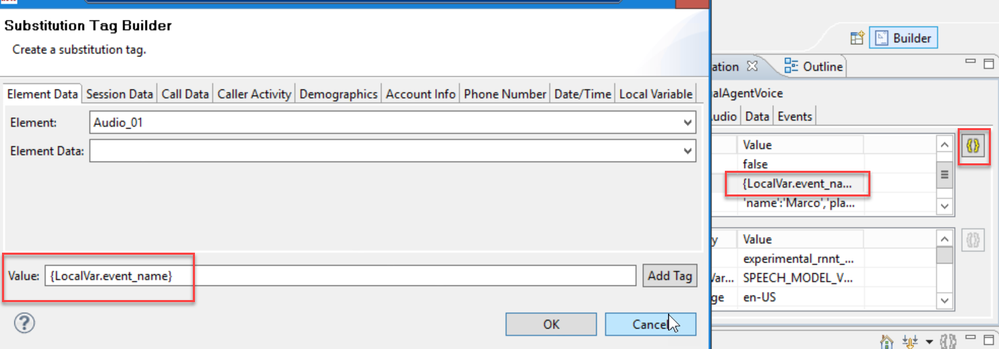
The variable was defined in the set variable event.

Event in the Dialogflow CX Agent.
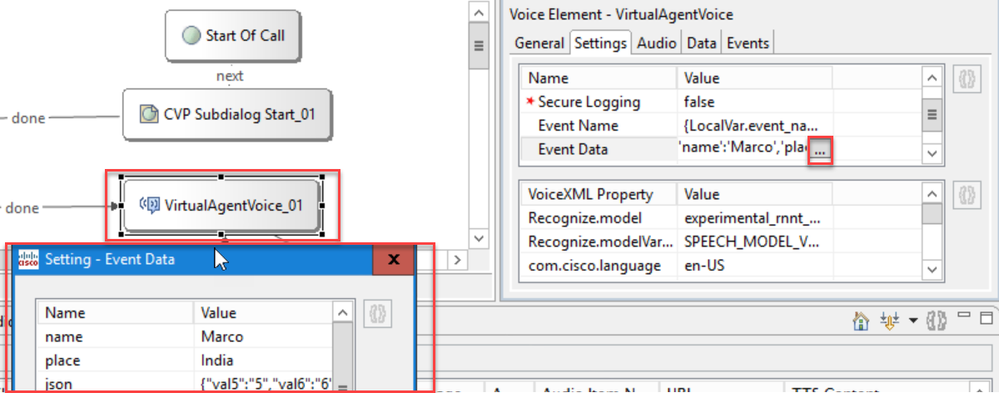
Step 5. On the Event Data, add the parameters that you want to pass with the Event Name to Google Dialogflow CX. Click ... to open the Event Data field. in this example, three variables are passed, Name, Place and json type field values.
Step 6. SIP Header restrictions allows you to filter what information from the SIP messages is sent to Google Dialogflow CX agent. This is to prevent that personal or critical information is passed via the cloud.

Step 7. To improve the Automatic Speech Recognition (ASR), Text-to-Speech (TTS) and Natural Language Understanding (NLU) interaction with Google Dialogflow a set of VXML parameters have been added.

Recognize Models
This is used to specify the machine learning model to be used by the cloud speech-to-text transcription to improve the recognition results.
You can find more information in this documents:
Recognize Models Variant
Contains the model variant name.StringRecognize.modelVariant. For example, these four values are supported as model.
• USE_STANDARD
• SPEECH_MODEL_VARIANT_UNSPECIFIED
• USE_ENHANCED
• USE_BEST_AVAILABLE (default)
Synthesize Voice Gender
Set the gender type for Synthesize operation.
Synthesize Voice Name
Set the voice name for Synthesize operation. Helps to select the voice and the accent in which the prompts have to be played.
Here are the supported voices and languages by Google: Google Voice and Language Support.
Configure Partial Response in Dialogflow CX
The partial response feature plays an interim message and engages the caller while the webhook response is processing the request in the background. The webhook request in Dialogflow CX often takes longer to receive a response. If there is no interim response to the caller while the webhook response is processing the request, the caller is kept completely silent and could hang up the phone. To avoid this, use the partial response to notify the caller that their request is still being processed.
- If the webhook returns the actual response before or during the partial response, the system stops the partial response and plays the final response to the callers.
- The first prompt response that is received from Dialogflow CX agent does not support partial response.
- Barge-in cannot be enabled for the partial response prompt to allow the callers to interrupt an agent response.
Note: Partial response is configured on Google Dialogflow CX agent. This support is available only from ES1 of 12.6(2) VVB base release. For more information review this document: Google Partial Response
For more information about partial response, you can review this document: https://help.webex.com/en-us/article/nzlot2u/Configure-Partial-Response-in-Dialogflow-CX
Verify
There is currently no verification procedure available for this configuration.
Troubleshoot
There is currently no troubleshooting procedure available for this configuration.
Related Information
- UCCE Features guide 12.6.2
- Exchange Self-Signed Certificates in UCCE 12.6
- Implement CA-Signed Certificates in 12.6
- Exchange Self-Signed Certificates in PCCE 12.6
- Provision Google CCAI Hybrid Services with CCE
- Google - Dialogflow CX Introduction
- Google - Use Pre-built agent template to create a Dialogflow CX agent
- Google - Introduction to pages and transitions in Dialogflow CX
- Google - Create a single-flow conversational agent
- Cisco Unified Contact Center Enterprise Installation and Upgrade Guide 12.6.2
- Call Studio VAV Sample Application
- VXML Element Specification Guide
- Enhanced Models
- Select Enhanced Models
- Google Voice and Language Support
- Technical Support & Documentation - Cisco Systems
Revision History
| Revision | Publish Date | Comments |
|---|---|---|
2.0 |
09-Jan-2024 |
release 3 |
1.0 |
18-Aug-2023 |
Initial Release |
Contributed by Cisco Engineers
- Ramiro AmayaCisco TAC
- Adithya Udupa and Anjum JeelaniCisco Engineering
- Raghavendra GuvvalaCisco Engineering
Contact Cisco
- Open a Support Case

- (Requires a Cisco Service Contract)
 Feedback