Integrate Third Party Gadget and User Interface into PCCE
Available Languages
Download Options
Bias-Free Language
The documentation set for this product strives to use bias-free language. For the purposes of this documentation set, bias-free is defined as language that does not imply discrimination based on age, disability, gender, racial identity, ethnic identity, sexual orientation, socioeconomic status, and intersectionality. Exceptions may be present in the documentation due to language that is hardcoded in the user interfaces of the product software, language used based on RFP documentation, or language that is used by a referenced third-party product. Learn more about how Cisco is using Inclusive Language.
Contents
Introduction
This document describes the steps to integrate third party gadget and third party User Interface (UI) into Package Contact Center Enterprise (PCCE).
Contributed by Ramiro Amaya and Anuj Bhatia, Cisco TAC Engineer and Rahila Valiya Peedikayil, Cisco Engineering.
Prerequisites
Requirements
Cisco recommends that you have knowledge of Cisco Package Contact Center Enterprise
Components Used
The information used in the document is based on PCCE 12.5(1) version.
The information in this document was created from the devices in a specific lab environment. All of the devices used in this document started with a cleared (default) configuration. If your network is live, ensure that you understand the potential impact of any step.
Background Information
With PCCE 12.5 release start the support of third-party User Interface (UI) integration into the Contact Center Enterprise (CCE) Administration. This feature enables to host such UI's on CCE Web Administration tool to provide administrative Single Pane of Glass (SPOG) experience. You start with a browser where you register your third party application or user interface. An Application Programming Interface (API) layer stores the details into the Administration Workstation (AW) database and additional information like where to place this user interface in the SPOG. You can render any UI interface or you can render a gadget via shindig.

Configure
Manage Third-Party Integration
Step 1. In Unified CCE Administration, navigate to Overview > Features > Third-party Integration.
Note: Only system administrators can add, edit, or delete a third-party user interface and customize the Unified CCE Administration layout. Third-party gadgets can be added or modified only from a principal AW machine.

Third Party Integration page has two tabs:
1. Manage Third-party Integration
2. Manage Layout.
Manage Third-party Integration tab list down all the third party UI integrated to CCE Web Administration tool. Administrator can integrate, update and delete any Third Party UI from this tab. Administrator can integrate up to 100 new Third Party UI pages.
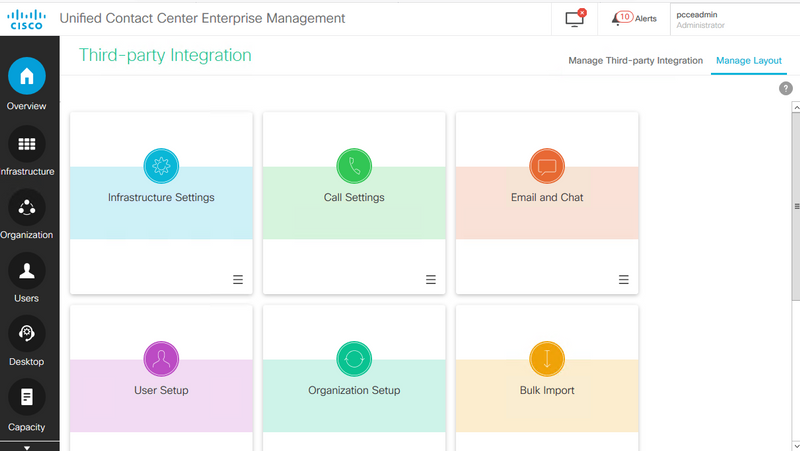
Manage Layout tab displays all the cards and menus.

Step 2. On the Manage Third-party Integration tab, click New.
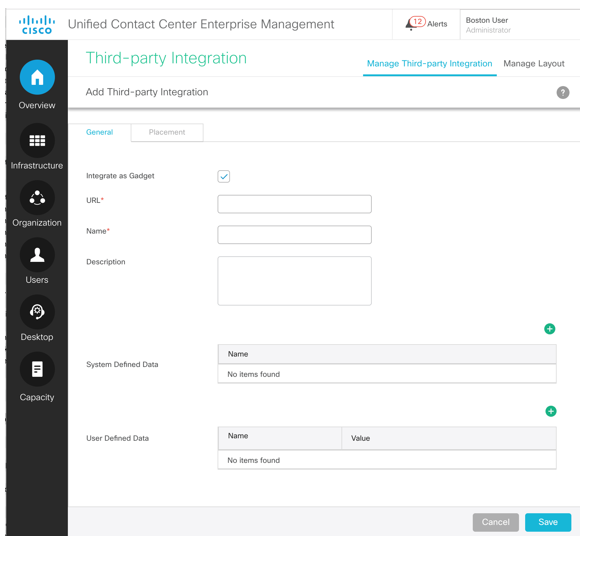
Step 3. In the General tab complete this information.
Integrate as Gadget: If the partner developed administrative UI is in open social gadget XML format, select this check-box.
Un-check the check box, if the third party UI is embeddable external iframe.
URL: Enter the secure URL of the third-party user interface.
Description(optional): Enter up to 255 characters to describe the third-party user interface.There is no restriction on the special characters.
Name: Name of the Third Party UI while accessed from CCE administration tool. This will be used as page title.
System Defined Data (optional): These are predefined variable data based on logged-in user and deployment.
Deployment Type: The current deployment type.
Current User: The credentials of the logged on user.
Current Role: The role of the logged on user.
API-based URL: The base URL on to which the APIs are loaded.
Locale: The current locale setting
User Defined Data(optional): These data are fixed for all users. These are key-value pair.
Note: All these data is sent across to the third party iframe (upon render through query param). The security concern is addressed through the mandatory usage of https for all third party UI.
Step 4. To set the placement of the third-party user interface in the Unified CCE Administration layout, click the Placement tab.
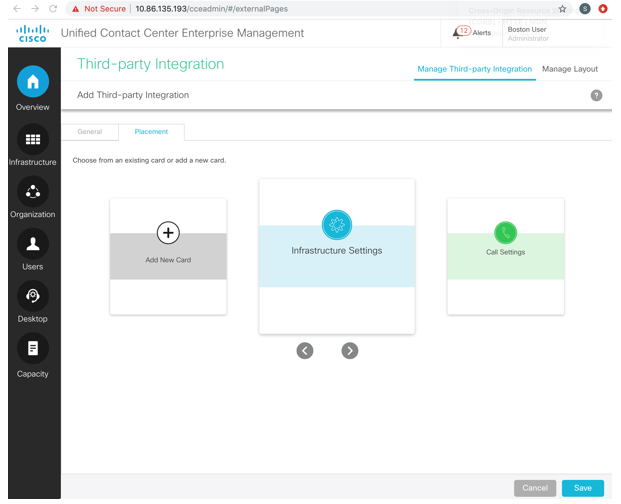
To add to a new menu in a new card:
a) Use the < and > icons to scroll and select the Add New Card card.
b) Click to select a color and icon for the card.
c) Click next to Add Title to enter the card title.
d) Click Save. The new card is displayed in the list of cards.
e) In the new card, click to enter the menu name. Click to save.
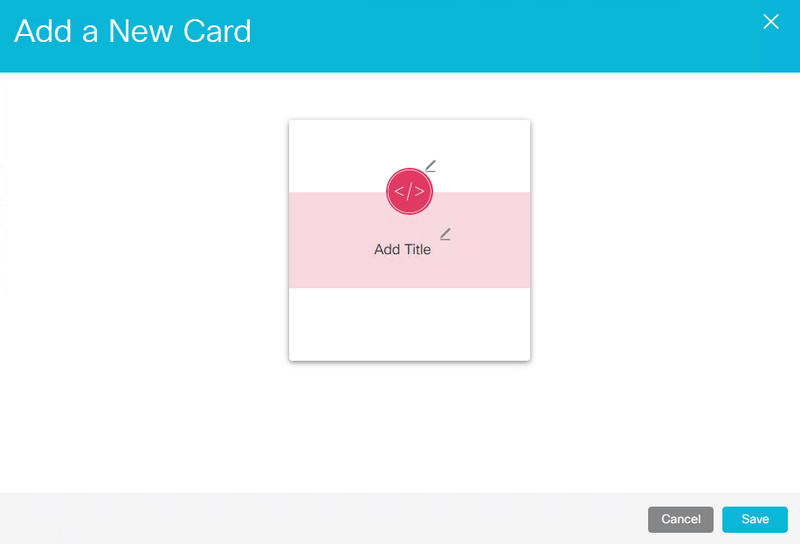
Note: You can only add up to eight cards.
To add to a new menu in a system-defined card:
a) Scroll using the < and > icons to select a system-defined card.
b) Click to enter the menu name. Click to save. In this example, the Features card is used to add a new menu.
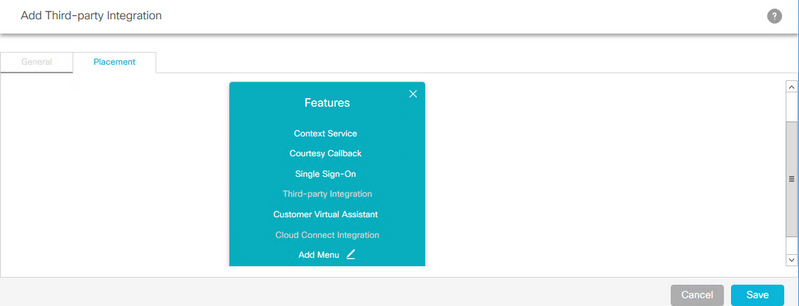
Note: You can only add up to seven menus in each card and in each menu up to five tabs.
To add to a system-defined menu in a system-defined card:
a) Select the menu. The selected menu is highlighted in a red box. In this example the infrastructure settings card and the log Collection menu is selected for the placement of the new UI.
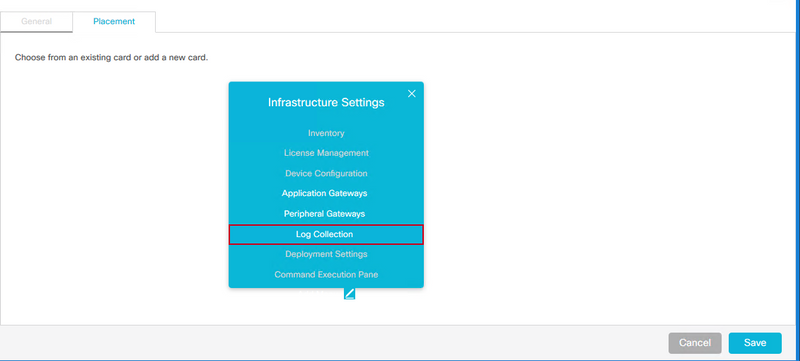
Note: You can only add up to seven menus in each card and in each menu up to five tabs
Step 5 Click Save.
Manage Layout
Manage Layout Tab displays all the cards and menus. Administrator can add menus to system defined cards, change positions of User defined cards, and can edit and delete only user defined cards and menus.
Role Based Access
System administrators can assign access to the third-party user interface to custom roles.
Step 1. Navigate to User Setup > Roles.

Step 2. Select the custom role.

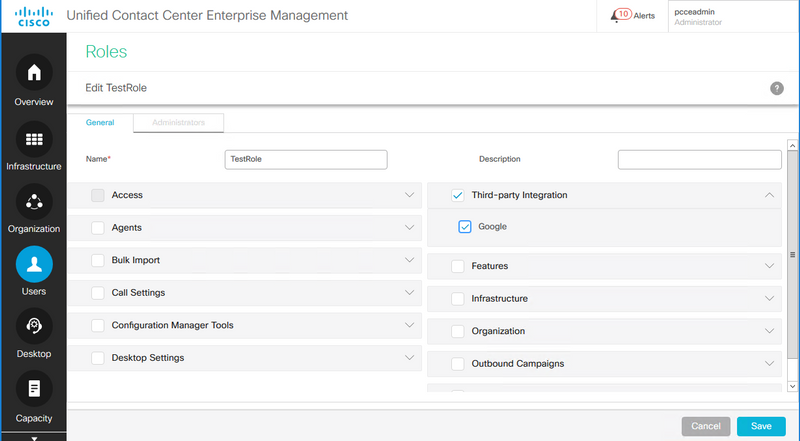
Step 3. Under Third-party Integration, select the check box that is named after the third-party user interface (for example, if the name of the third-party user interface is Google, CCE Administration creates a check box named Google) and click Save.
Verify
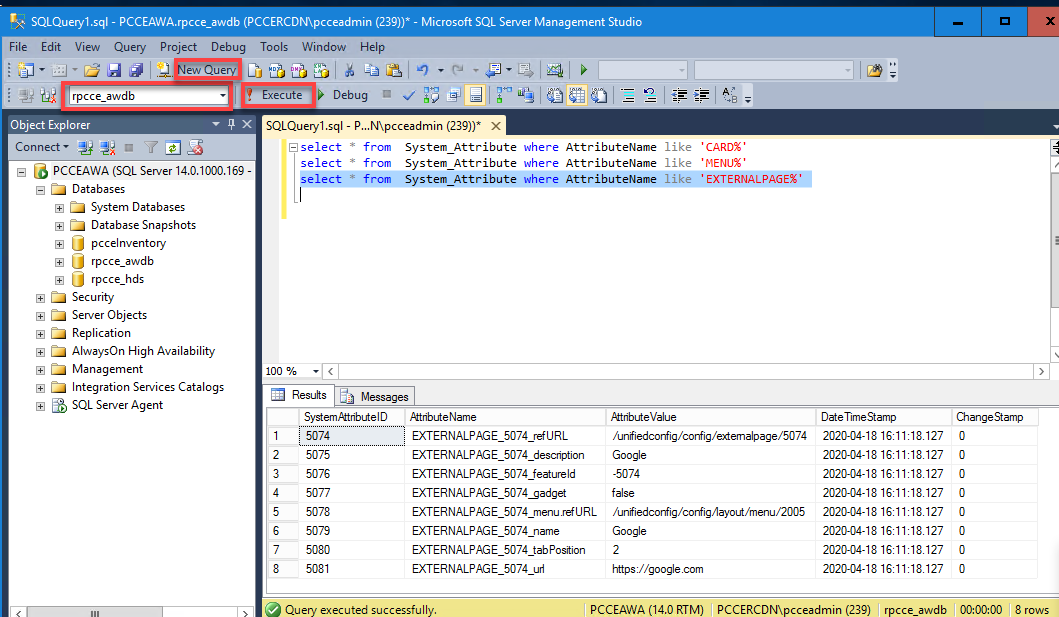
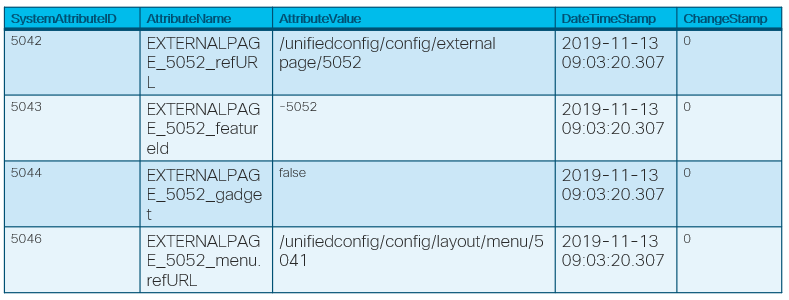
Third Party Integration feature uses System_Attribute Table in the configuration database (Logger and AW) to store Card, Menu, Gadget and Layout configuration. Here is an example of the third-party integration information added to the database.
Step 1. On the AW server, open Microsoft SQL Server Management Studio (MSSMS).

Step 2. On the MSSMS, click on New Query tab, select the awdb database and on the query window type the query for the specific component added (CARD, MENU, EXTERNALPAGE).
Step 3. Click on Execute to run the query.
Cards:
select * from System_Attribute where AttributeName like 'CARD%'

Menues:
select * from System_Attribute where AttributeName like 'MENU%'

External Pages:
select * from System_Attribute where AttributeName like 'EXTERNALPAGE%'
Troubleshoot
Scenarios
Here are different scenarios to troubleshoot:
1. Third Party UI does not load and provides an error in console: "A cookie associated with a cross-site resource at <URL> was set without the `SameSite` attribute.”
If X-Frame-Options is set in cookies for Third Party UI, page will not load. Ensure X-Frame-Options are not set for Third Party UI pages.
2. Third Party UI does not load with error: “The request reached the server but it took too long to respond. Try reloading the page.”
This could be an issue with respect to certificates not imported. Ensure you import the appropriate certificate from the host UI machine.
3. New Card and Menu is not displayed in UI:
Step 1. Ensure administrator has logged-out and logged-in again after integration Third Party UI.
Step 2. Check the output of UI Access details API: https://<host>/unifiedconfig/config/uiaccesslist/uiaccessdetails.
Step 3. Check if Third Party UI is registered properly as a new feature: https://<host>/unifiedconfig/config/role/available_features.
Step 4. Check if user role has access to the new Third Party UI: https://<host>/unifiedconfig/config/role/<roleId>.
Step 5. Check browser console logs if there is any error.
Log Analysis
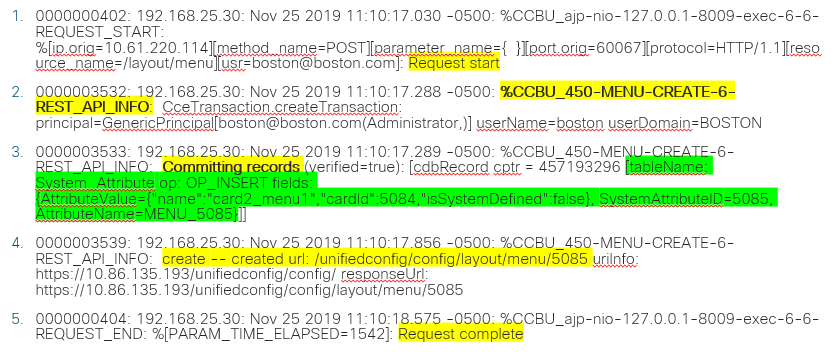
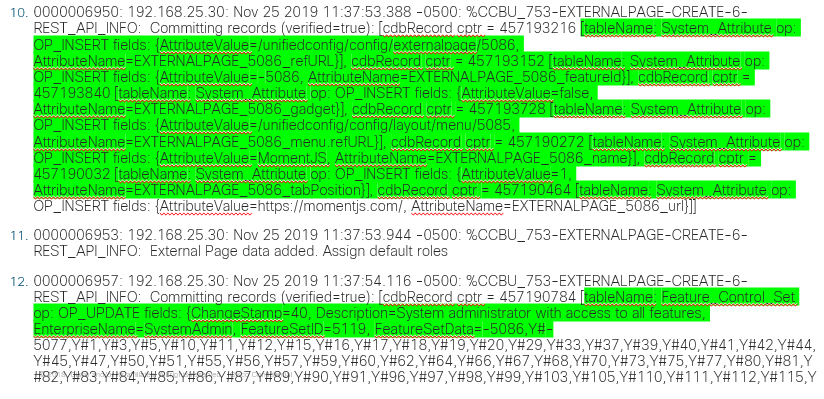
The Tomcat logs c:\icm\tomcat\logs\CCBU.<timestamp> are needed to troubleshoot the scenarios related the APIs request in a third-party integration.
Contributed by Cisco Engineers
- Ramiro AmayaCisco TAC Engineer
- Anuj BhatiaCisco TAC Engineer
- Rahila Valiya PeedikayilCisco Engineering
Contact Cisco
- Open a Support Case

- (Requires a Cisco Service Contract)



 Feedback