Introduction
This document describes how to configure and troubleshoot Cisco Video Integration (CVI) with Microsoft Teams (MS Teams) integration.
Prerequisites
Requirements
Cisco recommends that you have knowledge of these topics:
- Webex Control Hub general configuration
- Office 365 (O365) general configuration
- Endpoint web admin configuration
- Windows Power Shell configuration
- Webex Edge for Devices configuration
Components Used
The information in this document is based on these software and hardware versions:
- O365 Admin Site
- Cisco WebEx Control Hub with A-MST-WX-CVI-ROOMS license
- Windows Power Shell version 5.1
- DX70 with Webex Edge for Devices
The information in this document was created from the devices in a specific lab environment. All of the devices used in this document started with a cleared (default) configuration. If your network is live, ensure that you understand the potential impact of any command.
Background Information
Required Ports
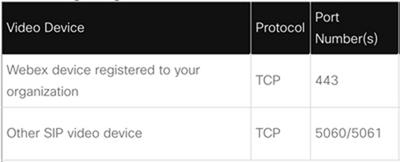
Ports required for signaling:
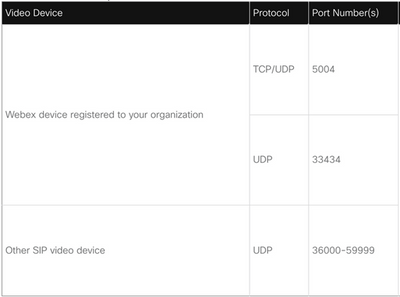
Ports required for media:
Supported Device Types for One Button to Push (OBTP)
- Webex Board, Room, and Desk devices
- Webex Room Kit and Room Phone
- Cisco MX, SX, and DX series
Configuration
Set Up the Video Integration in Control Hub
Step 1. Sign in to https://admin.webex.com.
Step 2. In order to check if the subdomain is set for Webex Session Initiation Protocol (SIP) addresses, navigate to Organization Settings >SIP Address for Cisco Webex Calling.
Note: In case it is not set, review the next document, Change Your Cisco Webex SIP Address.
Step 3. Navigate to. Locate the Video Integration card for Microsoft Teams, selectSet Up. (Additional License is required).
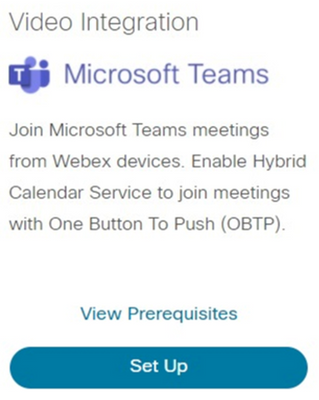
Warning: At this point, A-MST-WX-CVI-ROOMS license is required in order to make further progress.
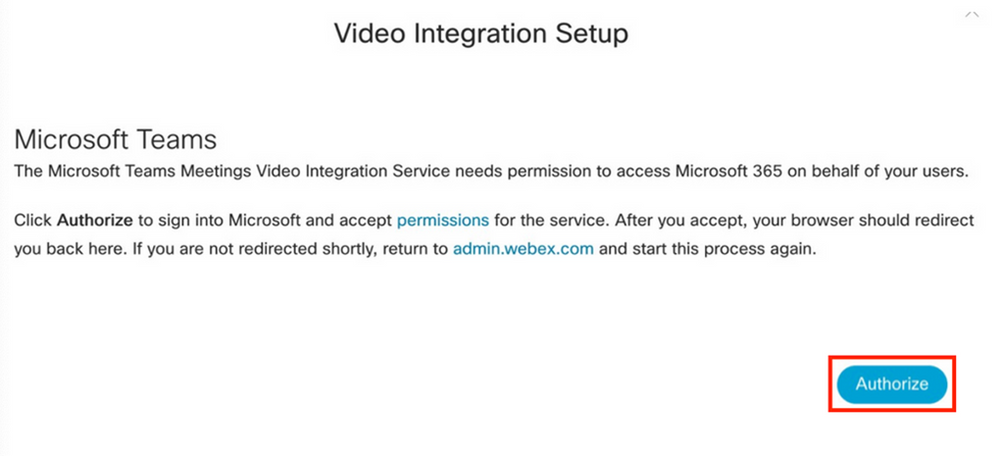
Step 4. On the Video Integration Setup screen, select Authorize.
Step 5. Select the account with the Microsoft Tenant Global Administrator privileges, and enter the credentials.
Note: The Microsoft user has to authenticate at least two separate times. It is recommended the steps are performed by a Microsoft administrator whose account has full administrator access to Control Hub.
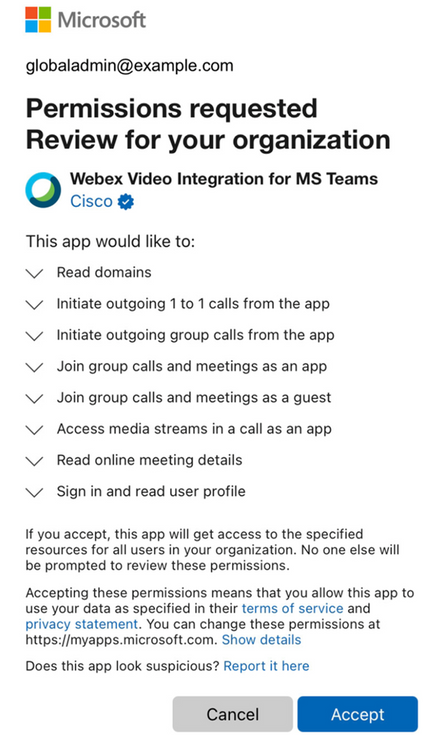
Step 6. In order to validate the requested permissions, select Accept. This grants Webex Video Integration application access your Microsoft tenant. A redirect to the Control Hub Video Integration Setup screen takes place.
Step 7. Open a PowerShell window on your computer and install the MicrosoftTeams PowerShell module if not already installed with the next command:
Install-Module MicrosoftTeams -AllowClobber
Step 8. Import MicrosoftTeams module and connect to your Teams tenant with the next command:
Import-Module MicrosoftTeams
Connect-MicrosoftTeams
Step 9. A Microsoft sign-in page appears. Enter the credentials for the user with Microsoft Teams administration privileges for the tenant. If the process is successful, feedback is provided about the account and tenant is successfully signed in.
Step 10. Navigate to Video Integration setup screen in Control Hub, select the clipboard button in order to copy the text of the New-CsVideoInteropServiceProvider section, from the first text box and paste it into the PowerShell session and confirm.
Step 11. Select how you want to enable the integration for your users. Use the examples as reference for the integration for all users, or per user as shown in the next examples:
All users:
Grant-CsTeamsVideoInteropServicePolicy -PolicyName
 CiscoServiceProviderEnabled -Global
Per User:
Grant-CsTeamsVideoInteropServicePolicy -PolicyName
CiscoServiceProviderEnabled -Identity
Step 12. Select Ok to complete the setup.
Note: PowerShell changes to Microsoft tenant can take time to propagate in the Microsoft 365 environment. Microsoft says this can take up to 6 hours, although it typically takes less than 20 minutes.
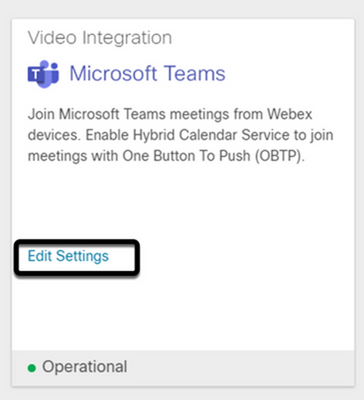
Step 13. In case access to the PowerShell command text after configuration is not completed, navigate to Control Hub > Hybrid > Services > Video Integration and select Edit settings.
Troubleshoot
Case 1. Command Install-Module not Recognized in Windows Power Shell
When command Install-Module is configured on Windows PowerShell, no variation from the command is recognized by the console:

Step 1. With an Windows Admin account, open Windows PowerShell and run the command Get-Command on the console in order to validate if Install-Module is listed as a valid command.
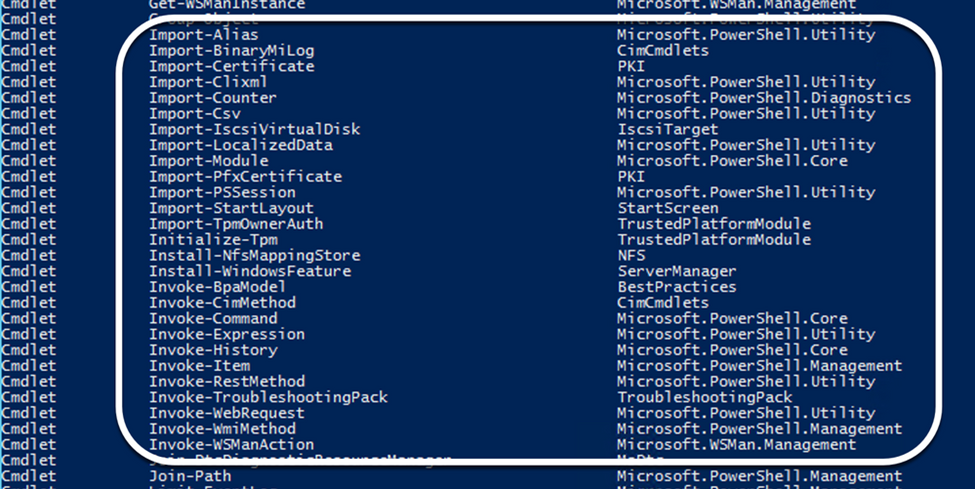
Step 2. In case it is not listed, run the command Get-Host and validate the current PowerShell version:

Step 3. In case PowerShell current version is older than 5.0, upgrade to any supported version mentioned on the next Microsoft document: Install-Module Supported PowerShell version.
Step 4. After the upgrade, verify one more time that the version is now updated with Get-Host command.

Step 5. Run the command Install-Module MicrosoftTeams -AllowClobber, and confirm with Y command in order to continue with the regular installation process.

Case 2. Command Install-Module not Recognized in Windows PowerShell
Even with the correct PowerShell version, download process can fail with a similar error as shown in the next image:

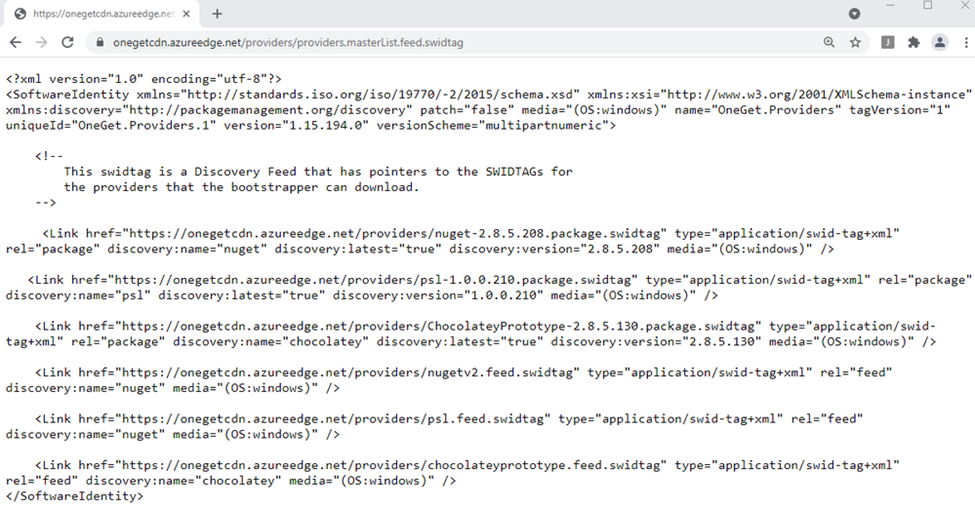
Step 1. Discard any issue with reachability from the server to the Uniform Resource Locator (URL). Copy the URL specified on the PowerShell window, and paste it on a web browser in order to validate content is displayed.
Step 2. If reachability is not an issue, this can mean the issue is related to Transport Layer Security (TLS) protocol version. Microsoft deprecated TLS versions 1.0 and 1.1 as shown in the next document: Microsoft TLS 1.0 and 1.1 Disablement Notice.
Step 3. In order to change TLS default PowerShell version, run the next command:
[Net.ServicePointManager]::SecurityProtocol = Net.SecurityProtocolType]::Tls12

Step 4. Run the command Install-Module MicrosoftTeams -AllowClobber, and confirm with Y command in order to attempt the regular installation process.

Step 5. Confirm the second selection with Y command in order to start the download process.


Step 6. Confirm Microsoft Teams module is installed with the command Get-InstalledModule, and proceed with the deployment process.


Case 3. Meeting is Scheduled but is not Displayed on the Device
When you schedule a meeting on MS Teams, details are displayed within the invite, however, the endpoint does not show the meeting.
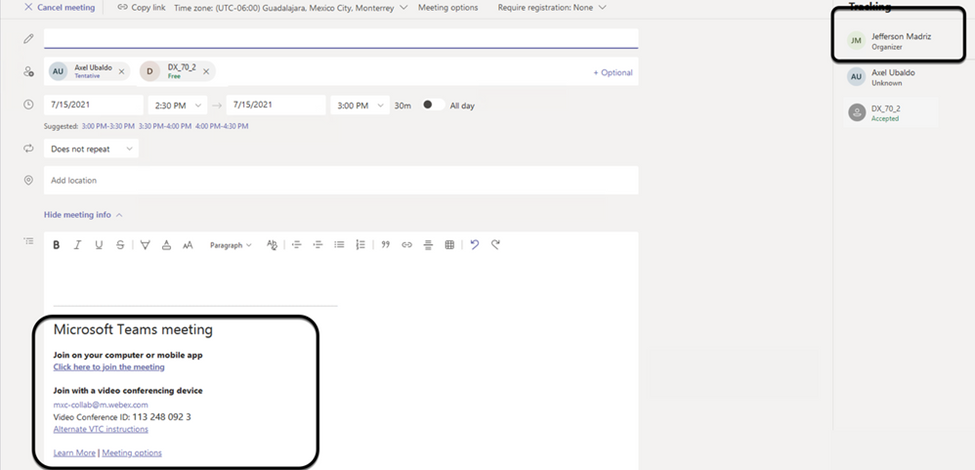
Device Room mailbox appears listed within Microsoft Teams meeting invite, some details are not properly configured.
Webex Control Hub does not display meeting information either.

Step 1. Navigate to O365 admin site https : admin . microsoft . com and log in with an admin account.
Step 2. Navigate to Users > Active Users menu.
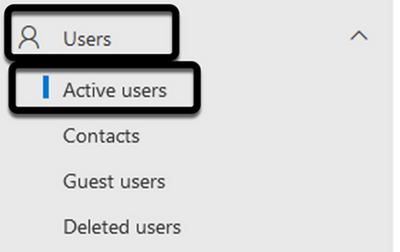
Step 3. Locate the meeting organizer user account and expand its details.
Step 4. Navigate to Licenses and Apps section within the user details in order to find the assigned licenses to it.
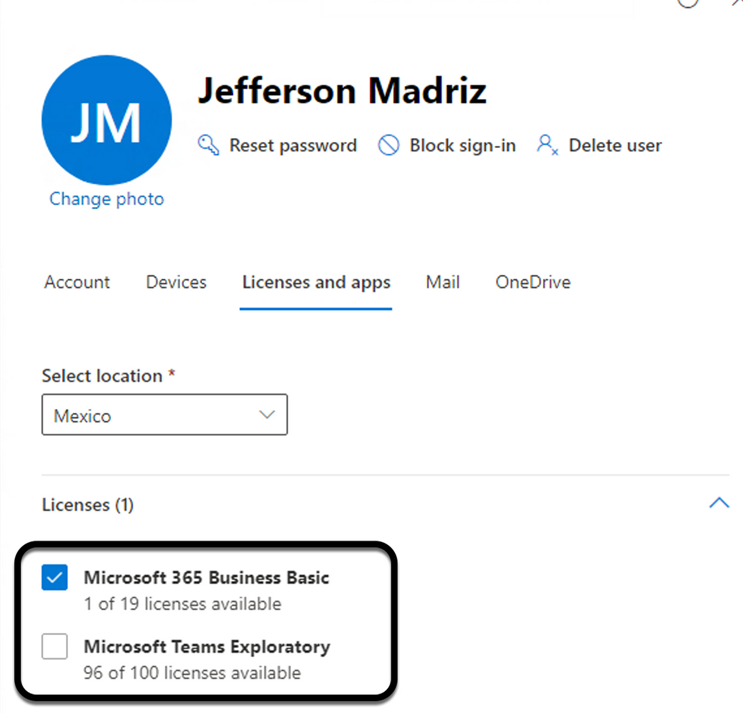
Step 5. Microsoft Teams Exploratory license must be assigned for each user on O365. In case this is not assigned, MS Teams meeting details are not sent to device calendar on Webex Control Hub.
Step 6. Assign the license and test.
Case 4. MS Teams License is Assigned, but Meeting is still not Displayed on the Device
Even after the proper licenses are in place, the meeting is not displayed yet on the device calendar with the same banner from Webex Control Hub:

Step 1. Navigate to https://admin.webex.com.
Step 2. Navigate to Management > Workspaces, in order to find the affected device listed.
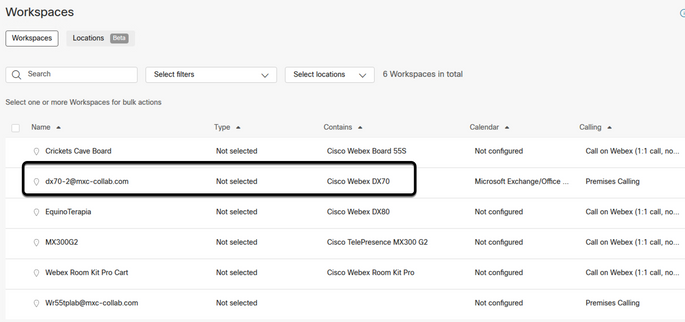
Step 3. Open the device details, and locate Calendar section. Validate the Email Address configured for that device.
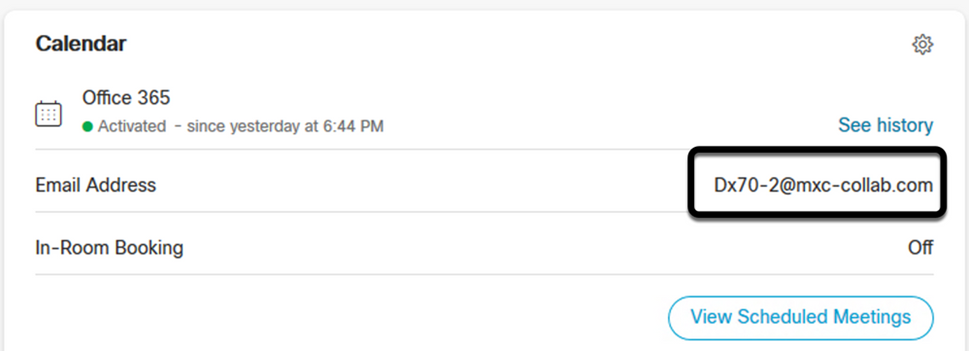
Email Address assigned to the device must match the device Workspace display name on Control Hub, and Username and email on O365 User configuration. In case this information does not match, Control Hub is not able to identify and forward the meeting to the proper device.

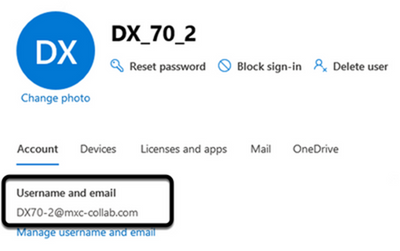
Note: This field is not case sensitive. However, it must match exactly any other letter or symbol.
Verify
Example with logs from a viable Scenario:
When everything is in place and fully operational, you can validate that the implementation works properly on three different perspectives:
Device Calendar on Webex Control hub shows the scheduled meeting with Start, End, Duration and Organizer meeting details:

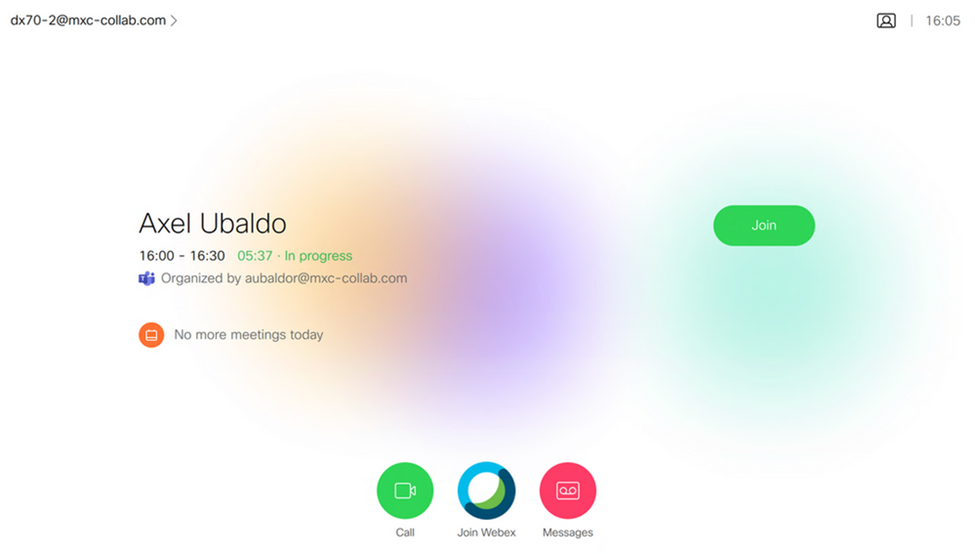
Device shows the One Button to Push, along with the MS Teams Icon on the touch panel:
Additionally, this can be verified in All.log file from endpoint logs. You can see the next information:
It contains the instruction calendar.meeting.create and a unique TrackingID. MSTEAMS is listed as the meeting Type:
2021-07-02T15:51:49.571-05:00 appl[2073]: Wx2 I: NotificationChannel: calendar.meeting.create, trackingid ccc_d0965d59-34ea-437e-9c09-c621e871e873
2021-07-02T15:51:49.572-05:00 appl[2073]: Wx2[3]: CalendarClientImpl::on_meeting_updated_event
2021-07-02T15:51:49.573-05:00 appl[2073]: Wx2[1]: Inserting new meeting - organizer='7ad83eb6-549d-4282-86a4-bf3c05e4b6f3' start='2021-07-02T21:00:00.000Z' id='8fd64402-f665-6bd3-bf15-be436bbe2c97' meetingJoinType='MSTEAMS' meetingJoinURI=true meetingJoinURL=true webexURI=false spaceURI=false callURI=false"
new meeting - organizer='7ad83eb6-549d-4282-86a4-bf3c05e4b6f3' start='2021-07-02T21:00:00.000Z' id='8fd64402-f665-6bd3-bf15-be436bbe2c97' meetingJoinType='MSTEAMS' meetingJoinURI=true meetingJoinURL=true webexURI=false spaceURI=false callURI=false"
An update event from Webex is pushed to the endpoint:
2021-07-02T15:51:49.579-05:00 appl[2073]: Wx2[5]: Creating new Meeting (id=2)
2021-07-02T15:51:49.579-05:00 appl[2073]: Wx2[5]: Attaching CalendarEvent (id=8fd64402-f665-6bd3-bf15-be436bbe2c97) to Meeting (id=2)
2021-07-02T15:51:49.579-05:00 appl[2073]: Wx2 I: Wx2MeetingsHandlerImpl::meetings_updated: num meetings=1


 Feedback