Custom Commands for Endpoint Configuration Templates in TMS
Available Languages
Contents
Introduction
This document describes how to configure custom command templates or custom configuration templates from the Cisco TelePresence Management Suite (TMS).
Prerequisites
Requirements
Cisco recommends that you have knowledge of these topics:
- Cisco TelePresence Management Suite
- Cisco TelePresence TC software
You must have these accesses and privileges:
- Web access to TMS with sufficient privileges in order to access Systems > Configuration Templates > Configuration Templates
- Web access to an endpoint that is running Cisco Telepresence TC software with sufficient privileges in order to access Configuration > API > /command.xml or /configuration.xml
- Secure Shell (SSH) or Telnet access to the endpoint with administrator level privileges
Components Used
The information in this document is based on these software and hardware versions:
- Cisco TelePresence Management Suite Version 14.2.2
- Cisco TelePresence Codec C40 (C40) with Cisco TelePresence TC Software Version TC6.2.1
The information in this document was created from the devices in a specific lab environment. All of the devices used in this document started with a cleared (default) configuration. If your network is live, make sure that you understand the potential impact of any command.
Related Products
This document can also be used with these hardware and software versions:
- Cisco TelePresence Management Suite Versions 13.x - 14.x
- Cisco TelePresence TC Software Versions TC6.0 - TC6.2.1
Configure
Create Simple Command Strings
Custom command templates are commonly used in order to set administrator passwords, because there is no predefined template in TMS for endpoints that run TC software. This example uses the /command.xml file.
The xCommand string for this setting is:
Xcommand SystemUnit AdminPassword Set Password: NewPassword
Navigate to Configuration > API>/command.xml, and review the /command.xml file located in the endpoint web interface:
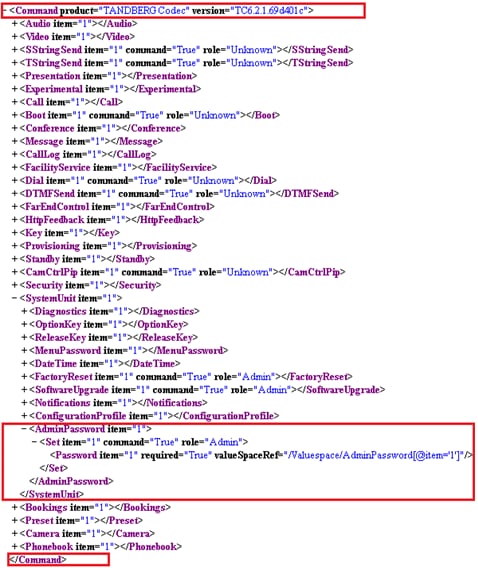
Notice that the format is the same as the xCommand string with the exception of the closing tags necessary for XML. This yields the XML string that changes the AdminPassword:
<Command>
 <SystemUnit>
  <AdminPassword>
   <Set>
    <Password>NewPassword</Password>
   </Set>
  </AdminPassword>
 </SystemUnit>
</Command>
NewPassword is your choice of password.
Create Multi-Part Command Strings
You can use a custom command template for a multi-part command string, such as the common use of feedback expressions in order to determine which events the endpoint reports to TMS.
This is an example of the Telnet/SSH command string:
xcommand HttpFeedback Register FeedbackSlot: 1 ServerUrl:
http://172.30.10.7/tms/public/feedback/code.aspx
Expression: /History/CallLogs/Call Expression: /Status/Call[Status='Connected']
Expression: /Status/H323/Gatekeeper Expression: /Status/SIP/Registration
Expression: /Status/Network/Ethernet/Speed Expression: /Event/CallSuccessful
Expression: /Event/Message/Prompt/Response Expression: /Configuration
Expression: /Event/CallDisconnect Expression: /Status/Call
Review the /command.xml file:
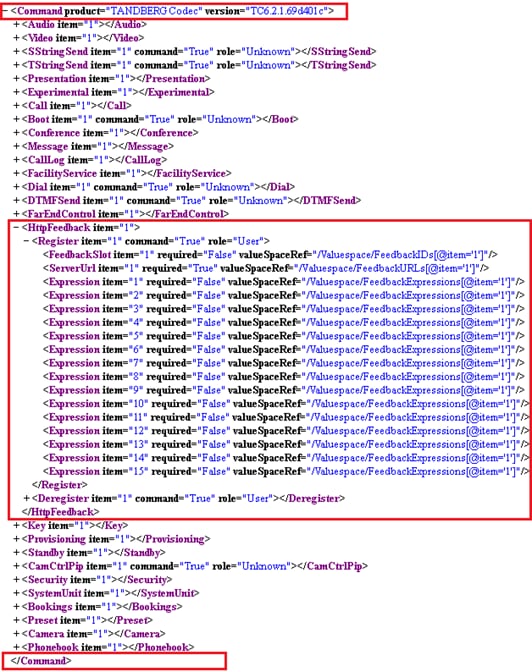
Compare the command string to the /command.xml file. This yields the equivalent XML string:
<Command>
 <HttpFeedback>
  <Register>
   <FeedbackSlot>1</FeedbackSlot>
   <ServerUrl>http://172.30.10.7/tms/public/feedback/code.aspx</ServerUrl>
   <Expression item="1">/History/CallLogs/Call</Expression>
   <Expression item="2">/Status/Call[Status='Connected']</Expression>
   <Expression item="3">/Status/H323/Gatekeeper</Expression>
   <Expression item="4">/Status/SIP/Registration</Expression>
   <Expression item="5">/Status/Network/Ethernet/Speed</Expression>
   <Expression item="6">/Event/CallSuccessful</Expression>
   <Expression item="7">/Event/Message/Prompt/Response</Expression>
   <Expression item="8">/Configuration</Expression>
   <Expression item="9">/Event/CallDisconnect</Expression>
   <Expression item="10">/Status/Call</Expression>
  </Register>
 </HttpFeedback>
</Command>
Create Multi-Task Command Strings
Unlike SSH commands, you can use custom command templates in order to create multi-task commands. This example combines the two previous examples and sets both the HttpFeedback and AdminPassword with a single custom command string:
<Command>
 <HttpFeedback>
  <Register>
   <FeedbackSlot>1</FeedbackSlot>
   <ServerUrl>http://172.30.10.7/tms/public/feedback/code.aspx</ServerUrl>
   <Expression item="1">/History/CallLogs/Call</Expression>
   <Expression item="2">/Status/Call[Status='Connected']</Expression>
   <Expression item="3">/Status/H323/Gatekeeper</Expression>
   <Expression item="4">/Status/SIP/Registration</Expression>
   <Expression item="5">/Status/Network/Ethernet/Speed</Expression>
   <Expression item="6">/Event/CallSuccessful</Expression>
   <Expression item="7">/Event/Message/Prompt/Response</Expression>
   <Expression item="8">/Configuration</Expression>
   <Expression item="9">/Event/CallDisconnect</Expression>
   <Expression item="10">/Status/Call</Expression>
  </Register>
 </HttpFeedback>
 <SystemUnit>
  <AdminPassword>
   <Set>
    <Password>NewPassword</Password>
   </Set>
  </AdminPassword>
 </SystemUnit>
</Command>
Review the /command.xml file and see how it maps to the custom multi-task command string:
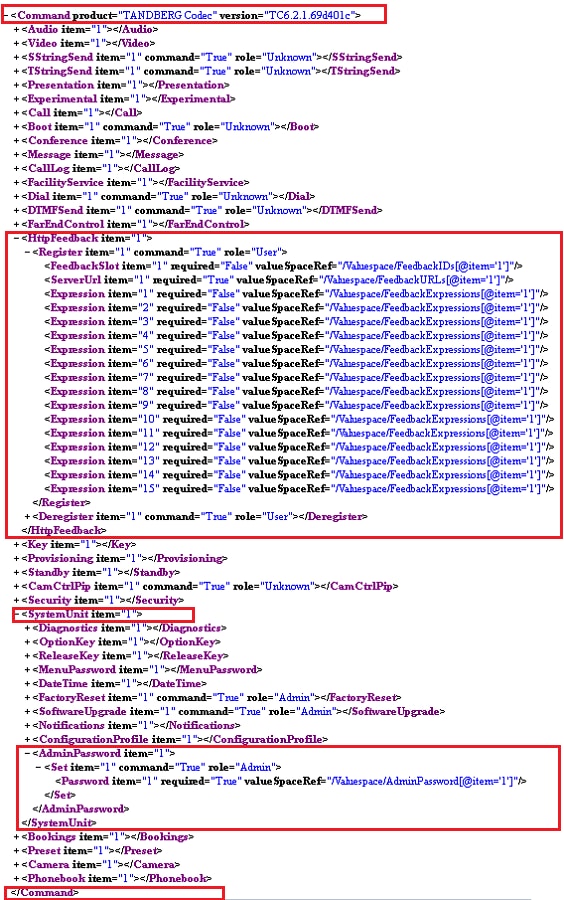
Create Simple Configuration Strings
This example sets the DefaultCall protocol to H323. This is the SSH/Telnet command:
Xconfiguration Conference DefaultCall protocol: H323
Review the /configuration.xml file:
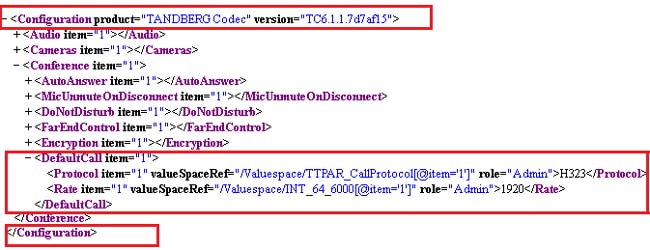
Compare the command string to the /command.xml file. This yields the equivalent XML string:
<Configuration>
 <Conference>
  <DefaultCall>
   <Protocol>H323</Protocol>
  </DefaultCall>
 </Conference>
</Configuration>
Create Multi-Part Configuration Strings
Unlike Xcommand strings that let you run a command in order to set multiple components, xConfiguration strings only support a single configuration change per string. Therefore, this section does not apply.
Create Multi-Task Configuration Strings
As with custom command strings, you can combine multiple configuration strings in a single custom configuration XML string. This example uses these xConfiguration strings as a base:
xConfiguration H323 Profile 1 H323Alias ID: c40-1.lab.h323@tac.lab
xConfiguration H323 Profile 1 H323Alias E164: 180004
xConfiguration H323 Profile 1 CallSetup Mode: Gatekeeper
xConfiguration H323 Profile 1 Gatekeeper Address: taccluster.tac.lab
xConfiguration H323 Profile 1 Gatekeeper Discovery: Manual
xConfiguration SIP Profile 1 URI: c40-1.lab.sip@tac.lab
xConfiguration SIP Profile 1 DefaultTransport: Auto
xConfiguration SIP Profile 1 Proxy 1 Discovery: Manual
xConfiguration SIP Profile 1 Proxy 1 Address: "taccluster.tac.lab"
Review these sections of the /configuration.xml file:
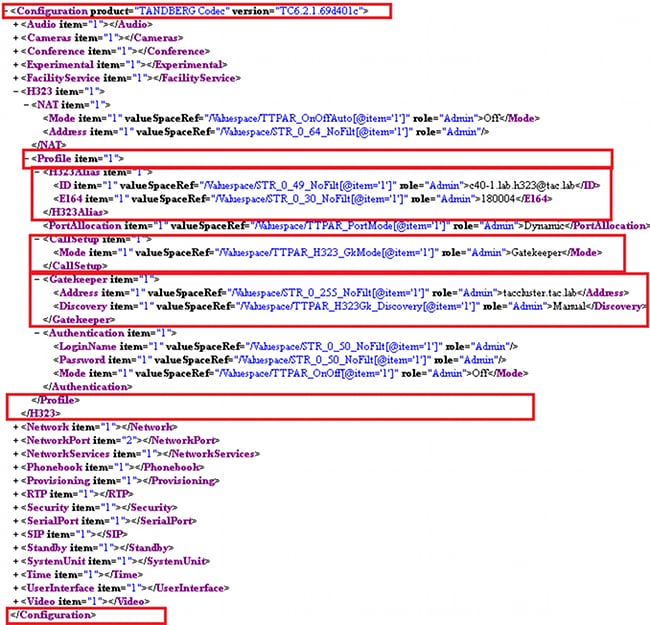
and
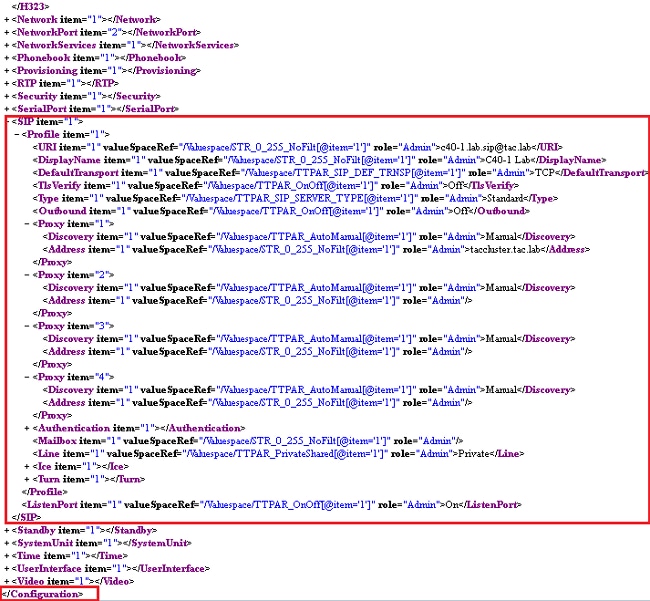
Compare the command string to the /command.xml file. This yields the equivalent XML string:
<Configuration>
 <H323>
  <Profile>
   <H323Alias>
    <ID>c40-1.lab.h323@tac.lab</ID>
    <E164>180004</E164>
   </H323Alias>
  <CallSetup>
   <Mode>Gatekeeper</Mode>
  </CallSetup>
  <Gatekeeper>
   <Address>taccluster.tac.lab</Address>
   <Discovery>Manual</Discovery>
  </Gatekeeper>
  </Profile>
 </H323>
 <Sip>
  <Profile>
   <URI>c40-1.lab.sip@tac.lab</URI>
   <DefaultTransport>Auto</DefaultTransport>
   <Proxy item="1">
    <Discovery>Manual</Discovery>
    <Address>taccluster.tac.lab</Address>
   </Proxy>
  </Profile>
 </Sip>
</Configuration>
Add Created XML Strings to TMS Custom Template
Once you have the XML string identified, add the string to a custom command or configuration template. This procedure describes how:
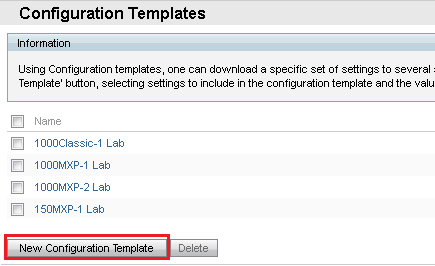
- In the TMS web interface, navigate to Systems > Configuration Templates > Configuration Templates, and select New Configuration Template:
- Click the Select Advanced Settings tab, and enter the word custom in the Filter text field under Cisco TelePresence Group Systems:
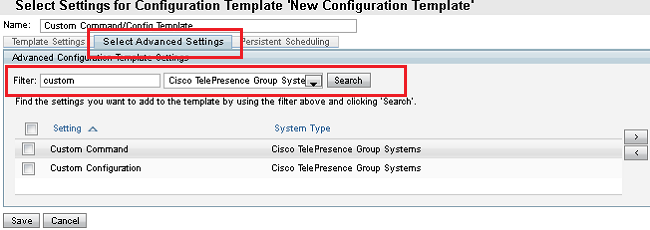
- Check the box next to the appropriate setting (Custom Command and/or Custom Configuration), and click the right arrow (>) to move it.
- Click the Template Settings tab:
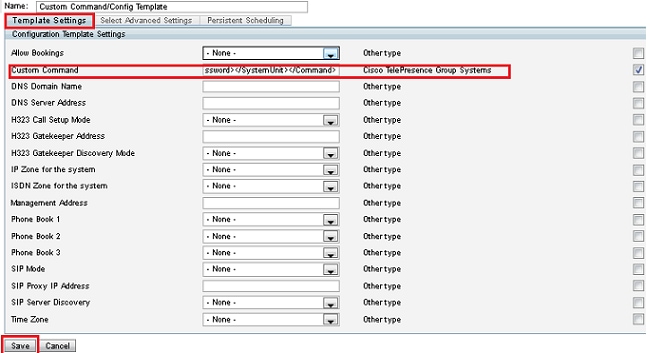
- Enter your XML script into the appropriate Custom Command and/or Custom Configuration text field.
- Select Save.
Verify
There is currently no verification procedure available for this configuration.
Troubleshoot
There is currently no specific troubleshooting information available for this configuration.
Revision History
| Revision | Publish Date | Comments |
|---|---|---|
1.0 |
19-Feb-2014 |
Initial Release |
Contact Cisco
- Open a Support Case

- (Requires a Cisco Service Contract)


 Feedback