Introduction
This document describes the recommended steps to upgrade Cisco Meeting Server (CMS) to avoid any unexpected issues.
Prerequisites
Requirements
Cisco recommends that you have knowledge of these topics:
- CMS Server deployment and configuration.
- VMware Elastic Sky X Integrated (ESXI).
- The required software package from Software Download.
- Secure File Transfer Protocol (SFTP)
Components Used
This document is not restricted to specific software and hardware versions.
- CMS Server 2.5.1
- Putty or similar application
- WinSCP (or similar application)
Note: This procedure applies to all versions of CMS from 2.0 to 2.6.
The information in this document was created from the devices in a specific lab environment. All of the devices used in this document started with a cleared (default) configuration. If your network is live, ensure that you understand the potential impact of any command.
Note: To upgrade 2.9 to 3.0 software version, there are some special considerations that can be consulted in the Guidance for Smooth Upgrade from Cisco Meeting Server 2.9 to 3.0 (and Onwards)
Background Information
Key points to be noted before the upgrade procedure.
- Validate the compatibility for the version in the release notes at Products Release Notes.
- Ensure you copy the cms.lic file and certificates along with backup, those files are overwritten on the rollback process (in case it is needed). The .JSON file is not overwritten and does not need to be re-uploaded.
- The process explained in this document is the same for all CMS nodes in a cluster.
Configure
Upgrade
Step 1. Take a Backup of CMS Configuration.
- Use putty to Log in to CMS Server Command Line Interface (CLI).
- Run the command backup snapshot <filename>.

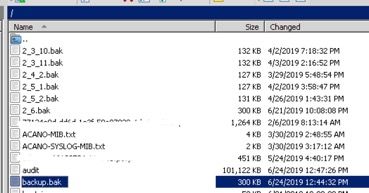
- Use winSCP to Log in to the CMS server via SFTP on port 22.
- Download backup file created to a safe location.
- In the example shown in this document, backup.bak.

Step 2. Upgrade the Server.
- Extract the downloaded software package zip file.
- The extracted file must be called upgrade.img.
- Use WinSCP (or similar application) to Log in to CMS Server uses SFTP on port 22.
- Upload the upgrade.img file to the server.

- Use Putty to Log in to CMS Server CLI.
- Run the command upgrade.
- Ensure to enter capital letter Y when the CMS asks for confirmation.

Note: If the CMS is clustered ensure you Upgrade all Core servers one by one. Start with the non-database servers first, followed by the peer database servers, and the primary database server last. After CMS upgrade, run the command database cluster status on all servers. Once all database servers are connected and in sync, navigate to the current primary database server and run the command database cluster upgrade_schema.
Downgrade
Step 1. Downgrade the Server.
- Follow exact same process for an upgrade in order to downgrade back to the old version.
- Once the CMS server is downgraded, Log in to CMS Server CLI.
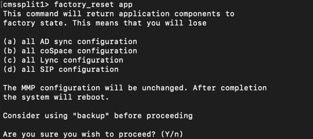
- Run the command factory_reset app and wait for the CMS server to reboot from factory reset.
Caution: The factory reset command deletes the CMS configuration, it is important to take the backup in order to restore the previous configuration. It is important to note, that the CMS version where the backup was taken, must match with the CMS version where the CMS was downgraded.

Step 2. Rollback the Configuration.
- Once the system comes back, Log in to CMS Server CLI.
- Run the command backup rollback <name> to revert backup taken before upgrade.
- In the example shown in this document, backup rollback backup.bak
Note: In case Extensible Messaging and Presence Protocol (XMPP) cluster is used, it must be Re-clustered, navigate to the next link in order to cluster again: Configure XMPP Resiliency
Caution: The backup rollback command overwrites the current configuration as well as the license.dat file, certificates, and private keys on the system, and reboots the CMS. Therefore it must be used with caution. Ensure you copy your current cms.lic file and certificates before because they are overwritten in the backup rollback process. The .JSON file is not overwritten and does not need to be re-uploaded.
Verify
- Log in to CMS Server CLI.
- Run the command version.
- Validate the CMS is in the correct version.

- Additionally, this can be validated in the web interface.
- Navigate to Status > General.


 Feedback