Introduction
This document describes how to configure camera presets on Tandberg Codec (TC) endpoints.
Camera Presets are pre-saved values of Pan, Tilt, Zoom, and Focus (PTZF) of the camera with respect to the desired positions. You can move the cameras and have them focus on a particular point and save it as a Preset to be recalled later during calls. This can be used to point the camera to different seats where the participants are sitting, or maybe to whiteboard for classes etc.
Prerequisites
Requirements
Cisco recommends that you have knowledge of these topics:
- Using the Touch panel and the Remote Control
- Application Program Interface (API) /Command Line Interface (CLI) of TC software
Components Used
This document is not restricted to specific software and hardware versions.
The information in this document was created from the devices in a specific lab environment. All of the devices used in this document started with a cleared (default) configuration. If your network is live, make sure that you understand the potential impact of every command.
Configure
Option 1. Set Presets with Hand Held Remote Control
Here are the steps in order to setup the presets with the remote control:
Step 1. Click the Menu button on the remote.
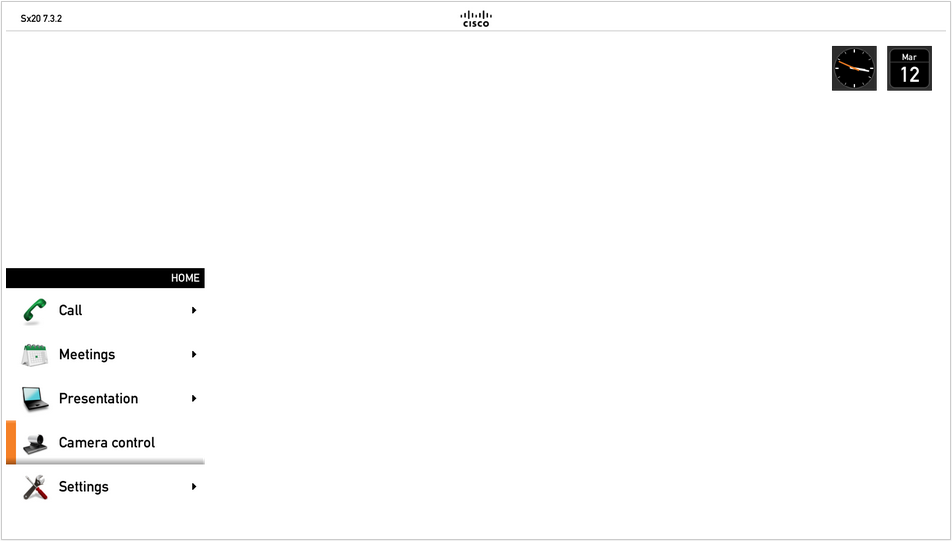
Step 2. Select Camera Control from the Menu as seen in the previous image.
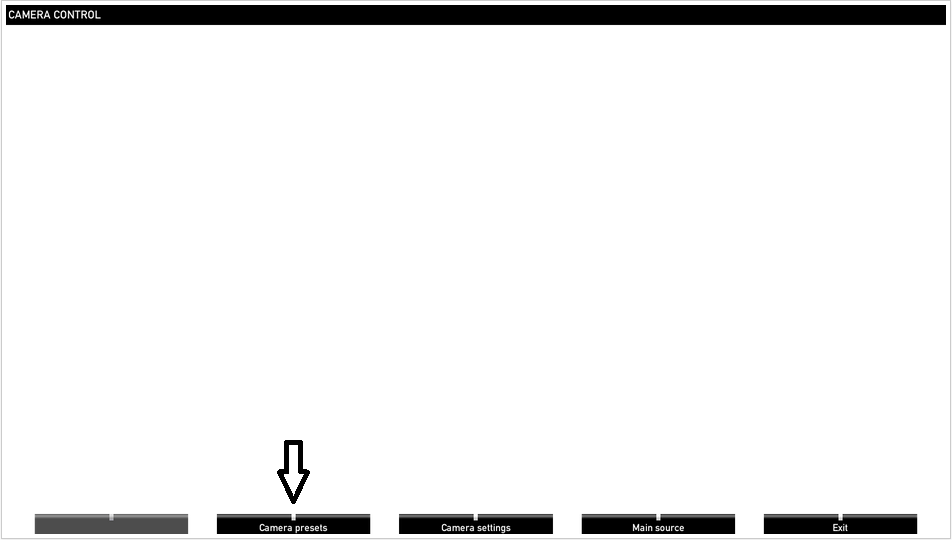
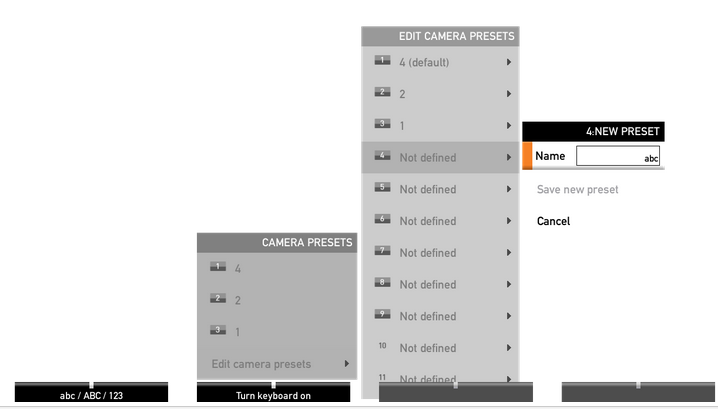
Step 3. Move the camera/cameras to the desired positions, and then select the Camera Preset option with the remote (this option is displayed on the bottom of the display) and save the position of the camera/cameras with either a name or a number as seen in the image.
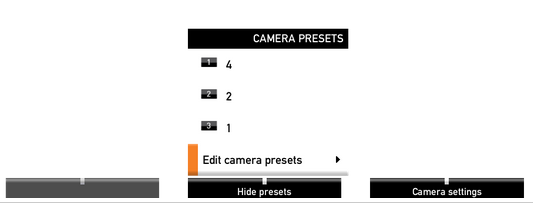
Step 4. You can save a number of camera positions in different presets as seen in this images.
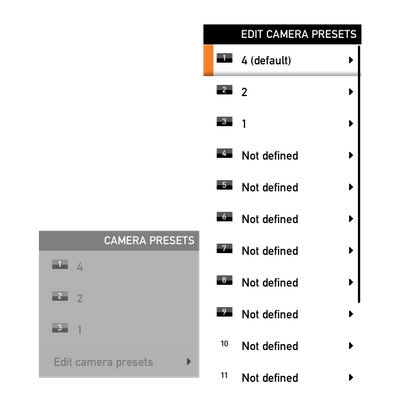
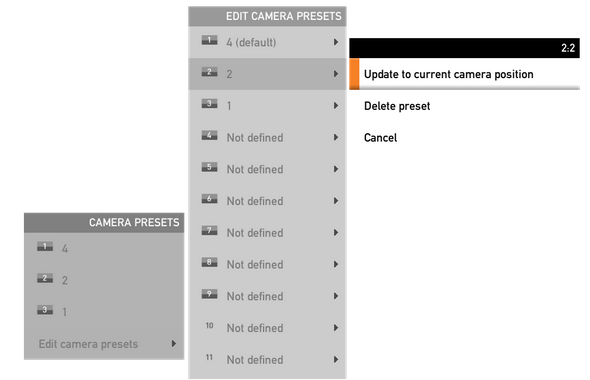
Step 5. You can also reset/delete the preset by selecting the pre-saved value as seen in this image.
Note: If there are more than one cameras connected, the preset will save the values for all the cameras connected. If the camera preset is recalled, all the cameras will move to the position saved.
Recalling these presets is very simple, you can use the Preset key on the remote control and select the desired preset saved earlier, or simply use the same Camera Control option and then select the preset number or name.
Option 2. Set Presets with Touch Panel
Touch 8
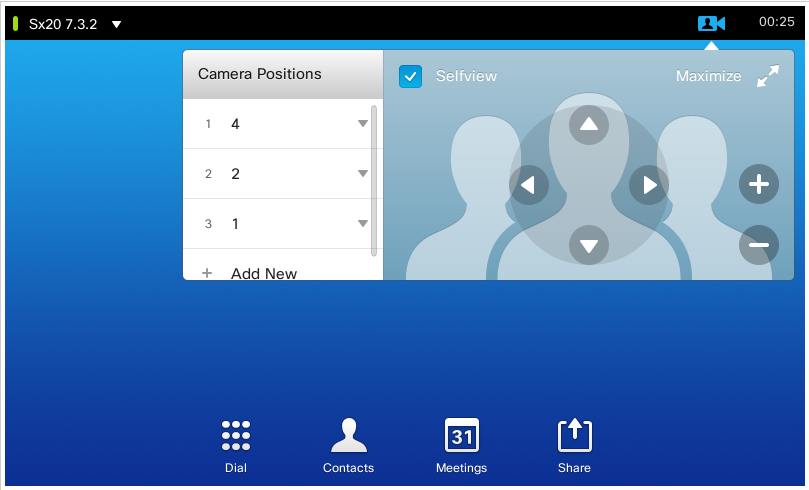
Step 1. Click the Camera Icon on the top right side of the touch screen, it is right next to where the time is displayed as seen in this image.
Step 2. Move the camera to the desired position with the arrows and then click on Add New as seen in this image.
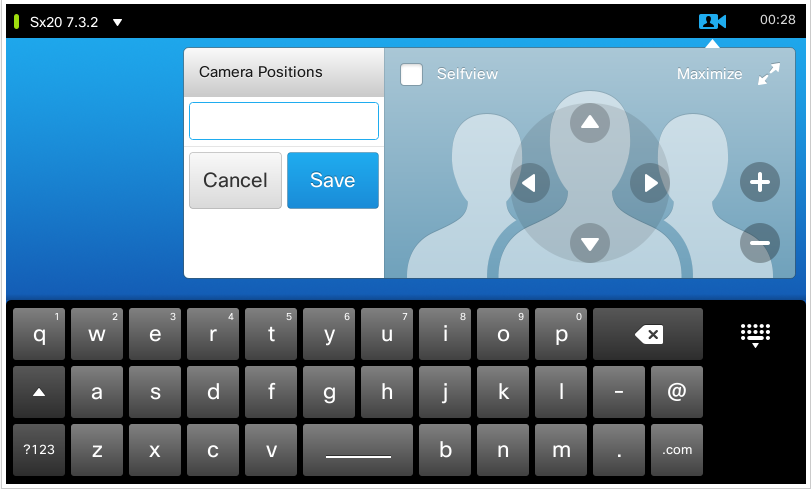
Step 3. Save the preset with desired values/names.
Step 4. In order to recall the presets, simply click on any pre-saved Preset.
Step 5. For Deleting/modifying the Preset, press the Down Arrow right next to the Preset Value/Name as seen in this image.
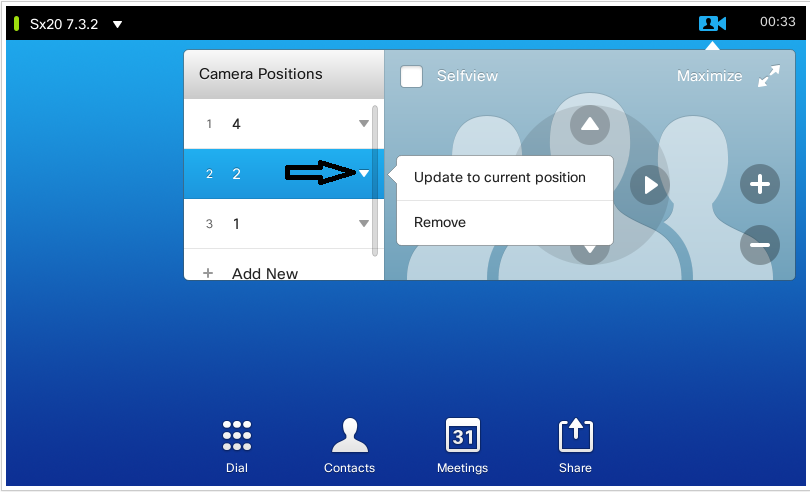
Touch 10
This kind of touch panel is used with SX80 which generally has a speaker track connected to it. And, the speaker track does not give an option to save presets as it does the job of tracking active speakers. In systems where there is no speaker track camera (MX profiles with single camera), the steps to save the camera presets are the same as earlier.
However, where there is a speaker track connection, you do not find any option to control or save camera positions as the camera Tracking option is enabled which can be seen on the top right side of the touch panel, as seen in this image.
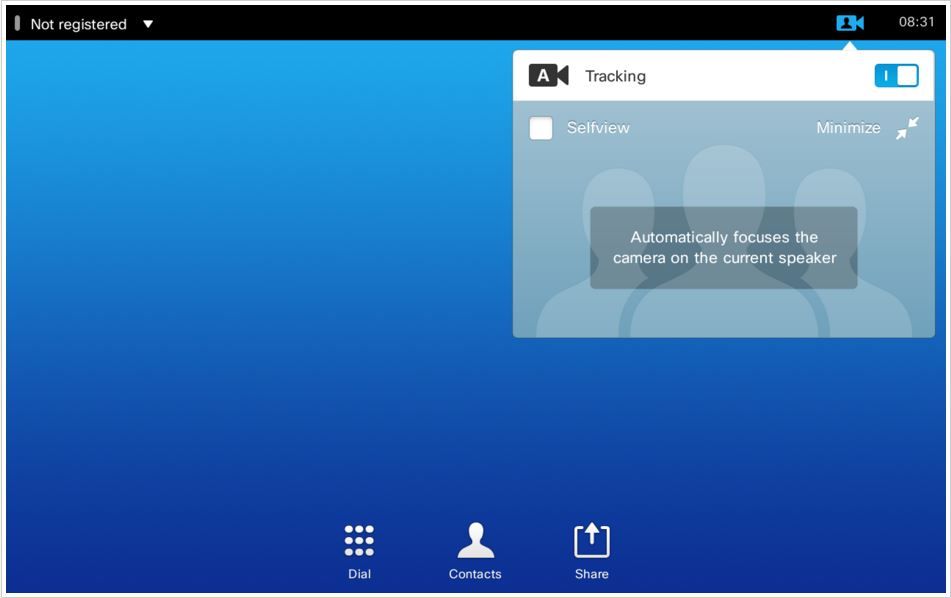
Once you turn off the tracking, you get the option to move the cameras separately by selecting them individually one by one as seen in this image.
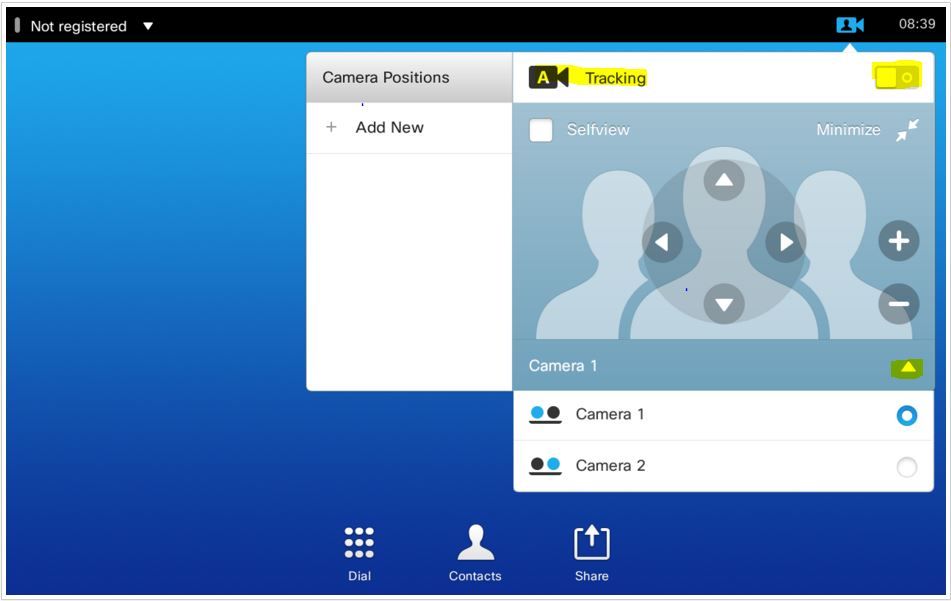
And then, you can save their positions as illustrated for the Touch 8.
Note: The position of both the cameras is saved in a single preset. So you can move both the cameras individually to point to different locations, and then save them as 1 preset. However, the Main Video Source Selection will still have to be done manually from the touch panel as seen in this image.
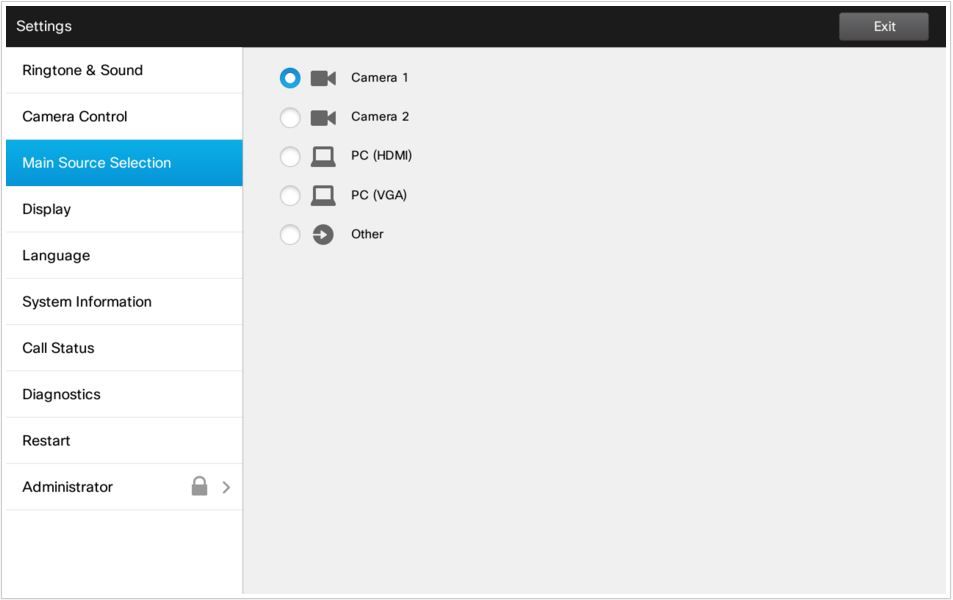
Option 3. Set Presets with CLI Commands
You can use these commands in order to save/activate/remove presets. This information is also available in the API guide of every software/product.
- xCommand Camera PositionSet
Position the camera by defining the pan, tilt, zoom and focus parameters. If the camera is placed in a daisy chain you need to know the CameraId for the camera you want to address.

Requires user role: USER

Parameters:

CameraId(r): <1..7>

Pan: <-65535..65535>

Tilt: <-65535..65535>

Zoom: <0..65535>

Focus: <0..65535>

Example:


xcommand Camera PositionSet CameraId: 1 pan:140 tilt: 140 zoom:4096 focus: 147
Store the connector selections for all video input sources and the current position for all cameras.
Note: The information about all video input sources and all camera positions are included in the same preset. The system may hold 15 predefined video input presets.
These presets are available for far end control, i.e. they are referred in the PresetId parameter of the xCommand FarEndControl Preset Activate command.
In contrast, the xCommand Camera Preset commands applies to individual cameras only. Those presets are not available for far end control.
PresetId: The ID of this preset.

Type: Currently it makes no difference if you select Camera or All. However, this may change in the future (other audio or video settings may be included in a preset). If you want to ensure that a preset only affects camera positions we recommend that you select Camera.

Description: Enter a description of the camera preset.

Requires user role: USER

Parameters:

PresetId(r): <1..15>

Type(r): <All/Camera>

Description: <S: 0, 255>

Example:

xCommand Preset Store PresetId:3 Type:Camera Description:"Left view"
Activate one of the stored local presets.
Note: The information about all video input sources, and PTZF values for all the cameras are included in the same preset. In contrast, the xCommand Camera Preset commands applies to individual cameras only.
PresetId: The ID of the preset you want to activate.
Requires user role: USER
Parameters:
PresetId(r): <1..15>
Example:
xCommand Preset Activate PresetId:3
Delete a preset.
Note: The information about all video input sources, and PTZF values for all cameras are included in the same preset. In contrast, the xCommand Camera Preset commands applies to individual cameras only.
PresetId: The ID of the preset you want to delete.
Requires user role: USER
Parameters:
PresetId(r): <1..15>
Example:
xCommand Preset Clear PresetId:3
Verify
Use this section in order to confirm that your configuration works properly.
The Presets can be verified with these command.
xstatus // preset
*s Preset 1 Defined: True
*s Preset 1 Description: "12345"
*s Preset 1 Type: All
*s Preset 2 Defined: True
*s Preset 2 Description: "1"
*s Preset 2 Type: All
*s Preset 3 Defined: True
*s Preset 3 Description: "ROOF"
*s Preset 3 Type: All
Troubleshoot
This section provides information you can use in order to troubleshoot your configuration.
In order to check the camera status, run these command:
xstatus // camera
*s Camera 1 Capabilities Options: "ptzf"
*s Camera 1 Connected: True
*s Camera 1 DownloadProgress: 0
*s Camera 1 Flip: "Off"
*s Camera 1 HardwareID: "51000003"
*s Camera 1 IpAddress: ""
*s Camera 1 MacAddress: "00:50:60:83:E4:CD"
*s Camera 1 Manufacturer: "Cisco"
*s Camera 1 Model: "PrecisionHD 1080p 4X"
*s Camera 1 Position Focus: 4578
*s Camera 1 Position Pan: 421
*s Camera 1 Position Tilt: 121
*s Camera 1 Position Zoom: 8
*s Camera 1 SerialNumber: "XXXXXXXXXXX"
*s Camera 1 SoftwareID: "S01718-4.0FINAL [ID:40084] 2014-10-08"
*s Camera 1 UpgradeStatus: None
You must check the cables if the camera connection status is False.
Run the command in order to check if the codec was able to recall the presets.
log output on

OK


517171.07 CuilApp User __localtouchdevice__(1002) about to execute command '/Preset/Activate PresetId: 1' from .
517174.39 CuilApp User __localtouchdevice__(1002) about to execute command '/Preset/Activate PresetId: 3' from .
517177.77 CuilApp User __localtouchdevice__(1002) about to execute command '/Preset/Activate PresetId: 2' from .
After recalling preset, run the command:
xstatus // camera
*s Camera 1 Capabilities Options: "ptzf"
*s Camera 1 Connected: True
*s Camera 1 DownloadProgress: 0
*s Camera 1 Flip: "Off"
*s Camera 1 HardwareID: "51000003"
*s Camera 1 IpAddress: ""
*s Camera 1 MacAddress: "00:50:60:83:E4:CD"
*s Camera 1 Manufacturer: "Cisco"
*s Camera 1 Model: "PrecisionHD 1080p 4X"
*s Camera 1 Position Focus: 4573
*s Camera 1 Position Pan: 400
*s Camera 1 Position Tilt: 60
*s Camera 1 Position Zoom: 0
*s Camera 1 SerialNumber: "XXXXXXXXXXX"
*s Camera 1 SoftwareID: "S01718-4.0FINAL [ID:40084] 2014-10-08"
*s Camera 1 UpgradeStatus: None
Now, verify that the camera position has changed.


 Feedback