Access MX Series, C Series, and SX80 Codecs via a Secondary RJ45 Port
Available Languages
Introduction
This document describes access to a codec. If you cannot access a codec over the network, it might be necessary to plug directly into it for access. Most network configuration changes can also be made via a connected touch panel, but if that is down or unavailable you must plug in in order to access the codec. The codec has an internal DHCP server that assigns a laptop an IP address through a secondary Ethernet port for access to the web GUI or CLI. Access to the codec in this manner allows you to resolve network and codec accessibility issues.
Components Required
- Laptop
- Ethernet cable
Related Products
The information in this document can be used with this hardware and any software:
- C40
- C60
- C90
- SX80
- MX200 G2
- MX300 G2
- MX700
- MX800
Access the Codec
First, ensure the laptop is set to get an IP address via DHCP.
On Microsoft Windows, complete these steps:
- Select Control Panel > Network and Internet > Network Connections.
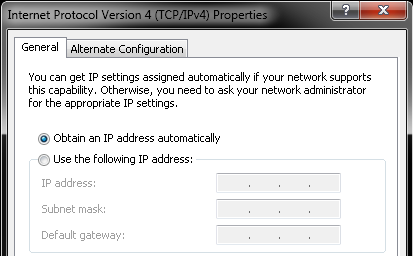
- Right-click the Local Area Connection and select Properties > Internet Protocol Version 4 > Properties.
- Click the Obtain an IP address automatically radio button.

On OS X, select Network > Ethernet > Configure IPv4. This should be set to Using DHCP.
Next, connect the Ethernet cable between the laptop LAN port and one of the secondary ports on the codec (not the network port). You might need to temporarily unplug a peripheral if all Ethernet ports on the codec are used.

Once the cable is plugged in, the computer should automatically get an IP address from the codec. You can check the assigned IP address from the Windows command-line with the ipconfig command or from the OS X terminal with the ifconfig command.

Once you receive the IP address, you should be able to ping the default gateway for this address range 169.254.1.1 and access the web interface or command-line of the codec.
Revision History
| Revision | Publish Date | Comments |
|---|---|---|
1.0 |
11-Nov-2014 |
Initial Release |
Contact Cisco
- Open a Support Case

- (Requires a Cisco Service Contract)

 Feedback