Introduction
This document describes how to allocate more disk space to a Virtual Machine (VM) when the /opt partition(partition for PCP/PCA) is already at 96% or higher
Prerequisites
Requirements
Cisco recommends that you have knowledge of these topics:
You will need root access to the PCA/PCP, if you do not have root access, steps to request for root access are described at the bottom of this document
Components Used
This document is not restricted to specific software and hardware versions.
The information in this document was created from the devices in a specific lab environment. All of the devices used in this document started with a cleared (default) configuration. If your network is live, make sure that you understand the potential impact of any command.
Problem
Following are the symptoms the PCP/PCA will start experiencing when the hard drive(/opt) is at 96% or higher
- Very Slow performance
- User not able to modify anything in the Graphical User Interface (GUI)
- Backups continuously fail
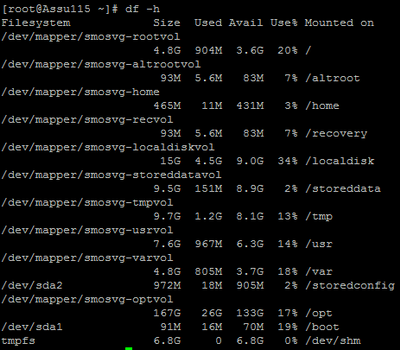
- When the command df -h is run you can see the /opt at 96% or above
Steps to Verify the df -h output
Step 1. Establish a secure shell (SSH) session to the PCP/PCA using an application such as putty, and authenticate with the root account (On the PCA use port 26 and on the PCP use port 22).
Step 2. Input: df -h and look towards the bottom right for /opt, if the usage is 96% or higher you are running into this issue

Solution
You must add additional Hard disk on the VM to resolve this issue
Step 1. Power down the VM
Step 2. Add Extra Hard Disk Drive (HDD) on the VM:
- Log in to Vsphere and right click on your VM.
- Select Power>Power Off.
- Right Click and Select Edit Settings, on the hardware tab select the hard disk 1 (take a note if you provisioned it as thin or thick provisioning) and at the top click Add.
- Add your new Hard disk and use the same provisioning as the first hard disk.
- (typically for PCP 50GB is sufficient and for PCA 100GB will work).
- After this is added, power back on the VM then login as root into your PCP/PCA .
Step 3. Allocate the New HDD Space to /opt:
- Log in to your PCP/PCA as root using Putty or Securecrt.
- Run the command: fdisk -l (this will list the available partitions)
You will see one of the partitions not having a valid partition table
Disk /dev/sdb doesn't contain a valid partition table
Step 3. Run the command : fdisk /dev/sdb
- At the bottom you should see
Command (m for help)

type: n

(this will add a new partition to /dev/sdb)

You will select P for Primary Partition

The Partition number will be 1

The first cylinder will be 1 and last cylinder will be the last cylinder listed, typically the last in the partition, it will list the default and you will put in that number.

Step 4. After you create the partition as above you will need to change the partition to a Linux Logical Volume Manager (LVM) partition
command (m for help)  type: t

    Next you will see: Hex Code (type L to list codes): type 8e
Note: You now have changed the partition to a Linux LVM Partition
Step 5. Write to disk and exit using the below command
Command (m for Help): press w
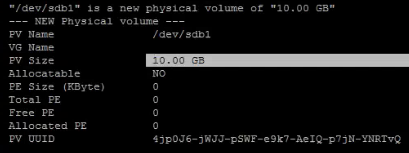
Step 6. Run the command pvcreate /dev/sdb1 to create the /dev/sdb1 physical volume.
Type: pvdisplay, you should see the new Physical Volume with the disk size as allocated

Step 7. Extend the volume group using : vgextend smosvg /dev/sdb1
After it has successfully extended you will see "smosvg successfully extended"
Step 8. Extend the LVM using: lvextend /dev/mapper/smosvg-optvol /dev/sdb1
Step 10. Add the volume to the /opt partition using : resize2fs /dev/mapper/smosvg-optvol
You can Verify the increased disk space using the df -h command:

Requesting Root Access to the PCA/PCP
Note: It is important to ensure that the spaces where applicable are in place
PCA 11.x and above you can follow the below procedure to gain Root access
Step 1.Log in to the PCA through CLI as the Admin User created from install.
Step 2. Input command: root_enable
Step 3. Enter in your root password.
Step 4. Logged in as admin enter in root and enter in your root password to gain access to root.
PCP 12.x and above you will need TAC to provide you with the CLI Access as this is restricted, the process is as below
Step 1. Log in to PCP GUI.
Step 2. Navigate to Administration > Logging and Showtech > Click on troubleshooting account > create the userid and select an appropriate time you will need root access to accomplish this.
Step 3. Provide to TAC the challenge string and they will provide you the password (this password will be very lengthy, do not worry it will work).
Example:
AQAAAAEAAAC8srFZB2prb2dsaW4NSm9zZXBoIEtvZ2xpbgAAAbgBAAIBAQIABAAA FFFFEBE0
AawDAJEEAEBDTj1DaXNjb1N5c3RlbXM7T1U9UHJpbWVDb2xsYWJvcmF0aW9uUHJv FFFFEB81
dmlzaW9uaW5nO089Q2lzY29TeXN0ZW1zBQAIAAAAAFmxsrwGAEBDTj1DaXNjb1N5 FFFFEB8A
c3RlbXM7T1U9UHJpbWVDb2xsYWJvcmF0aW9uUHJvdmlzaW9uaW5nO089Q2lzY29T FFFFEAD0
eXN0ZW1zBwABAAgAAQEJAAEACgABAQsBAJUhvhhxkM6YNYVFRPT3jcqAsrl/1ppr FFFFEB2B
yr1AYzJa9FtO1A4l8VBlp8IVqbqHrrCAIYUmVXWnzXTuxtWcY2wPSsIzW2GSdFZM FFFFE9F3
LplEKeEX+q7ZADshWeSMYJQkY7I9oJTfD5P4QE2eHZ2opiiCScgf3Fii6ORuvhiM FFFFEAD9
kbbO6JUguABWZU2HV0OhXHfjMZNqpUvhCWCCIHNKfddwB6crb0yV4xoXnNe5/2+X FFFFEACE
7Nzf2xWFaIwJOs4kGp5S29u8wNMAIb1t9jn7+iPg8Rezizeu+HeUgs2T8a/LTmou FFFFEA8F
Vu9Ux3PBOM4xIkFpKa7provli1PmIeRJodmObfS1Y9jgqb3AYGgJxMAMAAFB6w== FFFFEAA7
DONE.
Step 4. Log out of your current user and login with the userid you created and the password provided by TAC.
Step 5. Navigate to Troubleshooting Account > Launch > Click on Console Account and create your cli user id and password.
Step 6. Now log in to PCP as the user you created and perform the above steps.
