Introduction
This document describes how to build IOx applications using Vagrant and Virtualbox and deploy them in IOx local manager GUI.
Prerequisites
Windows/ MAC Intel/ Linux
MAC ARM Based - M1/M2/M3
- Git
- Vagrant
- VMWare Fusion
- vagrant-vmware-desktop plugin
To download:
Procedure to Set Up Build Environment Using Vagrant
Summary of Actions
- The vagrantfile configuration sets up a VM environment based on its host machine architecture.
- It configures the VM to use either VMware Fusion or VirtualBox, depending on the architecture
- It provisions the VM with necessary software and tools, including QEMU (Quick EMUlator) , Docker and ioxclient.
- Configruation automatically builds a sample iperf application for amd64 target Cisco platform devices.
Step 1. Clone the Github repository in your local system:
git clone https://github.com/suryasundarraj/cisco-iox-app-build.git
Alternatively, copy and paste the contents of the configuration enclosure into "Vagrantfile". This creates a file with the name "Vagrantfile" in the local system:
# -*- mode: ruby -*-
# vi: set ft=ruby :

# All Vagrant configuration is done below. The "2" in Vagrant.configure
# configures the configuration version (we support older styles for
# backwards compatibility). Please don't change it unless you know what
# you're doing.
Vagrant.configure('2') do |config|
  arch = `arch`.strip()
  if arch == 'arm64'
    puts "This appears to be an ARM64 machine! ..."
    config.vm.box = 'gyptazy/ubuntu22.04-arm64'
    config.vm.boot_timeout = 600
    config.vm.provider "vmware_fusion" do |vf|
      #vf.gui = true
      vf.memory = "8192"
      vf.cpus = "4"
    end
    config.vm.define :ioxappbuild
  else
    puts "Assuming this to be an Intel x86 machine! ..."
    config.vm.box = "bento/ubuntu-22.04"
    config.vm.network "public_network", bridge: "ens192"
    config.vm.boot_timeout = 600
    config.vm.provider "virtualbox" do |vb|
      #vb.gui = true
      vb.memory = "8192"
      vb.cpus = "4"
    end
    config.vm.define :ioxappbuild
  end

  config.vm.provision "shell", inline: <<-SHELL
    #!/bin/bash
    # apt-cache madison docker-ce
    export VER="5:24.0.9-1~ubuntu.22.04~jammy"
    echo "!!! installing dependencies and packages !!!"
    apt-get update
    apt-get install -y ca-certificates curl unzip git pcregrep
    install -m 0755 -d /etc/apt/keyrings
    curl -fsSL https://download.docker.com/linux/ubuntu/gpg -o /etc/apt/keyrings/docker.asc
    chmod a+r /etc/apt/keyrings/docker.asc
    echo "deb [arch=$(dpkg --print-architecture) signed-by=/etc/apt/keyrings/docker.asc] https://download.docker.com/linux/ubuntu $(. /etc/os-release && echo "$VERSION_CODENAME") stable" |  tee /etc/apt/sources.list.d/docker.list > /dev/null
    apt-get update
    apt-get install -y qemu binfmt-support qemu-user-static
    apt-get install -y docker-ce=$VER docker-ce-cli=$VER docker-ce-rootless-extras=$VER containerd.io docker-buildx-plugin docker-compose-plugin
    # apt-get install -y docker.io docker-compose docker-buildx
    usermod -aG docker vagrant
    echo "!!! generating .ioxclientcfg.yaml file !!!"
    echo 'global:' > /home/vagrant/.ioxclientcfg.yaml
    echo '  version: "1.0"' >> /home/vagrant/.ioxclientcfg.yaml
    echo '  active: default' >> /home/vagrant/.ioxclientcfg.yaml
    echo '  debug: false' >> /home/vagrant/.ioxclientcfg.yaml
    echo '  fogportalprofile:' >> /home/vagrant/.ioxclientcfg.yaml
    echo '    fogpip: ""' >> /home/vagrant/.ioxclientcfg.yaml
    echo '    fogpport: ""' >> /home/vagrant/.ioxclientcfg.yaml
    echo '    fogpapiprefix: ""' >> /home/vagrant/.ioxclientcfg.yaml
    echo '    fogpurlscheme: ""' >> /home/vagrant/.ioxclientcfg.yaml
    echo '  dockerconfig:' >> /home/vagrant/.ioxclientcfg.yaml
    echo '    server_uri: unix:///var/run/docker.sock' >> /home/vagrant/.ioxclientcfg.yaml
    echo '    api_version: "1.22"' >> /home/vagrant/.ioxclientcfg.yaml
    echo 'author:' >> /home/vagrant/.ioxclientcfg.yaml
    echo '  name: |' >> /home/vagrant/.ioxclientcfg.yaml
    echo '    Home' >> /home/vagrant/.ioxclientcfg.yaml
    echo '  link: localhost' >> /home/vagrant/.ioxclientcfg.yaml
    echo 'profiles: {default: {host_ip: 127.0.0.1, host_port: 8443, auth_keys: cm9vdDpyb290,' >> /home/vagrant/.ioxclientcfg.yaml
    echo '    auth_token: "", local_repo: /software/downloads, api_prefix: /iox/api/v2/hosting/,' >> /home/vagrant/.ioxclientcfg.yaml
    echo '    url_scheme: https, ssh_port: 2222, rsa_key: "", certificate: "", cpu_architecture: "",' >> /home/vagrant/.ioxclientcfg.yaml
    echo '    middleware: {mw_ip: "", mw_port: "", mw_baseuri: "", mw_urlscheme: "", mw_access_token: ""},' >> /home/vagrant/.ioxclientcfg.yaml
    echo '    conn_timeout: 1000, client_auth: "no", client_cert: "", client_key: ""}}' >> /home/vagrant/.ioxclientcfg.yaml
    cp /home/vagrant/.ioxclientcfg.yaml /root/.ioxclientcfg.yaml
    chown vagrant:vagrant /home/vagrant/.ioxclientcfg.yaml
    arch=$(uname -m)
    if [[ $arch == x86_64 ]]; then
      # download page https://developer.cisco.com/docs/iox/iox-resource-downloads/
      echo "!!! downloading and extracting ioxclient for x86_64 architecture !!!"
      curl -O https://pubhub.devnetcloud.com/media/iox/docs/artifacts/ioxclient/ioxclient-v1.17.0.0/ioxclient_1.17.0.0_linux_amd64.tar.gz
      tar -xvf /home/vagrant/ioxclient_1.17.0.0_linux_amd64.tar.gz
      cp /home/vagrant/ioxclient_1.17.0.0_linux_amd64/ioxclient /usr/local/bin/ioxclient
      rm -rv /home/vagrant/ioxclient_1.17.0.0_linux_amd64
    elif  [[ $arch = aarch64 ]]; then
      # download page https://developer.cisco.com/docs/iox/iox-resource-downloads/
      echo "!!! downloading and extracting ioxclient for arm64 architecture !!!"
      curl -O https://pubhub.devnetcloud.com/media/iox/docs/artifacts/ioxclient/ioxclient-v1.17.0.0/ioxclient_1.17.0.0_linux_arm64.tar.gz
      tar -xvf /home/vagrant/ioxclient_1.17.0.0_linux_arm64.tar.gz
      cp /home/vagrant/ioxclient_1.17.0.0_linux_arm64/ioxclient /usr/local/bin/ioxclient
      rm -rv /home/vagrant/ioxclient_1.17.0.0_linux_arm64
    fi
    chown vagrant:vagrant /usr/local/bin/ioxclient
    echo "!!! pulling and packaging the app for x86_64 architecture !!!"
    docker pull --platform=linux/amd64 mlabbe/iperf3
    ioxclient docker package mlabbe/iperf3 .
    cp package.tar /vagrant/iperf3_amd64-$(echo $VER | pcregrep -o1 ':([0-9.-]+)~').tar
  SHELL
end
Step 2. Ensure that the "export VER="5:24.0.9-1~ubuntu.22.04~jammy" line is uncommented and all other export statement are commented. This corresponds to the Docker Engine version you wish to install in this Vagrant environment:
cisco@cisco-virtual-machine:~/Desktop/ioxappbuild$ cat Vagrantfile | grep 'export' | grep -v '#'
export VER="5:24.0.9-1~ubuntu.22.04~jammy"
Step 3. Start the Vagrant environment with the vagrant up command in the directory where the Vagrantfile resides and observe a successful build of the iperf IOx application for amd64 tar file:
vagrant up

Procedure to Build a Custom IOx Application
This section describes, how to build a custom IOx application using the vagrant environment.

Note: The directory "/vagrant" in the VM and the directory which contains the "Vagrantfile" in the host system are in sync.
As shown in the image, the new.js file is created inside the VM and is also accessible on the host system:

Step 1. Clone a sample application to the same folder where "Vagrantfile" resides. On this example "iox-multiarch-nginx-nyancat-sample" application is used:
git clone https://github.com/etychon/iox-multiarch-nginx-nyancat-sample.git
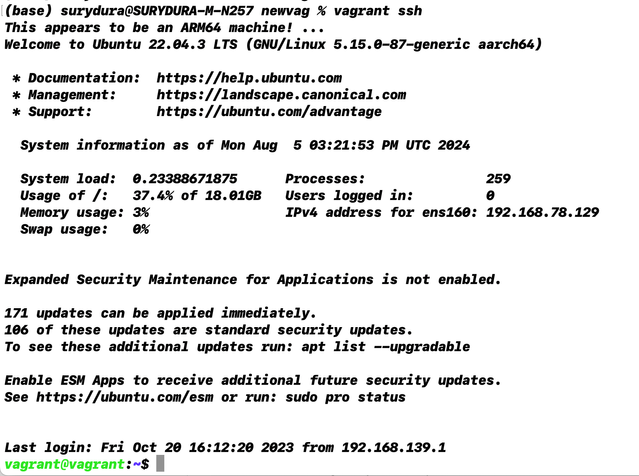
Step 2. SSH into the vagrant machine:
vagrant ssh
Step 3. Build the application:
cd /vagrant/iox-multiarch-nginx-nyancat-sample/
chmod +x build
sh ./build
After the build process is completed, you now have two IOx applications ready for deployment ("iox-amd64-nginx-nyancat-sample.tar.gz" for amd64 and "iox-arm64-nginx-nyancat-sample.tar.gz" for target platforms):

Deploy the IOx Application
Step 1. Access the IR1101 with the use of the web interface:
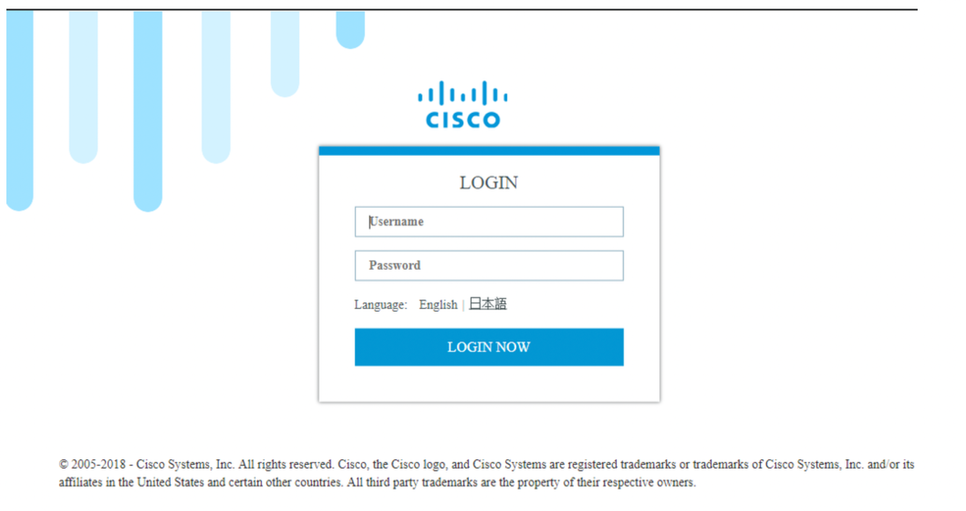
Step 2. Use the privilege 15 account:
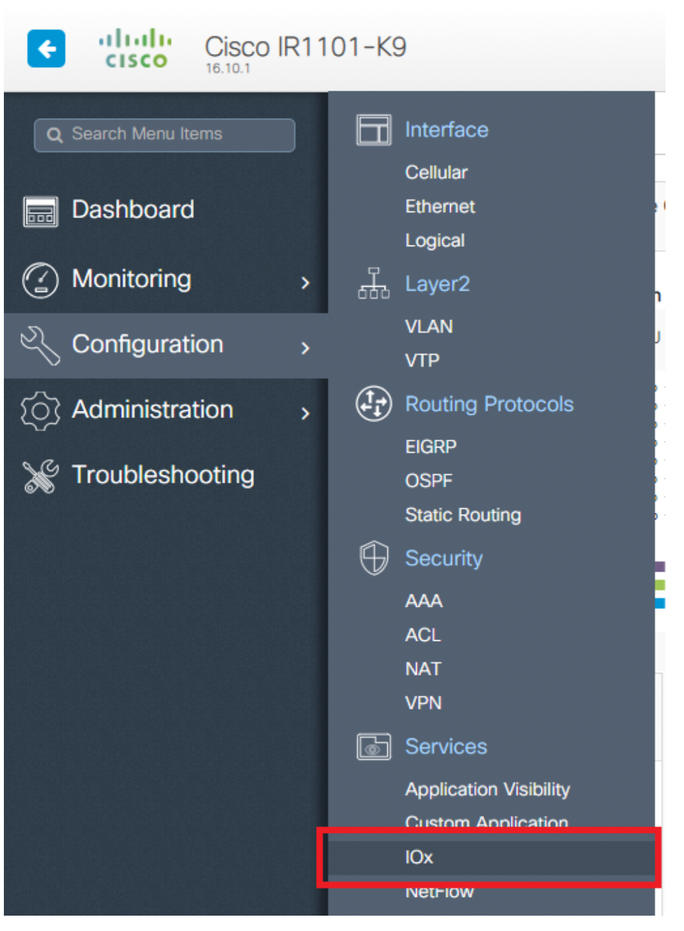
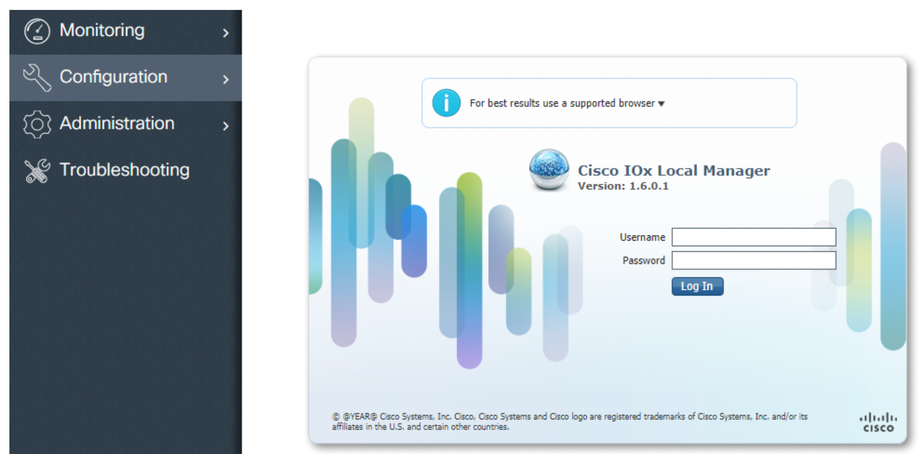
Step 3. In the IOx Local Manager login, use the same account to continue as shown in the image:
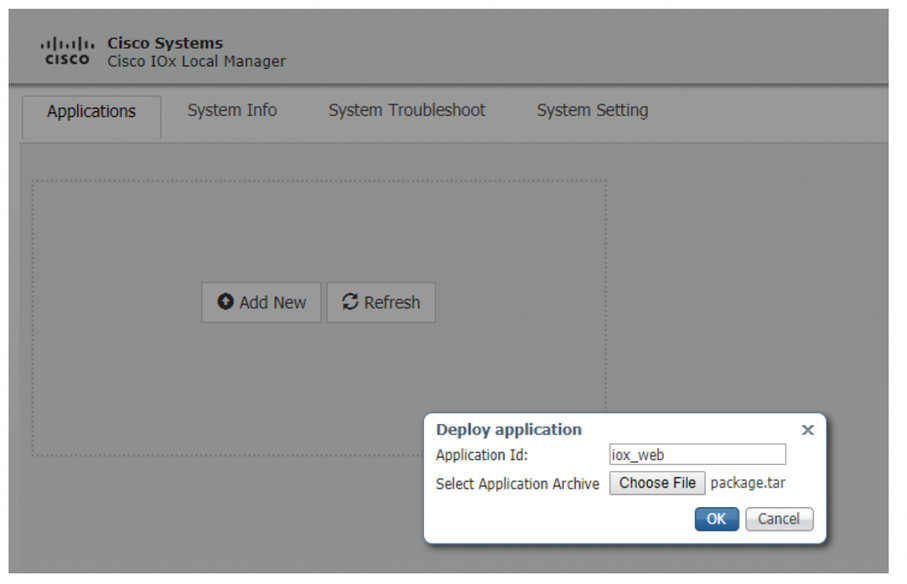
Step 4. Click Add New, select a name for the IOx application, and choose the package.tar which was built in Step 3 of the Procedure to Set Up Build Environment Using Vagrant section, as shown in the image:
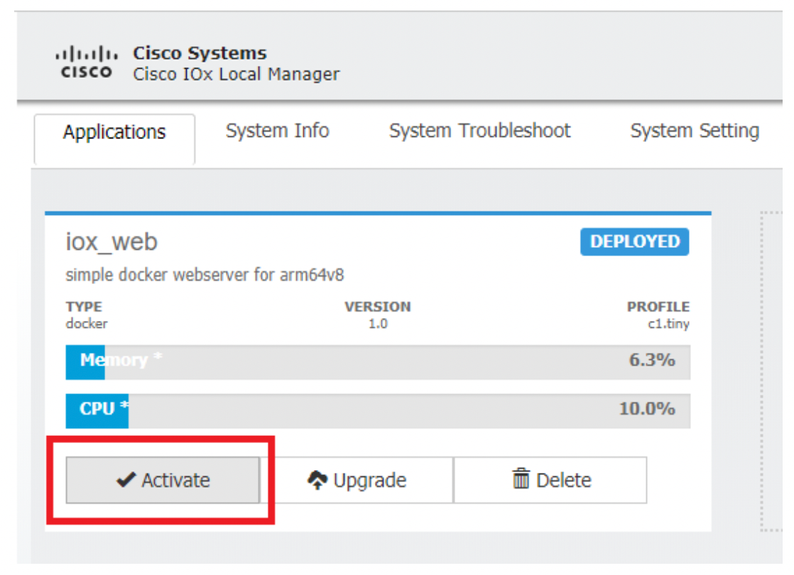
Step 5. Once the package is uploaded, activate it as shown in the image:
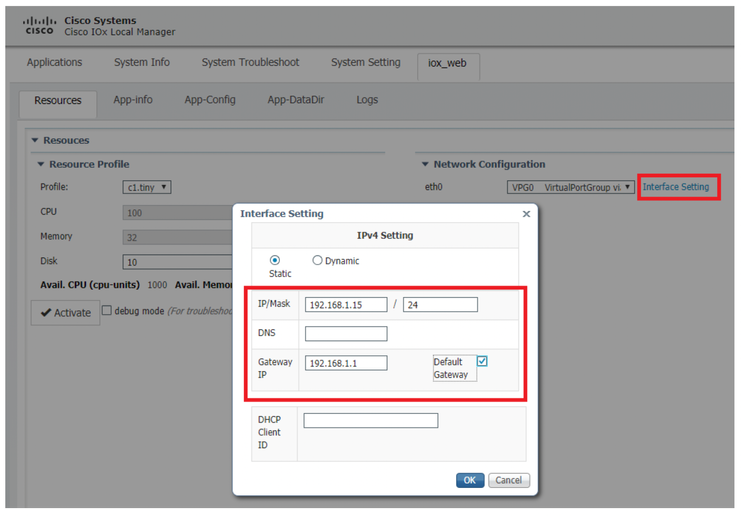
Step 6. In the Resources tab, open the interface setting in order to specify the fixed IP that you want to assign to the app as shown in the image:
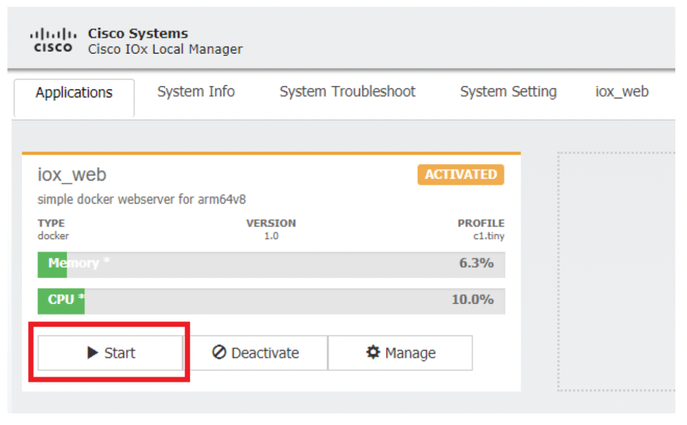
Step 7. Click OK, then Activate. Once the action completes, navigate back to the main Local Manager page (Applications button on the top menu), then start the application as shown in the image:
After you go through these steps, your application is ready to be running.
Troubleshoot
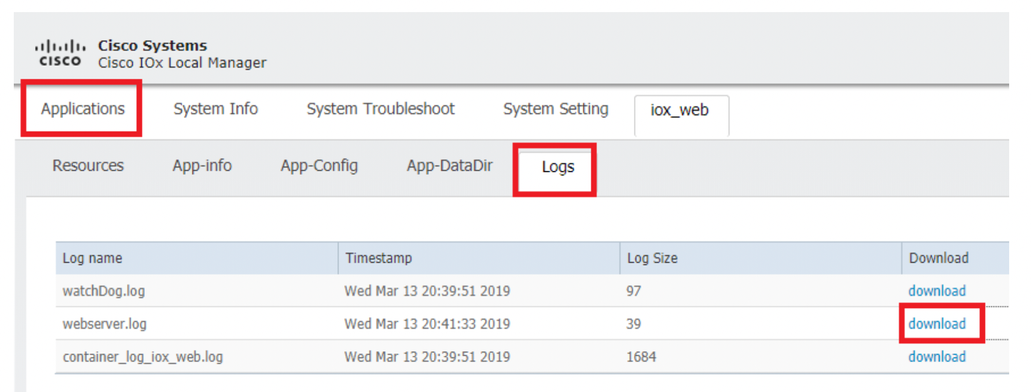
In order to troubleshoot your configuration, check the log file which you create in the Python script using a local manager. Navigate to Applications, click Manage on the iox_web application, then select the Logs tab as shown in the image:


 Feedback