Deploy and Run IOx Applications on IE3400
Available Languages
Download Options
Bias-Free Language
The documentation set for this product strives to use bias-free language. For the purposes of this documentation set, bias-free is defined as language that does not imply discrimination based on age, disability, gender, racial identity, ethnic identity, sexual orientation, socioeconomic status, and intersectionality. Exceptions may be present in the documentation due to language that is hardcoded in the user interfaces of the product software, language used based on RFP documentation, or language that is used by a referenced third-party product. Learn more about how Cisco is using Inclusive Language.
Contents
Introduction
This document describes how to deploy, activate and start an IOx application on IE3400.
Prerequisites
Requirements
Cisco recommends that you have knowledge of these topics:
- Basic understanding of Cisco IOx and IOS
- IE3400 8P2S or 8T2S running IOS XE version >17.2.1
Configure
Since IOS version 17.2.1, the IE3400 rugged series switches support IOx application hosting. This allows you to run your own custom code/applications/containers on the edge device. As with most of the IoT platforms that support application hosting, there are some specifics to keep in mind, which are further explained in this document.
Networking
The IE3400 has an additional (virtual) interface for connectivity to the IOx applications, called AppGigabitEthernet1/1
Simplified architecture for this interface is shown in this image.

As you can see, the interface called AppGigabitEthernet1/1 provides connectivity to the applications. There are various options available as AppGigabitEthernet1/1 can be configured as a regular, physical, interface in both access or trunk mode. Another common name for this port is the KR port.
Currently, an IOx application interface needs to have VLAN ID configured even if the AppGigiabitEthernet1/1 interface is configured in access mode, this is because the traffic received by virteth2/L2br is always tagged.
In this document, AppGigabitEthernet1/1 in access mode in VLAN 1 is configured:
ie3400#conf t
Enter configuration commands, one per line. End with CNTL/Z.
ie3400(config)#interface AppGigabitEthernet1/1
ie3400(config-if)#switchport mode access
ie3400(config-if)#switchport access vlan 1
ie3400(config-if)#end
In order to reach both the switch and IOx applications, SVI IP-address for VLAN 1 needs to be configured:
ie3400#conf t
Enter configuration commands, one per line. End with CNTL/Z.
ie3400(config)#interface Vlan1
ie3400(config-if)#ip address 192.168.0.30 255.255.255.0
ie3400(config-if)#end
Enable IOx
Once the network is configured, enable IOx on the device.
On IE3400, an SD-card is required to store the IOx applications and data. Before IOx is enabled, ensure that the SD-card is formatted with the ext4 filesystem:
ie3400#format sdflash: ext4
Format operation may take a while. Continue? [confirm]
Format operation will destroy all data in "sdflash:".  Continue? [confirm]
format completed with no errors

Format of sdflash: complete
Then, enable IOx with this command:
ie3400#conf t
Enter configuration commands, one per line.  End with CNTL/Z.
ie3400(config)#iox
Warning: Do not remove SD flash card when IOx is enabled or errors on SD device could occur.

*Feb 21 12:49:18.310: %UICFGEXP-6-SERVER_NOTIFIED_START: R0/0: psd: Server iox has been notified to start
*Feb 21 12:49:48.165: %IM-6-IOX_ENABLEMENT: R0/0: ioxman: IOX is ready.
In order to get access to the IOx functionality remotely, using, for example, Local Manager or ioxclient, ensure that the webserver is enabled and a user is configured for access:
ie3400#conf t
Enter configuration commands, one per line. End with CNTL/Z.
ie3400(config)#ip http secure-server
ie3400(config)#username admin privilege 15 password 0 secret
Get started
There are multiple methods to deploy IOx applications to the IE3400. This document describes these:
- Using Local Manager - Graphical UI
- Using ioxclient - Remote CLI
- Using IOS-XE - On-device CLI
One of the methods is sufficient to perform all tasks, they are just documented all three here for completeness and to reach a wide audience.
Via Local Manager
Local Manager is a graphical interface to be used to manage and deploy IOx applications on IOx-enabled platforms. Local Manager is running on the IOx-enabled device itself, in this case, the IE3400.
Connect to Local Manager
If you have gone through the procedure to enable the webserver and to add a user, you should be able to access the IE3400's web interface using the SVI IP-address using https://<svi ip>/ (in this article: https://192.168.0.30/):
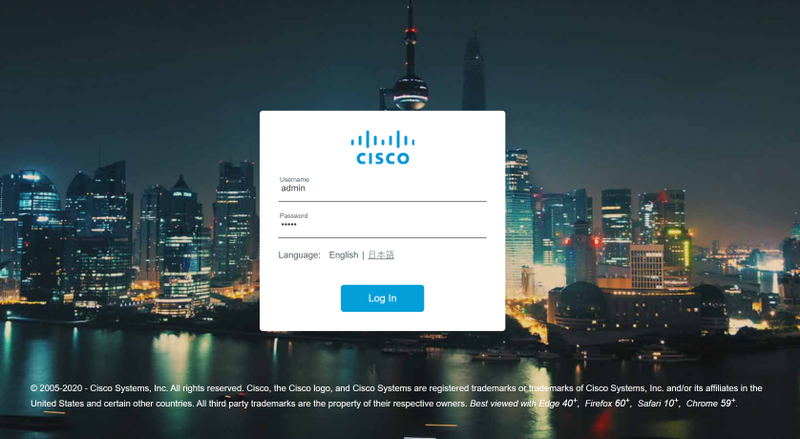
You can log in using the user created as explained above, then navigate to Configuration > Services > IOx, as shown in the image.
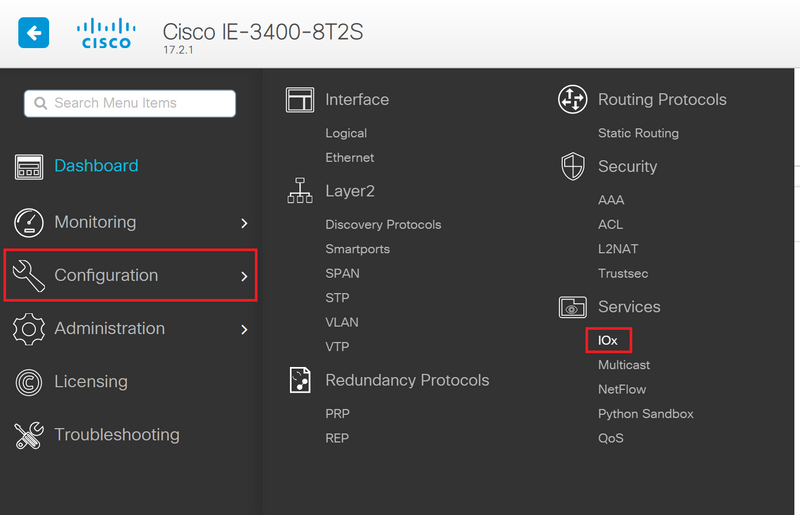
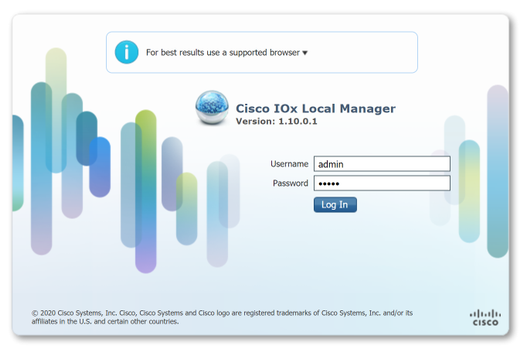
In case you prefer to directly navigate to Local Manager, you can use the following URL: https://<svi ip>/iox/login (in this article https://192.168.0.30/iox/login).
On the Local Manager login screen, again use the priv 15 user define above.
Deploy
Once you log in, start the deployment of the application.
Click Add New, choose a name for the application, and browse to the application package on your PC, as shown in the image.
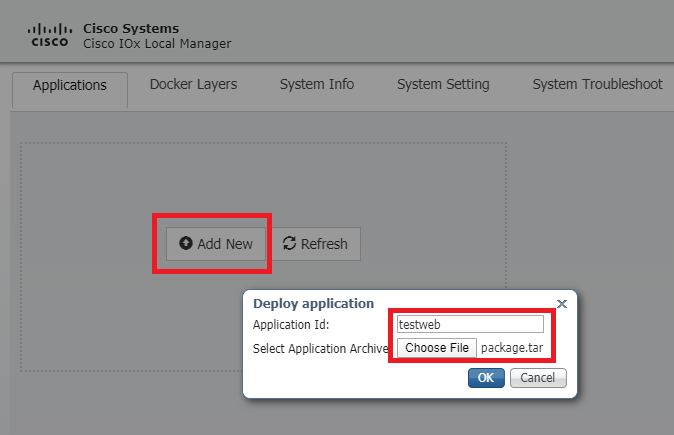
After you click OK, the application is uploaded and installed on the IE3400. If all goes well, you should see this image on your screen, with your IOx application in a deployed state.
Activate
Once the application is deployed, the next step is to activate it. In this phase, the resources used by the application are specified.
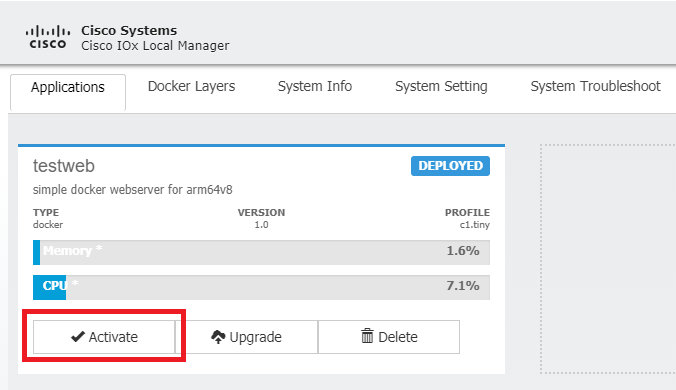
Click on the Activate button of the deployed IOx application, as shown in the image.
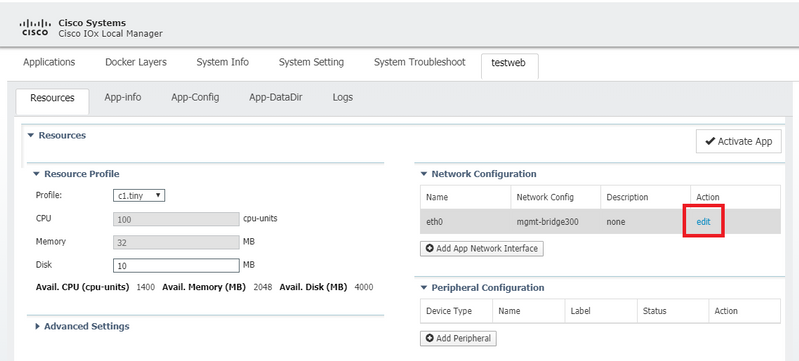
In the next screen, you can select the amount of compute resources to assign to the application.
In order to configure networking, click on edit for the Network Configuration, as shown in the image.
In the network configuration, choose to edit the default network-name (mgmt-bridge300) and then click on Interface Setting, as shown in the image.
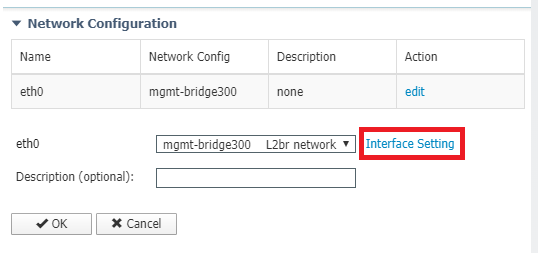
In the popup, choose to use either a dynamic IP, which allows the IOx application to fetch an IP from the DHCP-server in the VLAN you configured on the AppGi1/1 interface or set a static IP.
It is important, as mentioned with the networking step, that you specify the VLAN to match with the access/trunk of AppGi1/1 in this step.
Currently, an IOx application interface needs to have VLAN ID configured even if the AppGigiabitEthernet1/1 interface is configured in access mode, this is because the traffic received by virteth2/L2br is always tagged.

Now save the network settings and activate the application.
If all goes well, the application should end up in the Activated status.
Start
Now that the application is activated, all that rests in order to get things going, is to start the application.
Click on the Start button for the application in Local Manager, as shown in the image.

After this action, the app should be in the Running state and you should be able to reach the application using the networking configured.
In case you chose to use DHCP, navigate to Manage > App-Info > interface-name > eth0, in order to find the IP address for the application.
For this document, this application is a simple webserver, running on port 9000. In order to test it, navigate to the IP-address configured (or obtained through DHCP):

Use IOxclient
IOxclient is the CLI-based counterpart of Local Manager and is used to manage and deploy IOx applications on IOx-enabled platforms using CLI. IOxclient is talking wit the same web-service running on the IOx-enabled device itself, in this case the IE3400.
You can download ioxclient using the following link: https://developer.cisco.com/docs/iox/#!iox-resource-downloads
Prepare ioxclient
Once extracted, we can run ioxclient and create a profile that will tell ioxclient how to reach the IE3400:
[jensd@cen8 ~]$ ioxclient profiles create
Config file not found :  /home/jensd/.ioxclientcfg.yaml
Creating one time configuration..
Your / your organization's name : Cisco
Your / your organization's URL :
Your IOx platform's IP address[127.0.0.1] : 192.168.0.30
Your IOx platform's port number[8443] : 443
Authorized user name[root] : admin
Password for admin :
Local repository path on IOx platform[/software/downloads]:
URL Scheme (http/https) [https]:
API Prefix[/iox/api/v2/hosting/]:
Your IOx platform's SSH Port[2222]:
Your RSA key, for signing packages, in PEM format[]:
Your x.509 certificate in PEM format[]:
Activating Profile  default
Saving current configuration
The info that needs to be entered depends on the network configuration and priv15 user specified as explained at the start of this article.
Keep in mind that the IOx port number for IE3400 is 443 by default and not the suggested port 8443.
Deploy
The first step is to deploy IE3400 as the application installed on the edge device.
This can be done as shown here via ioxclient:
[jensd@cen8 ~]$ ioxclient app install testweb package.tar
Currently active profile :  default
Command Name:  application-install
Using the package descriptor file in the project dir
Validating descriptor file package.yaml with package schema definitions
...
Sending request to install the app
Installation Successful. App is available at : http://192.168.0.30/iox/api/v2/hosting/apps/testweb
Successfully deployed
You can verify the status of the app with the app list command:
[jensd@cen8 ~]$ ioxclient app list
Currently active profile :  default
Command Name:  application-list
List of installed App :
 1. testweb    --->    DEPLOYED
Activate
Now that the application is deployed, you can proceed to activate it. In this phase, you specify which resources to be used by the application.
To choose which compute resources are allowed for the application to use or to configure networking, you need to provide information in JSON-format.
For this article, this JSON is used for activation:
[jensd@cen8 ~]$ cat activation.json
{
    "resources": {
        "network": [{
                        "interface-name": "eth0",
                        "network-info": {"vlan-id": "1"},
                        "network-type": "vlan",
                        "ipv4": {
                                "dns": "",
                                "gateway": "192.168.0.1",
                                "ip": "192.168.0.223",
                                "mode": "static",
                                "prefix": "24"
                        }
                }]
    }
}
The above sets the correct VLAN ID and IP address to use for the application. In case you would like to use DHCP, you can remove the ipv4 block.
It's important, as mentioned with the networking step, that you specify the VLAN to match with the access/trunk of AppGi1/1 in this step.
Currently, an IOx application interface needs to have VLAN ID configured even if the AppGigiabitEthernet1/1 interface is configured in access mode, this is because the traffic received by virteth2/L2br is always tagged.
In order to active the IOx application through JSON payload, use this command:
[jensd@cen8 ~]$ ioxclient app activate testweb --payload activation.json
Currently active profile :  default
Command Name:  application-activate
Payload file : activation.json. Will pass it as application/json in request body..
App testweb is Activated
Again, you can use the app list command to check the status after activation:
[jensd@cen8 ~]$ ioxclient app list
Currently active profile :  default
Command Name:  application-list
List of installed App :
 1. testweb    --->    ACTIVATED
Start
Now that the application is activated, all that rests in order to get things going, is to start the application.
The ioxclient command to start our application is as follows:
[jensd@cen8 ~]$ ioxclient app start testweb
Currently active profile :  default
Command Name:  application-start
App testweb is Started
In order to know which IP-address was acquired from DHCP, in case you skipped the ipv4 part during activation, you can use this command:
[jensd@cen8 ~]$ ioxclient app info testweb | grep ipv4
     "ipv4": {
   "ipv4": "192.168.0.223",
...
To check if the start command was successful, we could again use the ioxclient app list command or simply check if the application does what it is supposed to.
For this article, this application is a simple webserver, running on port 9000 so we can test it by querying the IP-address configured (or obtained through DHCP):
[jensd@cen8 ~]$ curl http://192.168.0.223:9000
<html><body><h1>IOX python webserver on arm64v8</h1></body></html>
Use IOS-XE CLI
IOS-XE device that are IOx-enabled, expose the ability to do the application deployment, and managed directly from the IOS-XE CLI. This does not require the web-server on IOS-XE to be enabled.
Deploy
Since the application is deployed from the IOS-XE CLI, first copy your IOx application package over to a file system that is easily accessible from that CLI.
The easiest is to first copy the IOx application package (package.tar) to flash:
ie3400#copy scp: flash:
Address or name of remote host []? 192.168.0.21
Source username [admin]? jensd
Source filename []? /home/jensd/package.tar
Destination filename [package.tar]?
Password:
 Sending file modes: C0644 16547840 package.tar
!!!!!!...!!!!!!
16547840 bytes copied in 25.244 secs (655516 bytes/sec)
Once the package is there, deploy it for IOx:
ie3400#app-hosting install appid testweb package flash:package.tar
Installing package 'flash:package.tar' for 'testweb'. Use 'show app-hosting list' for progress.
When this is completed you can check the status of the installation.
ie3400#sh app-hosting list
App id                                   State
---------------------------------------------------------
testweb                                  DEPLOYED
Activate
After the deployment, as with the other methods, the next step is to activate the application. In this phase, specify which resources are used by the application.
At a minimum, you need to configure networking. This can be done as shown here:
ie3400#conf t
Enter configuration commands, one per line.  End with CNTL/Z.
ie3400(config)#app-hosting appid testweb
ie3400(config-app-hosting)#app-vnic AppGigabitEthernet trunk
ie3400(config-config-app-hosting-trunk)#vlan 1 guest-interface 0
ie3400(config-config-app-hosting-vlan-access-ip)#guest-ipaddress 192.168.0.224 netmask 255.255.255.0
ie3400(config-config-app-hosting-vlan-access-ip)#end
This instructs the application to receive a static IP, using VLAN ID 1.
It's important, as mentioned with the networking step, that you specify the VLAN to match with the access/trunk of AppGi1/1 in this step.
Currently, an IOx application interface needs to have VLAN ID configured even if the AppGigiabitEthernet1/1 interface is configured in access mode, this is because the traffic received by virteth2/L2br is always tagged:
After setting the configuration, proceed with the activation:
ie3400#app-hosting activate appid testweb
testweb activated successfully
Current state is: ACTIVATED
Start
After the activation, the last step is to start the application.
This can be done with this command:
ie3400#app-hosting start appid testweb
testweb started successfully
Current state is: RUNNING
In case you did not set an IP-address in the activation phase and decided to use DHCP, you can get the IP-address your application received:
ie3400#sh app-hosting detail | i IPv4
   IPv4 address        : 192.168.0.224
In order to check if the start command was successful, we can simply check if the application does what it is supposed to.
For this document, this application is a simple webserver, that runs on port 9000 so we can test it by querying the IP-address configured (or obtained through DHCP).

Contributed by Cisco Engineers
- Jens DepuydtCisco TAC Engineer
Contact Cisco
- Open a Support Case

- (Requires a Cisco Service Contract)
 Feedback