Introduction
This document describes how to generate and export the correct certificate from the Windows Private Key Infrastructure (PKI) for use in combination with Plug and Play (PNP) on Field Network Director (FND).
Problem
When you try to use PNP to do Zero Touch Deployment (ZTD) on newer Cisco IOS® and Cisco IOS®-XE releases, the process fails with one of these PNP errors:
Error while creating FND trustpoint on the device. errorCode: PnP Service Error 3341,
errorMessage: SSL Server ID check failed after cert-install
Error while creating FND trustpoint on the device. errorCode: PnP Service Error 3337,
errorMessage: Cant get PnP Hello Response after cert-install
Since some time, the PNP code in Cisco IOS®/Cisco IOS®-XE requires the Subject Alternative Name (SAN) field to be populated in the certificate offered by the PNP-server/controller (FND in this case).
The PNP Cisco IOS® Agent checks only the certificate SAN field for the server identity. It does not check the common name (CN) field anymore.
This is valid for these releases:
-
Cisco IOS® Release 15.2(6)E2 and later
-
Cisco IOS® Release 15.6(3)M4 and later
-
Cisco IOS® Release 15.7(3)M2 and later
-
Cisco IOS® XE Denali 16.3.6 and later
-
Cisco IOS® XE Everest 16.5.3 and later
-
Cisco IOS® Everest 16.6.3 and later
-
All Cisco IOS® releases from 16.7.1 and later
More information can be found here: https://www.cisco.com/c/en/us/td/docs/solutions/Enterprise/Plug-and-Play/solution/guidexml/b_pnp-solution-guide.html#id_70663
Solution
Most of the guides and documentation for FND do not mention yet that the SAN field needs to be populated.
In order to create and export the correct certificate for use with PNP and to add it to the key store, follow these steps.
Generate a New Certificate with the Use of the FND/NMS Template on the Windows CA-Server
Navigate to Start > Run > mmc > File > Add/Remove Snap-in... > Certificates > Add > Computer Account > Local Computer > OK and open the certificates MMC snap-in.
Expand Certificates (Local Computer) > Personal > Certificates
Right-click on Certificates and select All Tasks > Request New Certificate... as shown in the image.

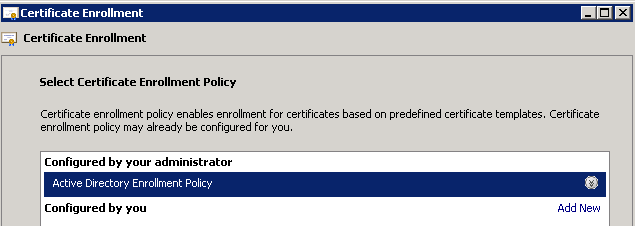
Click Next and select Active Directory Enrollment Policy as shown in the image.
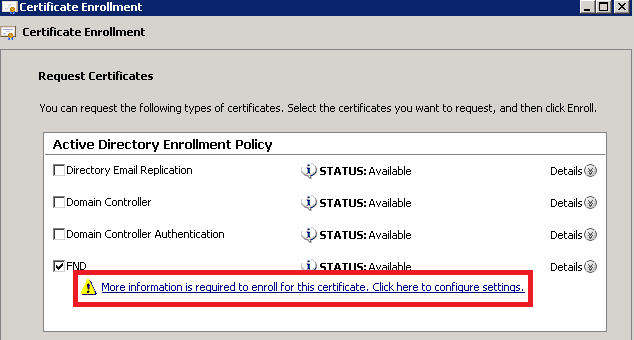
Click Next and select the template created for NMS/FND-server (repeat later for TelePresence Server (TPS)) and click the More Information link as shown in the image.
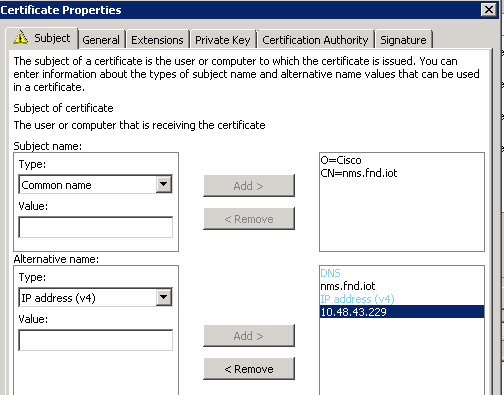
In the certificate properties, supply this information:
Subject name:
- Organisation: your organisation name
- Common name: the Fully Qualified Domain Name (FQDN) of the FND-server (or TPS if applicable)
Alternative name (the SAN field):
- If you use Domain Name System (DNS) in order to contact the PNP-part of the FND-server, add a DNS-entry for the FQDN
- If you use IP in order to contact the PNP-part of the FND-server, add an IPv4 entry for the IP
It is recommended to include multiple SAN values in the certificate, in case discovery methods vary. For example, you can include both the controller FQDN and IP address (or NAT IP address) in the SAN field. If you do include both, set the FQDN as the first SAN value, followed by the IP address.
Example configuration:
Once completed, click OK in the Certificate Properties Window, then Enroll in order to generate the certificate and Finish when the generation is complete.
Check the SAN-Field in the Generated Certificate
Just to check if the generated certificate contains the correct information, you can check it as follows:
Open the certificates Snap-In in Microsoft Management Console (MMC) and expand Certificates (Local Computer) > Personal > Certificates.
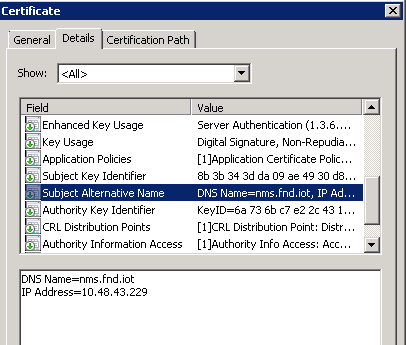
Double-click the generated certificate and open the Details tab. Scroll down to find the SAN field as shown in the image.
Export the Certificate to Import to the FND Keystore
Before you can import or replace the certificate that exists in the FND keystore, you need to export it to a .pfd file.
In the certificates Snap-In in MMC, expand Certificates (Local Computer) > Personal > Certificates
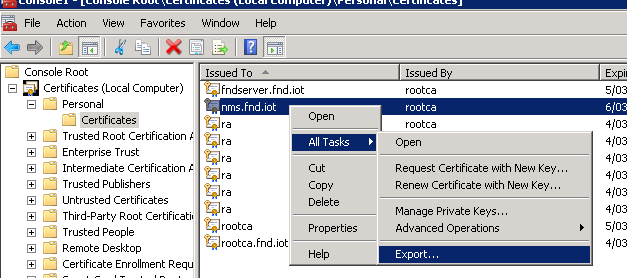
Right-click the generated certificate and select All Tasks > Export... as shown in the image.
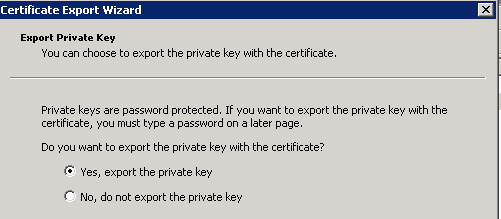
Click Next, select in order to export the private key as shown in the image.
Select in order to include all certificates in the certification path as shown in the image.

Click Next, select a password for the export and save the .pfx in a known location.
Create the FND Keystore for Use with PNP
Now that you have the certificate exported, you can build the keystore needed for FND.
Transfer the generated .pfx from the previous step securely to the FND-server (Network Management Systems (NMS) machine or OVA host), for example with the use of SCP.
List the contents of the .pfx to get to know the auto-generated alias in the export:
[root@iot-fnd ~]# keytool -list -v -keystore nms.pfx -srcstoretype pkcs12 | grep Alias
Enter keystore password:  keystore
Alias name: le-fnd-8f0908aa-dc8d-4101-a526-93b4eaad9481
Create a new keystore with the use of this command:
root@iot-fnd ~]# keytool -importkeystore -v -srckeystore nms.pfx -srcstoretype pkcs12 -destkeystore cgms_keystore_new -deststoretype jks -srcalias le-fnd-8f0908aa-dc8d-4101-a526-93b4eaad9481 -destalias cgms -destkeypass keystore
Importing keystore nms.pfx to cgms_keystore_new...
Enter destination keystore password:
Re-enter new password:
Enter source keystore password:
[Storing cgms_keystore_new]

Warning:
The JKS keystore uses a proprietary format. It is recommended to migrate to PKCS12 which is an industry standard format using "keytool -importkeystore -srckeystore cgms_keystore_new -destkeystore cgms_keystore_new -deststoretype pkcs12".
In the command, ensure that you replace nms.pfx with the correct file (exported from Windows CA) and that the srcalias value matches with the output of the previous command (keytool -list).
After you generate it, convert it to the new format as suggested:
[root@iot-fnd ~]# keytool -importkeystore -srckeystore cgms_keystore_new -destkeystore
cgms_keystore_new -deststoretype pkcs12
Enter source keystore password:
Entry for alias cgms successfully imported.
Import command completed:  1 entries successfully imported, 0 entries failed or cancelled

Warning:
Migrated "cgms_keystore_new" to Non JKS/JCEKS. The JKS keystore is backed up as
"cgms_keystore_new.old".
Add the CA certificate, exported earlier, to the keystore:
[root@iot-fnd ~]# keytool -import -trustcacerts -alias root -keystore cgms_keystore_
new -file rootca.cer
Enter keystore password:
Owner: CN=rootca, DC=fnd, DC=iot
Issuer: CN=rootca, DC=fnd, DC=iot
...
Trust this certificate? [no]:  yes
Certificate was added to keystore
And finally, add the SUDI certificate, that is used in order to verify the identity by serial of the FAR when you use PNP, to the keystore.
For a RPM installation, the SUDI certificate is bundled with the packages and can be found in: /opt/cgms/server/cgms/conf/ciscosudi/cisco-sudi-ca.pem
For an OVA installation, first copy the SUDI certificate to the host:
[root@iot-fnd ~]# docker cp fnd-container:/opt/cgms/server/cgms/conf/ciscosudi/cisco-sudi-ca.pem .
Then add it to the keystore as trusted with alias SUDI:
[root@iot-fnd ~]# keytool -import -trustcacerts -alias sudi -keystore cgms_keystore_new -file cisco-sudi-ca.pem
Enter keystore password:
Owner: CN=ACT2 SUDI CA, O=Cisco
Issuer: CN=Cisco Root CA 2048, O=Cisco Systems
...
Trust this certificate? [no]:  yes
Certificate was added to keystore
At this point, the keystore is ready to be used with FND.
Activate the New/Modified Keystore for Use with FND
Before you use the keystore, replace the previous version and optionally update the password in the cgms.properties file.
First, take a backup of the keystore that already exists:
For a RPM installation:
[root@fndnms ~]# cp /opt/cgms/server/cgms/conf/cgms_keystore cgms_keystore_backup
For an OVA installation:
[root@iot-fnd ~]# cp /opt/fnd/data/cgms_keystore cgms_keystore_backup
Replace the one that exists with the new one:
For a RPM installation:
[root@fndnms ~]# cp cgms_keystore_new /opt/cgms/server/cgms/conf/cgms_keystore
For an OVA installation:
[root@iot-fnd ~]# cp cgms_keystore_new /opt/fnd/data/cgms_keystore
Optionally, update the password for the keystore in the cgms.properties file:
First, generate a new encrypted password string.
For a RPM installation:
[root@fndnms ~]# /opt/cgms/bin/encryption_util.sh encrypt keystore
7jlXPniVpMvat+TrDWqh1w==
For an OVA installation:
[root@iot-fnd ~]# docker exec -it fnd-container /opt/cgms/bin/encryption_util.sh encrypt keystore
7jlXPniVpMvat+TrDWqh1w==
Ensure that you replace keystore with the correct password for your keystore.
Change cgms.properties in /opt/cgms/server/cgms/conf/cgms.properties for the RPM-based install or /opt/fnd/data/cgms.properties for the OVA-based install in order to include the new encrypted password.
Finally, restart FND to start using the new keystore and password.


 Feedback