Configure Field Network Director to use Plug and Play on IR800
Available Languages
Download Options
Bias-Free Language
The documentation set for this product strives to use bias-free language. For the purposes of this documentation set, bias-free is defined as language that does not imply discrimination based on age, disability, gender, racial identity, ethnic identity, sexual orientation, socioeconomic status, and intersectionality. Exceptions may be present in the documentation due to language that is hardcoded in the user interfaces of the product software, language used based on RFP documentation, or language that is used by a referenced third-party product. Learn more about how Cisco is using Inclusive Language.
Contents
Introduction
This document describes how to get started with Field Network Director (FND) and Plug and Play (PNP) with the use of minimum set of components.
Prerequisites
Requirements
Cisco recommends that you have knowledge of these topics:
- Experience with Linux and knowledge in order to edit run configuration files on a Linux machine
- At least one of the supported routers to be managed by FND. For example IR809 or IR829.
- Console access
- Minimum IOS® version 15.7(3)M1
- OVA file deployed to a hypervisor (For example: VMWare ESXi). The OVA file, if entitled, can be downloaded from: https://software.cisco.com/download/home/286287993/type/286320249
Components Used
The information in this document is based on these software and hardware versions:
- OVA file for FND version 4.5.0-122 (CISCO-IOTFND-V-K9-4.5.0-122.zip)
- VMWare ESX
- IR809 with IOS® version 15.8(3)M2
The information in this document was created from the devices in a specific lab environment. All of the devices used in this document started with a cleared (default) configuration. If your network is live, ensure that you understand the potential impact of any command.
Background Information
Since FND has many different deployment options, the goal is to be able to set up a minimal but working, installation for FND. This setup can then serve as the start point for further customization and in order to add more features. The setup explained here is with the use of the Open Virtual Appliance (OVA)-packaged FND installation as the start point and it uses the easy mode in order to avoid the need for Public Key Infrastructure (PKI) and tunnel provisioning. Use PNP, in order to simplify and to add devices to the installation.
The result of this guide is not intended to be used in production as there might be some security risks due to plan-text password and the absence of tunnels and PKI.
Configure
Deploy and Configure the FND OVA
Step 1. download and deploy the FND OVA file to your hypervisor. For example for VMWare, this will be through File > Deploy OVF Template as shown in the image.

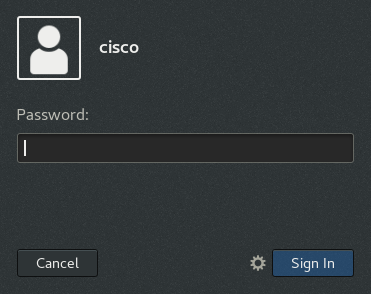
Step 2. Once it gets deployed, you can start the VM and is presented with a login screen, shown in the image.

The default passwords for the OVA file are:
- username: root password: cisco123
- username: cisco password: C_sco123
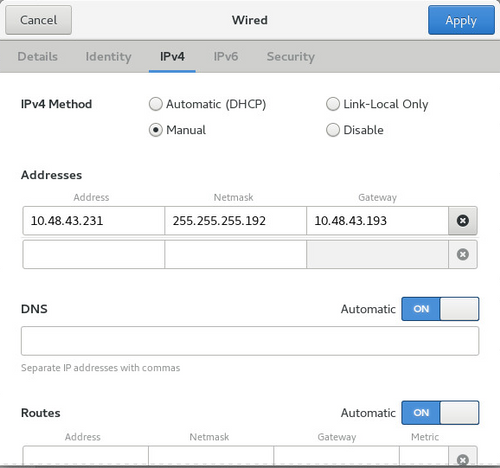
Step 3. Login with the cisco user and password and navigate to Applications > System Tools > Settings > Network. Add a wired profile and in hte IPv4 tab, set the desired IP address or DHCP as shown in the image.

Step 4. Click Apply and toggle the connection off/on in order to ensure that the new settings get applied.
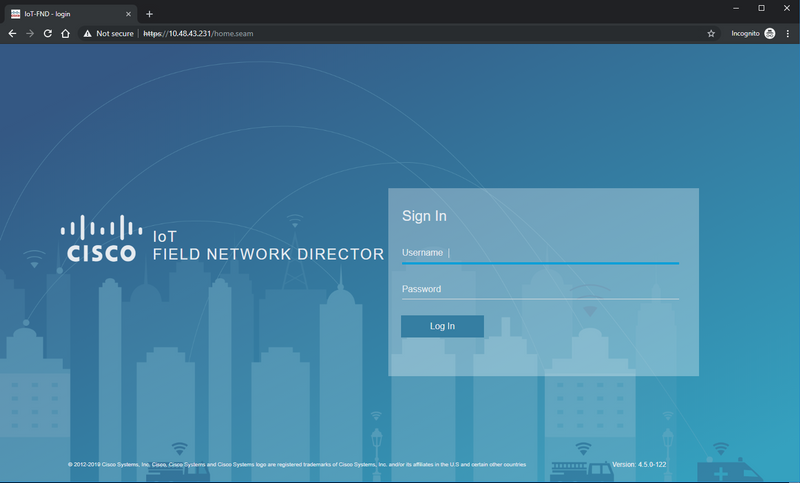
At this point, you should be able to navigate to the FND GUI with your browser and the IP-address configured as shown in the image.

Step 5. Login to the GUI with the use of the default username and password: root / root123
You are prompted to change your password right away and then redirected to the login once more.
If all goes well, you should be able to login with your new password and be able to navigate through the FND GUI.
Further, PNP and demo mode are described followed by the configuration of FND.
About PNP
PNP is the most current Cisco method to do Zero Touch Deployment (ZTD). With the use of PNP, a device can be fully configured and the need to touch the configuration manually will not arise.
For FND, with the use of PNP, the need to first bootstrap the router is avoided. In fact, all that PNP does, redirect it to the FND, in a secure way, and fetches the bootstrap configuration.
Once the bootstrap configuration is present in the device, the rest of the process is continued as with a classic bootstrapped device.
There are different ways to use PNP:
- Through the Cisco PNP service (devicehelper.cisco.com), with the use of a Smart Account. Enabled by default out of the factory on certain devices
- With the use of DHCP option 43 in order to supply the IP or hostname to connect to for bootstrapping
- By manually setting the PNP-server in the configuration
For this configuration, PNP-server IP is manually set, which is the FND-server's IP, and port on the device. In case you would like to do this with DHCP, you should supply the information as follows:
For Cisco IOS®, the DHCP-server should be configured as follows:
ip dhcp pool pnp_pool
network 192.168.10.0 255.255.255.248
default-router 192.168.10.1
dns-server 8.8.8.8
option 43 ascii "5A;K4;B2;I10.48.43.231;J9125"
!
For DHCPd on Linux:
[jedepuyd@KJK-SRVIOT-10 ~]$ cat /etc/dhcp/dhcpd.conf
subnet 192.168.100.0 netmask 255.255.255.0 {

option routers 192.168.100.1;
range 192.168.100.100 192.168.100.199;
option domain-name-servers 192.168.100.1;
option domain-name "test.dom";
option vendor-encapsulated-options "5A;K4;B2;I10.48.43.231;J9125";
}
In this configuration for option 43 or vendor-encapsulated-options, you need to specify these ASCII strings:
"5A;K4;B2;I10.50.215.252;J9125"
It can be tailored as follows:
- 5 – DHCP type code 5
- A – Active feature operation code
- K4 – HTTP transport protocol
- B2 – PnP server/TPS/FND server IP address type is IPv4
- I10.48.43.231 – FND server IP address
- J9125 – Port number 9125 (port for PNP on FND server)
More information with regards to PNP with DHCP can be found here: https://www.cisco.com/c/en/us/td/docs/routers/connectedgrid/iot_fnd/guide/4_3/iot_fnd_ug4_3/sys_mgmt.html#31568 in the section: Configure DHCP Option 43 on Cisco IOS® DHCP Server
About EasyMode
Easy mode has been introduced since FND 4.1, although it was called demo mode at the time, and allows you to run FND in a less secure way. Although this is not recommended for production, it is a good way to get started.
With the use of easy mode, you can focus on the PNP-process, bootstrapping and configuring of the router. In case something does not work, you do not need to suspect the tunnel build-up or certificates.
Changes that occur when you configure FND to run in easy mode:
- No need for a Head End Router (HER) or a tunnel to the FND server.
- No need for a Public Key Infrastructure (PKI) setup and Simple Certificate Enrollment Protocol (SCEP).
- No need for router certificates, trustpoint, and SSL certificates.
- All communication is taking place over HTTP instead of HTTPS.
More information regarding easy mode can be found over here:
Configure FND for PNP and Easy Mode
Now, you know what demo mode/PNP is and why it is used in this context. Let's change the FND configuration in order to enable it:
On the FND VM, which originated from the OVA file, connect with SSH and edit the cgms.properties as follows:
[root@iot-fnd ~]# cat /opt/fnd/data/cgms.properties
cgms-keystore-password-hidden=dD5KmzJHa64Oyvpqdu8SCg==
use-router-ip-from-db=true
rabbit-broker-ip=
rabbit-broker-port=
rabbit-broker-username=
rabbit-broker-password=
fogd-ip=192.68.5.3
enable-reverse-dns-lookup=false
enableApiAuth=false
fnd-router-mgmt-mode=1
enable-bootstrap-service=true
proxy-bootstrap-ip=10.48.43.231
The last three lines changed in the configuration file.
- Line 10: enables easy mode
- Line 11: enables PNP
- Line 12: sets the IP of the FND-server to contact
After you change the file, restart the FND container in order to adapt the changes made:
[root@iot-fnd ~]# /opt/fnd/scripts/fnd-container.sh restart
Stopping FND container...
fnd-container
[root@iot-fnd ~]# Starting FND container...
fnd-container
Once restarted, the rest of the configuration can be done with the use of the GUI.
Prepare the CSV and Add the Router to FND
It might sound a bit illogical to add the device at this point of the configuration process but unfortunately, parts of the configuration are not available until certain device types have been added.
This is done in order to avoid the GUI to be too overwhelming as different devices introduce different options.
Here, let's try to add an IR809 to FND.
The CSV looks as follows:
deviceType,eid,adminUsername,adminPassword,ip
ir800,IR809G-LTE-GA-K9+JMX2022X04S,fndadmin,C1sc0123!,10.48.43.250
The fields in the CSV are:
- deviceType: ir800
- eid: PID and serial together with +
- adminUsername: this username will be added to the router config and later will be used to complete the registration process
- adminPassword: password for adminUsername
- ip: the IP address to substitue in the configuration of the device after deployment
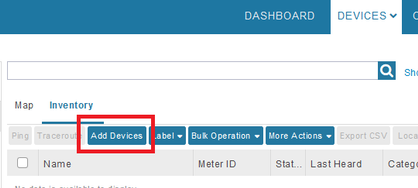
In order to add this device, connect to the GUI and navigate to Devices > Field Devices > Inventory > Add Devices as shown in the image.

In the dialog, specify the location of your CSV file and click Add to add it to FND as shown in the image.

If all goes well, you should see the history item to list "COMPLETED". After you close the dialog, the device should appear in the inventory as shown in the image.

Since the device of deviceType ir800 was added, the applicable templates and groups will become available in the GUI at this point.
Prepare the Provisioning Settings, Bootstrap Template and the Configuration Template
Since FND is configured for demo mode, it is needed to change the provisioning URL to use HTTP instead. Navigate to Admin > Provisioning Settings in order to do so:

Change the IoT-FND URL to http://<FND IP>:9121
Next, configure two minimal templates for bootstrapping and configuration.
The first one, called Router Bootstrap Configuration template, is the configuration that is pushed to the router once it is able to successfully contact FND with the use of PNP.
If PNP is not in use, it would be the configuration that is put on the router manually or in the factory at the time of the bootstrap process. This configuration contains just enough information for the router to start the registration process in FND.
The second one, called the Configuration template, will be the configuration that is added to the currently running configuration of the device. In fact, it can be seen as an increment on the existing configuration.
In most cases, this leads to an odd situation, so it is recommended to first erase all configurations on the router before you add it to FND.
In order to set the Router Factory Reprovision template, navigate to Configure > Tunnel Provisioning > Router Bootstrap Configuration and replace it with the following template:
<#if isBootstrapping = true>
<#assign mgmtintf = "GigabitEthernet0">
<#assign fndserver = "10.48.43.231">
<#assign sublist=far.eid?split("+")[0..1]>
<#assign pid=sublist[0]>
<#assign sn=sublist[1]>

<#-- General parameters  -->
hostname ${sn}BS
ip domain-name ${sn}
ip host fndserver.fnd.iot ${fndserver}
service timestamps debug datetime msec localtime show-timezone
service timestamps log datetime msec localtime show-timezone
!
<#-- Users  -->
username backup privilege 15 password C1sc0123!
username ${far.adminUsername} privilege 15 password ${far.adminPassword}
!
<#-- Interfaces  -->
interface ${mgmtintf}
  ip address ${far.ip} 255.255.255.192
exit
!
<#-- Clock  -->
clock timezone UTC +2
!
<#-- Archive  -->
file prompt quiet
do mkdir flash:archive
archive
  path flash:/archive
  maximum 8
exit
!
<#-- HTTP -->
ip http server
ip http client connection retry 5
ip http client connection timeout 5
ip http client source-interface ${mgmtintf}
ip http authentication local
ip http timeout-policy idle 600 life 86400 requests 3
ip http max-connections 2
!
<#-- WSMA -->
wsma profile listener exec
  transport http path /wsma/exec
exit
!
wsma profile listener config
  transport http path /wsma/config
exit
!
wsma agent exec
  profile exec
exit
!
wsma agent config
  profile config
exit
!
<#-- CGNA -->
cgna gzip
!
cgna profile cg-nms-register
  add-command show hosts | format flash:/managed/odm/cg-nms.odm
  add-command show interfaces | format flash:/managed/odm/cg-nms.odm
  add-command show ipv6 dhcp | format flash:/managed/odm/cg-nms.odm
  add-command show ipv6 interface | format flash:/managed/odm/cg-nms.odm
  add-command show platform hypervisor | format flash:/managed/odm/cg-nms.odm
  add-command show snmp mib ifmib ifindex | format flash:/managed/odm/cg-nms.odm
  add-command show iox host list detail | format flash:/managed/odm/cg-nms.odm
  add-command show version | format flash:/managed/odm/cg-nms.odm
  interval 10
  url http://fndserver.fnd.iot:9121/cgna/ios/registration
  gzip
  active
exit
!
<#-- Script to generate RSA for SSH -->
event manager applet genkeys
  event timer watchdog name genkeys time 30 maxrun 60
    action 10 cli command "enable"
    action 20 cli command "configure terminal"
    action 30 cli command "crypto key generate rsa modulus 2048"
    action 80 cli command "no event manager applet genkeys"
    action 90 cli command "exit"
    action 99 cli command "end"
exit

end
</#if>
In order to set the configuration template. Navigate to Config > Device Configuration > Edit Configuration Template and add this template:
<#-- Enable periodic inventory notification every 1 hour to report metrics. -->
    cgna profile cg-nms-periodic
      interval 60
    exit
<#-- Enable periodic configuration (heartbeat) notification every 15 min. -->
   cgna heart-beat interval 15

<#-- Enable SSH access -->
line vty 0 4
  transport input ssh
  login local
exit
This template will be the resulting router's running configuration. So any specific configuration for this configuration group should be added here.
The easiest is to start with this minimal template. Once successful, update and tailor the template according to your needs.
At this point, the configuration/preparation of FND is done and you can start with preparing the router.
Prepare the IR800 for Provisioning/PNP
If the device which you want to provision already contains a configuration or has been used before, it is better to completely erase the configuration of the router before you add it to FND with PNP.
Obviously, if this is a new device, this step can be skipped.
The easiest way to do this is with the use of the command write erase and reload the router with the use of the console.
ir809kjk#write erase
Erasing the nvram filesystem will remove all configuration files! Continue? [confirm]
[OK]
Erase of nvram: complete
*Oct 18 11:42:54.367 UTC: %SYS-7-NV_BLOCK_INIT: Initialized the geometry of nvram
ir809kjk#reload

System configuration has been modified. Save? [yes/no]: no
Proceed with reload? [confirm]

Starting File System integrity check
NOTE: File System will be deinited and later rebuilt
After some time, the IR800 should come back with the prompt to run the initial configuration dialog:
         --- System Configuration Dialog ---

Would you like to enter the initial configuration dialog? [yes/no]: no


Press RETURN to get started!
Ensure there are no more remains of a previous PNP/ZTD attempt, it is best to recreate the archive and directory and to remove the before-registration-config on the router as well:
IR800#delete /f before-*
IR800#delete /f /r archive*
IR800#mkdir archive
Create directory filename [archive]?
Created dir flash:/archive
IR800#conf t
Enter configuration commands, one per line.  End with CNTL/Z.
IR800(config)#archive
IR800(config-archive)#path flash:/archive
IR800(config-archive)#maximum 8
IR800(config-archive)#end
Right now, you either have a new device or a device with an empty configuration, so, if needed, this is the moment where a minimal configuration in order for the router to reach FND can be applied.
In case you have a DHCP-server, most of this should go automatically.
The follow manual configuration is selected on the device:
IR800>enable
IR800#conf t
Enter configuration commands, one per line.  End with CNTL/Z.
IR800(config)#int gi0
IR800(config-if)#ip addr dhcp
IR800(config-if)#no shut
IR800(config-if)#end
*Aug 1 12:02:02.887: %SYS-5-CONFIG_I: Configured from console by console

IR800#ping 10.48.43.231
Type escape sequence to abort.
Sending 5, 100-byte ICMP Echos to 10.48.43.231, timeout is 2 seconds:
!!!!!
Success rate is 100 percent (5/5), round-trip min/avg/max = 1/1/2 ms
IR800#
As you see, a quick ping was performed in order to test if the router was able to reach FND with the applied IP configuration.
Provision the IR800 Router
At this point, all prerequisites are complete and you can initiate the PNP process. It is done manually in this instance.
In a production environment, most likely, PNP will be used with DHCP option 43. It means that once the router is started, it receives an IP and the PNP configuration and you can skip this step and the next.
In order to manually configure PNP on the IR800 without DHCP, you need to specify the destination for the requests, which will be the FND-server.
This can be done as follows:
IR800(config)#pnp profile pnp-zero-touch
IR800(config-pnp-init)#transport http ipv4 10.48.43.231 port 9125
IR800(config-pnp-init)#end
As soon as you enter the line starting with "transport", the router starts the PNP process and will try to contact FND on the given IP and port.
If all goes well, the device passes through these:
- [UPDATING_ODM]: update the ODM (Operational Data Model) files on the device to match with the ones valid for the current FND version
- [UPDATING_ODM_VERIFY_HASH]: check if the updated files are correct
- [UPDATED_ODM]
- [COLLECTING_INVENTORY]: collect the current configuration and device info
- [COLLECTED_INVENTORY]
- [VALIDATING_CONFIGURATION]: try to apply the configuration from the bootstrap config (substituted Router Factory Reprovision template)
- [VALIDATED_CONFIGURATION]
- [PUSHING_BOOTSTRAP_CONFIG_FILE]: apply the validated configuration
- [PUSHING_BOOTSTRAP_CONFIG_VERIFY_HASH]: check if the applied configuration is correct
- [PUSHED_BOOTSTRAP_CONFIG_FILE]
- [CONFIGURING_STARTUP_CONFIG]:write the configuration as startup config
- [CONFIGURED_STARTUP_CONFIG]
- [APPLYING_CONFIG]: apply the startup config
- [APPLIED_CONFIG]
- [TERMINATING_BS_PROFILE]: stop bootstrapping.
You can track the process in the FND server.log.
In the GUI, you will see the device move when you navigate to Unheard > Boostrapping > Bootstrapped
After the bootstrapping is completed, the router has the substituted Router Factory Reprovision template and behaves like a regular bootstrapped device without PNP.
In other words, a CGNA profile on the IR800 tries to register with the FND server.
Check the status of the CGNA profile:
JMX2022X04SBS#sh cgna profile-state all
Profile 1:
Profile Name: cg-nms-register
Activated at: Thu Aug  1 15:31:14 2019
URL: http://fndserver.fnd.iot:9121/cgna/ios/registration
Payload content type: xml
Interval: 10 minutes
gzip: activated
Profile command:
    show hosts | format flash:/managed/odm/cg-nms.odm
    show interfaces | format flash:/managed/odm/cg-nms.odm
    show ipv6 dhcp | format flash:/managed/odm/cg-nms.odm
    show ipv6 interface | format flash:/managed/odm/cg-nms.odm
    show platform hypervisor | format flash:/managed/odm/cg-nms.odm
    show snmp mib ifmib ifindex | format flash:/managed/odm/cg-nms.odm
    show iox host list detail | format flash:/managed/odm/cg-nms.odm
    show version | format flash:/managed/odm/cg-nms.odm
State: Wait for timer for next action
Timer started at Thu Aug  1 15:31:14 2019
Next update will be sent in 9 minutes 30 seconds
Last successful response not found
Last failed response not found
With the provided configuration, the device will try to register with FND after ten minutes. You can see that in this output, nine minutes and thirty seconds remain before the router starts the registration process.
You can either wait for the timer to finish or manually execute the cg-nms-register profile immediately:
IR800-Bootstrap#cgna exec profile cg-nms-register
Verify
Use this section in order to confirm that your configuration works properly.
The device should move to the UP status in FND as shown in the image.

Troubleshoot
This section provides information you can use in order to troubleshoot your configuration.
In order to troubleshoot the bootstrapping process, check these:
- FND server log in: /opt/fnd/logs/server.log
- Increase the verbosity of the log in: Admin > Logging > Log Level Settings > Router Bootstrapping > Debug
- From the IR800 console: show pnp ? or debug pnp ?
- In the FND GUI: Devices > Inventory > Select Device > Events
- Most of the issues in this stage are related to (syntax) errors in the Router Factory Reprovision template
In order to troubleshoot the registration process, check these:
- FND server log in: /opt/fnd/logs/server.log
- From the IR800 console:
- show cgna profile-state all
- debug cgna logging ?
- debug wsma agent
- In the FND GUI: Devices > Inventory > Select Device > Events
- Check WSMA connectivity over HTTP to the IR800 from the FND VM
- URI used by FND: http://10.48.43.231:80/wsma/exec
- Method: POST
- Security: basic auth
Contributed by Cisco Engineers
- Jens DepuydtCisco TAC Engineer
Contact Cisco
- Open a Support Case

- (Requires a Cisco Service Contract)
 Feedback