Upgrade Evolved Programmable Network Manager from Version 5.X to 6.1.1
Available Languages
Download Options
Bias-Free Language
The documentation set for this product strives to use bias-free language. For the purposes of this documentation set, bias-free is defined as language that does not imply discrimination based on age, disability, gender, racial identity, ethnic identity, sexual orientation, socioeconomic status, and intersectionality. Exceptions may be present in the documentation due to language that is hardcoded in the user interfaces of the product software, language used based on RFP documentation, or language that is used by a referenced third-party product. Learn more about how Cisco is using Inclusive Language.
Contents
Introduction
This document describes the instructions to upgrade Evolved Programmable Network Manager (EPNM) from 5.x to 6.1.1 version.
Chapter 1: Overview
This document does not replace the official EPNM installation guides and it must only be used as a reference. Adjustments must be made to this procedure in order to match your specific deployment setup. All upgrade steps must be verified in a lab before they are executed in a production environment.
The upgrade from EPNM 5.x to version 6.1.1 requires multiple intermediate steps as list.
- Backup EPNM 5.x data offline.
- Install EPNM 6.0 from scratch.
- Restore your EPNM 5.x backup into the new version 6.0.
- Upgrade your EPNM 6.0 server(s) to EPNM 6.1.1.
Upgrade Pre-checks
Please perform these pre-checks before you start the upgrade process:
- Please go through the EPNM installation guide to make sure you meet all the requirements
- Bare metal is not supported in Cisco EPN Manager 6.1. Migrate to ESXi based host before the upgrade, if EPNM is not already on virtual machine
- It is highly recommended to use Smart Licenses as traditional licenses are not supported post 6.1 release. To convert your license, use the EPNM Installation Guide Section View and Manage Licenses
- Make sure your Virtual Machine meets the minimum requirements referred in the EPNM installation guide
- EPNM .iso file downloaded to local machine
- EPNM patch files downloaded to local machine
- Server authentication keys, shell user, and root user passwords are available
- Names, quantities, and other information of the installed EPNM licenses
- A repository to store EPNM backup
- If you use Smart Licensing, save your Smart License Token and the Registration method URL. To do this, go to Administration > System Settings > General > Account Settings > Smart Licensing Transport. Save a copy of the Transport Mode and the URL configured here.
Chapter 2: Backup EPNM 5.x data offline
Since Cisco EPN Manager version 6.0 does not support an inline migration, we must transfer the latest backup(s) offline during the process. Cisco EPN Manager performs automatic application backups; more information is available in the Official Admin Guide Backup Scheduling section.
If needed, you can manually trigger an immediate application backup both from the Web GUI or the CLI as shown:

Tip: Backup duration is associated with the machine resources and amount of data stored in your DB. You can check the timestamps on your last automatic backup file and calculate the time based on the Server Backup job schedule.
2.1 - Perform Pre-Upgrade System Health Check
Please perform the system health checks before the start of the upgrade and record all the states for future references. Health checks are available in the appendix section.
2.2 - Perform an immediate Application Backup through the Web GUI
| Step 1 |
Choose Administration > Dashboards > Job Dashboard. |
| Step 2 |
Choose System Jobs > Infrastructure. |
| Step 3 |
In the Jobs list, check the Server Backup check box, then click Run. |
| Step 4 |
To view the backup status, scroll to the top of the table to locate the new job, then check its status and results. |
Here is a screenshot that exhibits the provided steps:
 Fig 2.1 - Server Backup System job details
2.3 - Perform an immediate Application Backup through the CLI
If you prefer to use CLI to perform application backup, please use the these steps:
| Step 1 |
Log into your Standalone/Primary server as the CLI admin user (see Establish an SSH Session With the Cisco EPN Manager Server). |
| Step 2 |
Display the list of backups, where repositoryName is the backup repository: |
| Step 3 |
Start the remote backup. where, filename is the name that you want to give the application backup file (for example, myBackup). The character length of the file name is 26 |
Here is a sample output of the provided commands for reference:
epnm50-pri/admin# show repository defaultRepo
epnm50-pri-230111-0330__VER6.0_BKSZ18G_CPU16_MEM6G_RAM31G_SWAP15G_APP_CK3279447439.tar.gpg
epnm50-pri/admin#

epnm50pri/admin# backup epnm50 repository defaultRepo application NCS
DO NOT press ^C while the backup is in progress
Aborting backup with a ^C may terminate the backup operation or the backup file may be corrupted
To restore this backup you will have to enter this password
Password :
Password Again :
Backup Started at : 01/13/23 18:19:28
Stage 1 of 7: Database backup ...
Database size: 26G
-- completed at 01/13/23 18:21:35
Stage 2 of 7: Database copy ...
-- completed at 01/13/23 18:21:35
Stage 3 of 7: Backing up support files ...
-- completed at 01/13/23 18:21:36
Stage 4 of 7: Compressing Backup ...
-- completed at 01/13/23 18:21:54
Stage 5 of 7: Building backup file ...
-- completed at 01/13/23 18:23:07
Stage 6 of 7: Encrypting backup file ...
-- completed at 01/13/23 18:23:18
Stage 7 of 7: Transferring backup file ...
-- completed at 01/13/23 18:23:18
% Backup file created is: epnm50-pri-230112-0330__VER5.0_BKSZ21G_CPU16_MEM6G_RAM31G_SWAP15G_APP_CK4068034237.tar.gpg
Total Backup duration is: 0h:3m:53s
epnm50-pri/admin#

epnm50-pri/admin# show repository defaultRepo
epnm50-pri-230111-0330__VER6.0_BKSZ18G_CPU16_MEM6G_RAM31G_SWAP15G_APP_CK3279447439.tar.gpg
epnm50-pri-230112-0330__VER5.0_BKSZ21G_CPU16_MEM6G_RAM31G_SWAP15G_APP_CK4068034237.tar.gpg
epnm50-pri/admin#
2.4 - Transfer the EPNM 5.x backup to your offline server
| Step 1 |
Log into your Standalone/Primary server as the CLI admin user (see Establish an SSH Session With the Cisco EPN Manager Server). |
| Step 2 |
Access the system shell and become root user: epnm50-primary/admin# shell |
| Step 3 |
Execute the script to get the SCP server credentials: ade # /opt/CSCOlumos/bin/getSCPCredentials.sh |
| Step 4 |
Connect to EPNM with your preferred SCP client application (use the credentials obtained from the step 3). Navigate in EPNM server to /localdisk/defaultRepo/ to find the latest backup file and save it to your machine. |
Here is a sample output of the mentioned commands for reference:
epnm50pri/admin# shell
Enter shell access password :
ade # whoami
admin
ade # sudo su
ade # whoami
root
ade # /opt/CSCOlumos/bin/getSCPCredentials.sh
user is scpuser
password is XXXXX
Connect to your Primary/Standalone EPNM 5.x server via SCP with your preferred application and transfer the backup file from the /localdisk/defaultRepo/ directory.
# scp scpuser@epnm50-pri:/localdisk/defaultRepo/epnm50-pri-230112-0330__VER5.0_BKSZ21G_CPU16_MEM6G_RAM31G_SWAP15G_APP_CK4068034237.tar.gpg /home/user/Download
scpuser@epnm50-pri's password:
epnm50-pri-230112-0330__VER5.0_BKSZ21G_CPU16_MEM6G_RAM31G_SWAP15G_APP_CK4068034237.tar.gpg       100%     729MB
Step For High Availability Deployments only
If you do not have High Availability deployment, you can proceed to the next chapter. For High Availability (HA) deployments, once the backup is fully completed, the High Availability (HA) configuration needs to be removed before we move to the next step.
This can be achieved via the Web GUI or the CLI.
Remove the High Availability configuration through the Web GUI
To remove High Availability configuration through GUI, use these steps:
| Step 1 |
Log into the Cisco EPN Manager web GUI on the primary server as a user with Administrator privileges. |
| Step 2 |
From the left sidebar, chooseAdministration>Settings>High Availability. |
| Step 3 |
ClickHA Configurationon the left. |
| Step 4 |
ClickRemove. |
| Step 5 |
When the remove operation completes, confirm that the Configuration Mode field displaysHA Not Configured. |
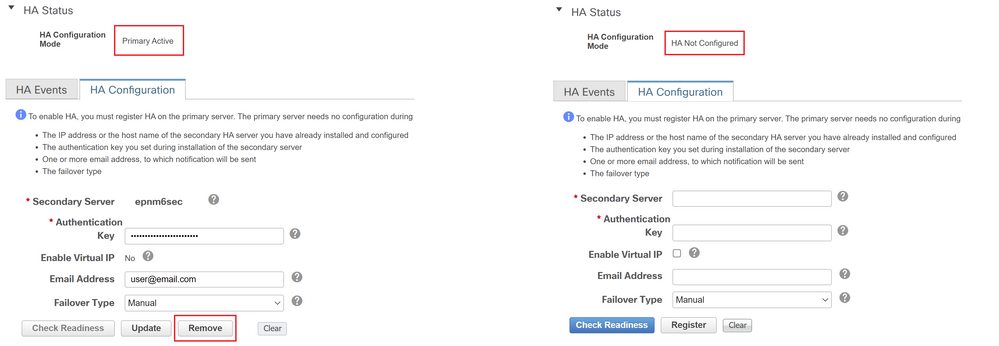 Fig 1 Remove High Availability prior to upgrade
Remove the High Availability configuration through the CLI
If you prefer to remove the High Availability configuration through CLI, use these steps:
| Step 1 |
Log into the Primary server as a Cisco EPN Manager CLI admin user (see Establish an SSH Session With the Cisco EPN Manager Server). |
| Step 2 |
Execute the command to verify HA configuration is present |
| Step 3 |
Execute the command to remove HA configuration |
| Step 4 |
Answer yes when asked if you want to proceed. |
| Step 5 |
Execute the command to verify HA configuration is removed |
Here is a sample output of the mentioned commands for reference:
epnm50-primary/admin# ncs hastatus
[Role] Primary [Secondary Server] epnm50-sec(*.*.*.*) [State] Primary Active [Failover Type] Manual
epnm50-primary/admin# ncs haremove
High availability configuration will be removed
Do you wish to continue? (y/N) y
Removing primary configuration will remove all database information
Primary is attempting to remove high availability configuration from both primary and secondary
Successfully removed high availability configuration
epnm50-primary/admin# ncs hastatus
[Role] Primary [State] HA not Configured
epnm50-primary/admin#
Chapter 3: Install EPN Manager 6.0 from scratch
The Cisco EPN Manager version 6.0 application needs to be deployed before your 5.x data can be restored over it.
This installation must done on a VM via OVA file. Bare-Metal servers are not supported post 6.0 version.
The steps involved in this Chapter include:
- Installation media download
- Verify the installation media
- Deploy the installation media based on the chosen platform
- Start the installation process.

Tip: The installation time is linked to your system resources. A typical installation time with the required restart at the end, usually takes around 3 hours.

Warning: If you have an HA setup, you must complete these steps on both Primary and Secondary servers.
3.1 - Download EPNM 6.0 installation media
Although EPNM 6.0 can be installed on a virtual machine (VM) or a Bare Metal server, for the upgrade to 6.1.1 and higher release, we do not support Bare Metal. For that reason, we recommend that you install OVA images available on the Official EPNM 6.0 Download page.
Please download the OVA file to use for new servers.
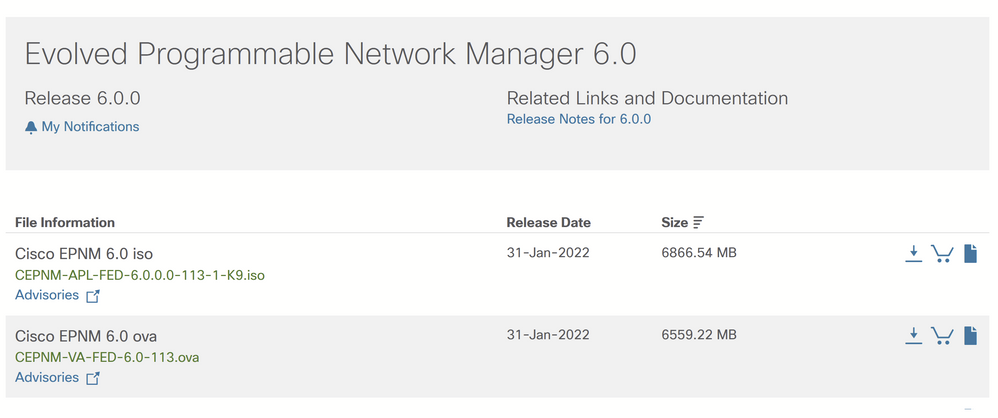 Fig 3.1 - EPN Manager 6.0 OVA and ISO installation files

Warning: Bare Metal: Although still available in the 6.0 current release, Bare Metal installation has been deprecated and is removed from release 6.1 onwards. For this upgrade, use OVA file on VMWare.
Please confirm your server(s) meet the minimum requirements in the Official EPNM 6.0 Installation Guide Hardware and Software Requirements section.
3.2 - Verify the OVA package
| Step 1 |
If you do not have openssl installed, download and install it (see more info here). |
| Step 2 |
Download these files from the Software Download site on Cisco.com, and place them in a temporary directory.
|
| Step 3 |
Move the OVA files, the certificate file, and the signature file to an alternate RHEL machine with openssl capability with a transfer method such as scp. |
| Step 4 |
Run this command: Where:
|
| Step 5 |
If the result is Verified OK |
Here is a sample output of the proivided commands for reference:
# ls -l
-rw-r--r--. 1 root root 6877839360 Jan 13 17:02 CEPNM-VA-FED-6.0-113.ova
-rw-r--r--. 1 root root 256 Jan 22 20:12 CEPNM-APL-FED-6.x.x.x-113-1-K9.iso.signature
-rw-r--r--. 1 root root 451        Jan 22 20:12 CiscoEPNM6.0.pem
# openssl dgst -sha512 -verify CiscoEPNM6.0.pem -signature CEPNM-APL-FED-6.x.x.x-113-1-K9.iso.signature CEPNM-VA-FED-6.0-113.ova
Verified OK
3.3 - Deploy the Cisco EPN Manager 6.0 Installer with an OVA/VM
| Step 1 |
Launch the VMware vSphere client. |
| Step 2 |
ChooseFile > Deploy OVF Template. |
| Step 3 |
In the Deploy OVF Template window, clickBrowse. |
| Step 4 |
Navigate to the OVA file, select it, then clickNext. |
| Step 5 |
Accept the End User License Agreement, and in the OVF Template Details window, verify the OVA file details like the product name, version, and size, then clickAccept. |
| Step 6 |
In the Name and Location window:
|
| Step 7 |
Select the cluster or host on which to install the OVA, then clickNext. |
| Step 8 |
Select the destination storage for the OVA to be deployed, then clickNext. |
| Step 9 |
Select the disk format asThick Provision Lazy Zeroed, then clickNext. |
| Step 10 |
Select the appropriate network based on the configured IP address, then clickNext. |
| Step 11 |
In the Ready to Complete window:
This process can take a few minutes to complete. Check the progress bar in the "Deploying Virtual Application" window to monitor the task status. When the deployment task has successfully completed, a confirmation window appears. |
| Step 12 |
ClickClose. The virtual appliance that you deployed is listed under the host, in the left pane of the VMware vSphere client. |
3.5 - Start EPN Manager 6.0 installation process
Note: The first startup takes approximately 30 minutes and is followed by a system reboot.
| Step 1 |
In the VMware vSphere Consoletab or in the UCS KVM Console at the localhost login prompt, entersetup. |
| Step 2 |
Enter these parameters as you are prompted for them: |
| Step 3 |
You are prompted to choose whether you want the newly-installed server to act as a secondary server in an HA implementation.
|
| Step 4 |
Enter a password for the Cisco EPN Managerweb GUI root user(you have to enter it twice). You use this password to log into the web GUI for the first time and create other user accounts. (This account must be disabled after you create a new user account with the same level of privileges.) |
| Step 5 |
Review your settings and:
|
Example Install EPNM 6.0 on Standalone/Primary server
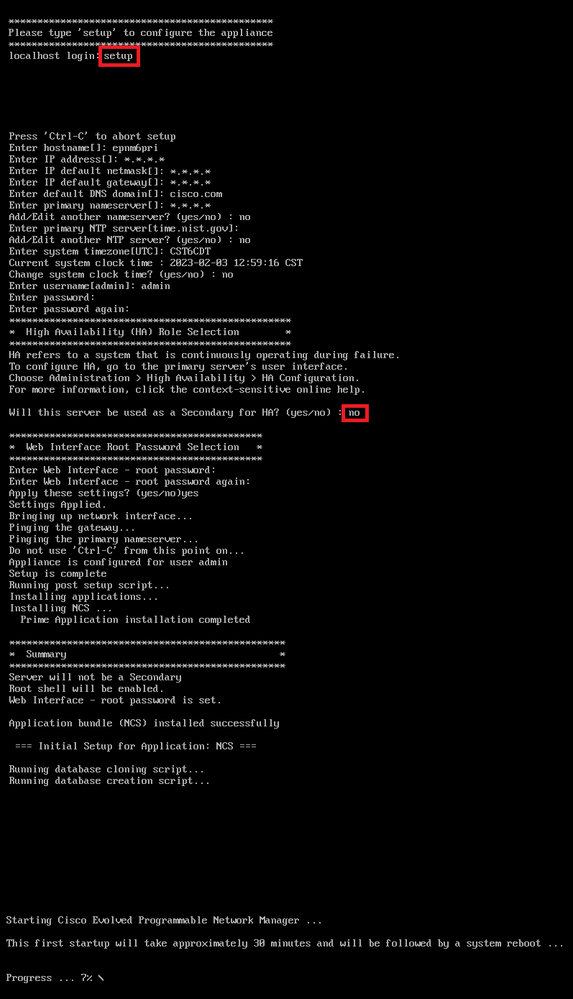 Fig 3.2 - Output of Standalone / Primary server installation
Example Install EPNM 6.0 on Secondary server (For High Availability Setups only)
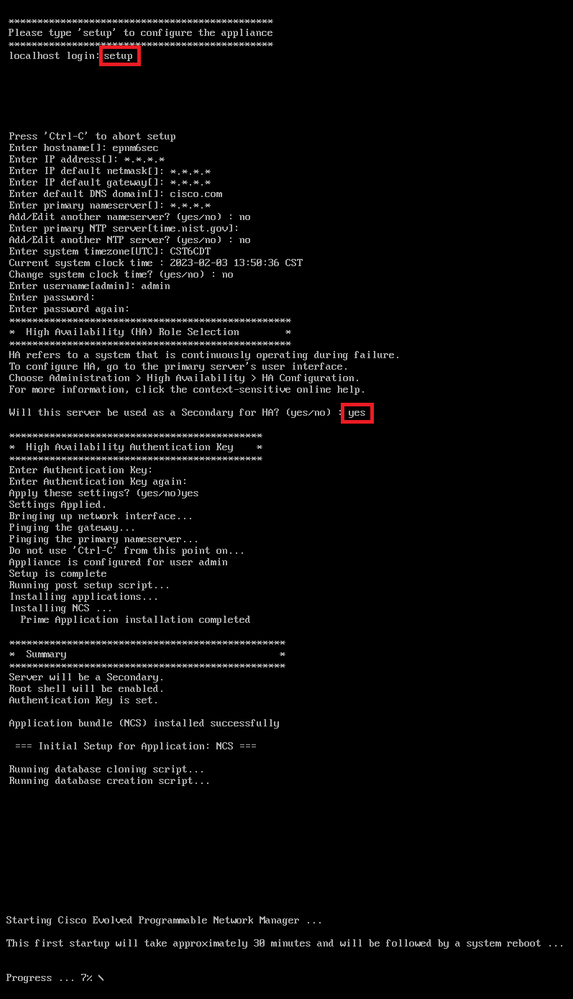 Fig 3.3 - Output of Secondary server installation
Ensure all the services are up and in good state with the ncs status command.
epnm6pri/admin# ncs status
Health Monitor Server is running. ( [Role] Primary [State] Primary Active )
Database server is running
Distributed Cache Service is running.
Messaging Service is running.
FTP Service is running
TFTP Service is running
NMS Server is running.
LCM Monitor is running.
SAM Daemon is running ...
DA Daemon is running ...
Compliance engine is running
epnm6pri/admin#
Verify the installation is successfully completed with the show version command.
epnm60pri/admin# show version

Cisco Application Deployment Engine OS Release: 6.7
ADE-OS Build Version: X.X.X.XXX
ADE-OS System Architecture: x86_64

Copyright (c) 2009-2020 by Cisco Systems, Inc.
All rights reserved.
Hostname: epnm6pri

Version information of installed applications
---------------------------------------------

Cisco EPN Manager
********************************************************
Version : 6.0.0 [FIPS not Enabled]
Build : 6.x.x.x.000
epnm6pri/admin#
Verify the version on the EPNM login page.
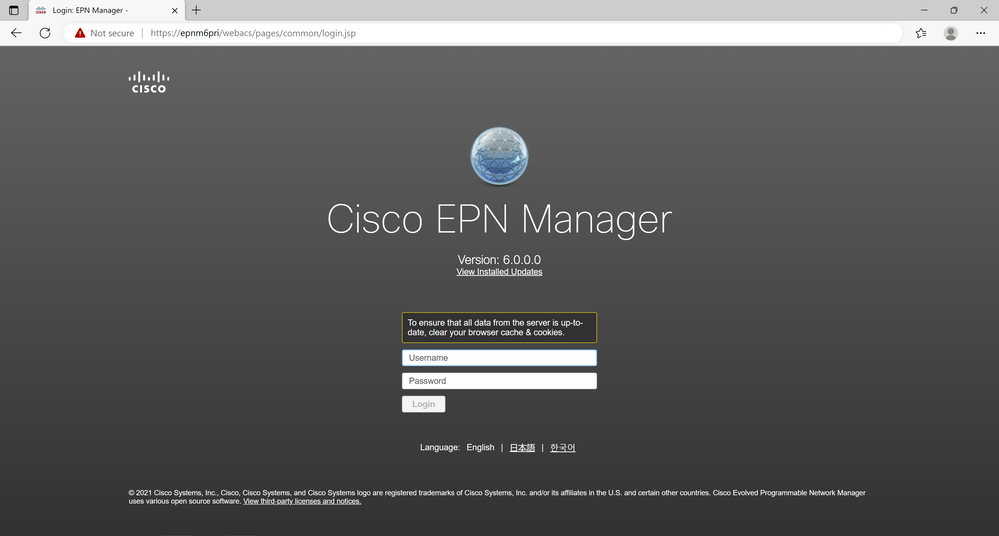 Fig 3.6 Login page shows new EPNM 6.0 Version
Chapter 4: Restore EPNM 5.x data into EPNM 6.0
Continue with the last step in order to transfer and restore your EPNM 5.x data stored in your Application Backup into your new EPNM 6.0 server.
4.1 - Transfer the EPNM 5.x data to your new server.
Login with the admin user via CLI to your new EPNM 6.0 server and access the shell.
Become the root user.
epnm60/admin# shell
Enter shell access password :
ade # whoami
admin

ade # sudo su
ade # whoami
root
Execute the script in order to get the SCP username and password that can be used to transfer the file into your new EPNM 6.0 server.
ade # /opt/CSCOlumos/bin/getSCPCredentials.sh
user is scpuser
password is <snip>
Connect to your new EPNM 6.0 server via SCP with your preferred application and transfer the EPNM 5.x backup file into the /localdisk/defaultRepo/ directory.
# scp epnm50-230113-0330__VER5.0_BKSZ21G_CPU16_MEM6G_RAM31G_SWAP15G_APP_CK4068034237.tar.gpg scpuser@epnm60-primary:/localdisk/defaultRepo
scpuser@epnm60-primary's password:
epnm50-230113-0330__VER5.0_BKSZ21G_CPU16_MEM6G_RAM31G_SWAP15G_APP_CK4068034237.tar.gpg         100%
4.2 - Restore the EPNM 5.x application backup into your new EPNM 6.0 server
Note: The Estimated time for application restore depends on the size of the backup file and the resources allocated to the new server.
Confirm the file is present in the repository.
epnm60-primary/admin# show repository defaultRepo
epnm50-230113-0330__VER5.0_BKSZ21G_CPU16_MEM6G_RAM31G_SWAP15G_APP_CK4068034237.tar.gpg
Kickoff the restore of the Application Backup file in your new EPNM 6.0 server.
epnm60-primary/admin# restore epnm50-230113-0330__VER6.0_BKSZ21G_CPU16_MEM6G_RAM31G_SWAP15G_APP_CK4068034237.tar.gpg repository defaultRepo application NCS
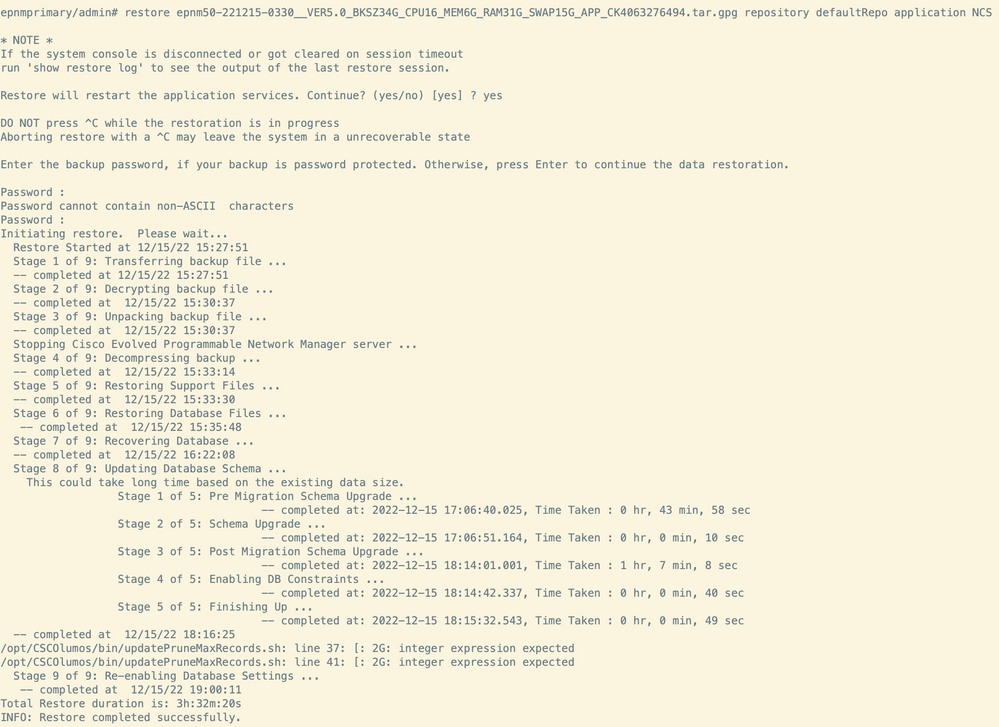 Fig 4.1 - EPNM 5.x backup restoration completed in new EPNM 6.0 server
4.3 - Synchronize your devices to refresh the data in your new EPNM 6.0
Check the network devices GUI page to verify the restore was completed successfully.
4.4 - Take a Virtual Machine (VM) snapshot
At this point, take a snapshot of your EPNM Virtual Machine. This snapshot can be used to rollback your system to this stage in case there are any issues with the proceeding upgrade steps.
You can refer to VMWare Knowedge Base article on how to create and manage your VM Snapshots.
Chapter 5: Upgrade from EPNM 6.0.x to EPNM 6.1.1
It is now time to install the final upgrade file and patch files over your new EPNM 6.0 setup in order to go to the latest EPNM version 6.1.1. At this point, it is expected that both your Standalone / Primary server and your Secondary (if any) are on version 6.0.
Please use the steps to install the required files
5.1 - Download EPNM 6.1.1 required file
The EPNM 6.1.1 patch file is available at the Official EPNM 6.1.1 Download page. From this page, download the file called: cepnm6.1-dpp1-build690.ubf
 Fig 5.2 - EPNM 6.1.1 patch file
Please keep the listed file in your client PC, from which you usually connect to EPNM Web GUI or CLI.
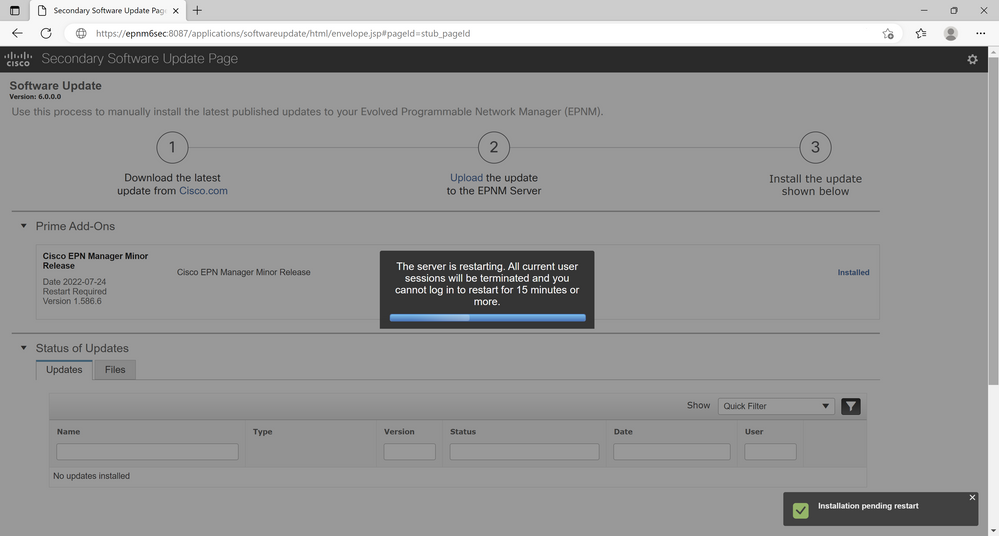 Fig 5.14 Message indicates System restarts
5.2 - Install EPNM 6.1.1 patch file
Next, we review the steps required to install the EPN Manager 6.1.1 patch on your Standalone or Primary server.
The installation is done through EPNM Web GUI.

Note: The EPNM 6.1.1 installation requires an automatic server reboot and can take up to 4 hours to complete based on your Hardware configuration.

Tip: Cisco highly recommends that you take a VM snapshot before you install the EPNM 6.1.1 patch, so that you can use that snapshot in case you need to rollback.
Example Install EPNM 6.1.1 patch file on Standalone / Primary server
| Step 1 |
Log into the Cisco EPN Manager web GUI as a user with Administrator privileges. |
| Step 2 |
Choose Administration > Software Update. |
| Step 3 |
|
| Step 4 |
Click the blue Install button next to the EPNM Device Pack and Patch info |
| Step 5 |
Click Yesin the confirmation message pop-up window to start the installation. |
Here are the screenshots of the steps provided:
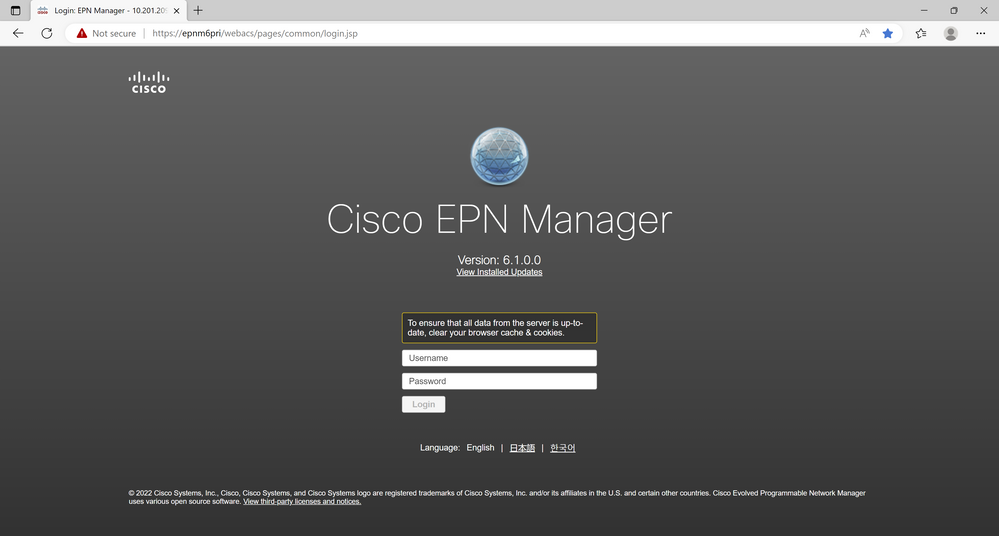 Fig 5.15 - EPNM 6.1 Standalone / Primary server login page
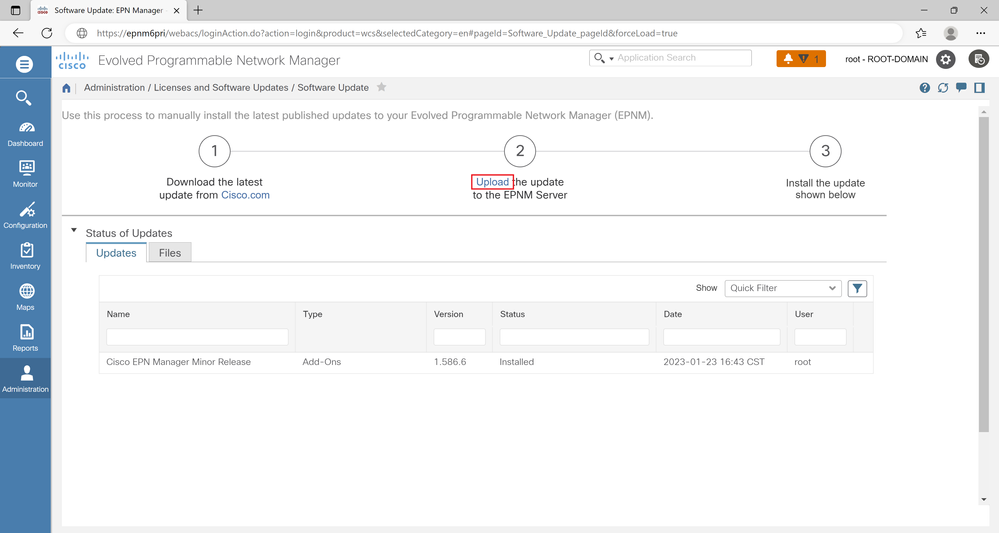 Fig 5.16 - Click the Upload hyperlink
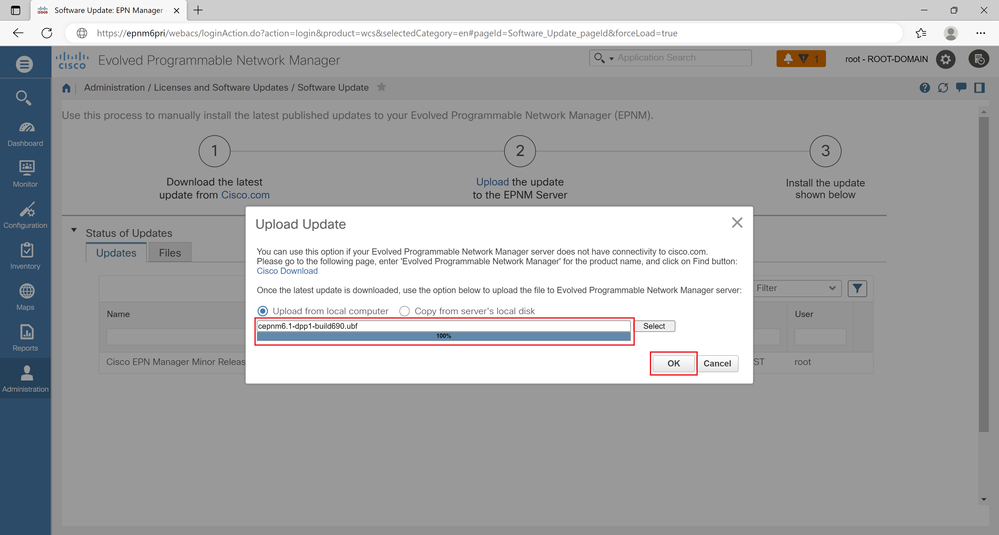 Fig 5.17 - Browse and select the 6.1.1 upgrade file cepnm6.1-dpp1-build690.ubf
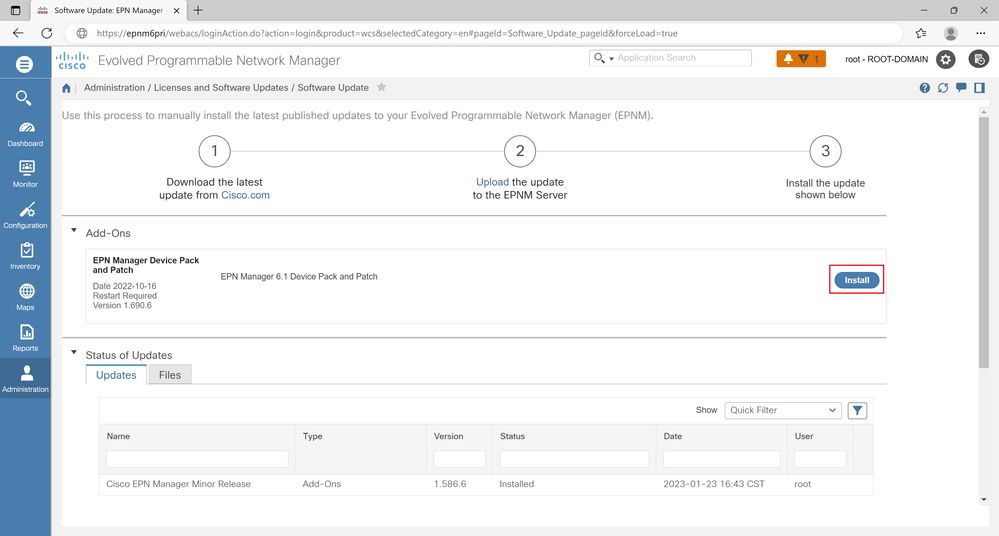 Fig 5.18 - Click the blue Install button
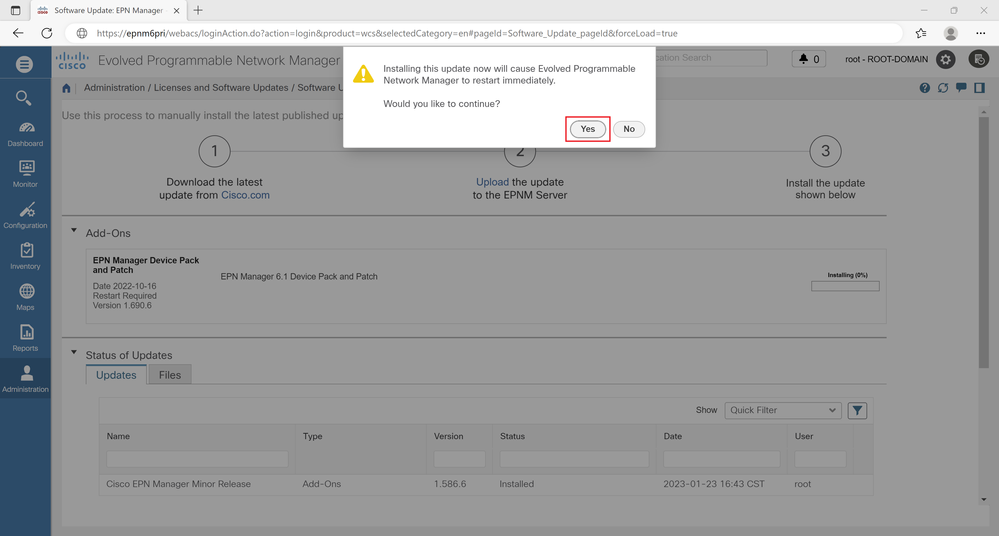 Fig 5.19 - Click "Yes" to start the Installation process
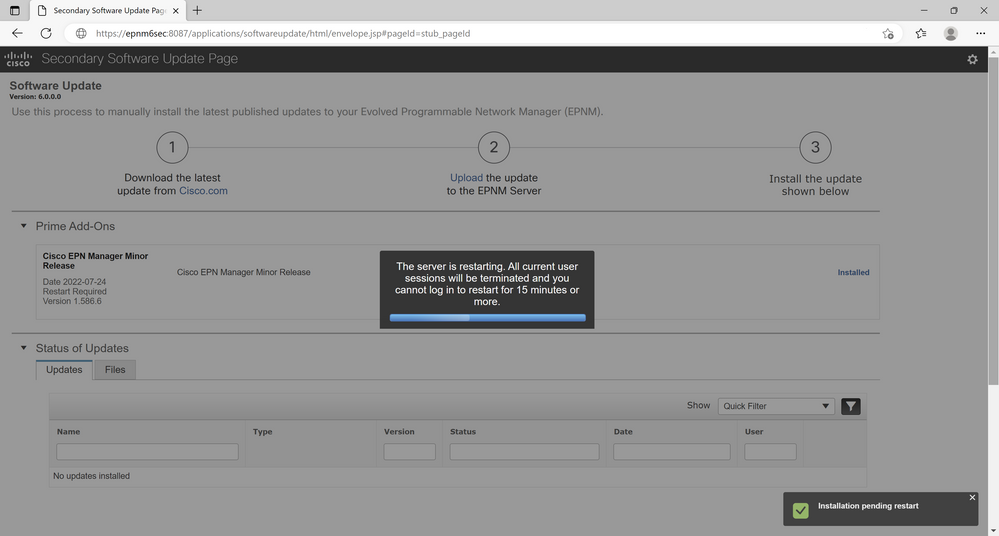 Fig 5.20 Message Indicates System restarts shortly
Example Install EPNM 6.1.1 patch file on Secondary server (Optional)
| Step 1 |
Log into the secondary server’s HM web page with this URL on your web browser:https://serverIP:8082 WhereserverIPis the IP address or host name of the secondary server. |
| Step 2 |
Enter the authentication key and clickLogin. |
| Step 3 |
ClickSoftware Updateat the top right of the Health Monitor window to open the Secondary Server Software Update window. |
| Step 4 |
Enter the authentication key and clickLogin. |
| Step 5 |
|
| Step 6 |
Click the blue Install button next to the EPNM Device Pack and Patch info. |
| Step 7 |
Click Yesin the confirmation message pop-up window to start the installation. |
Here are the screenshots of the listed steps:
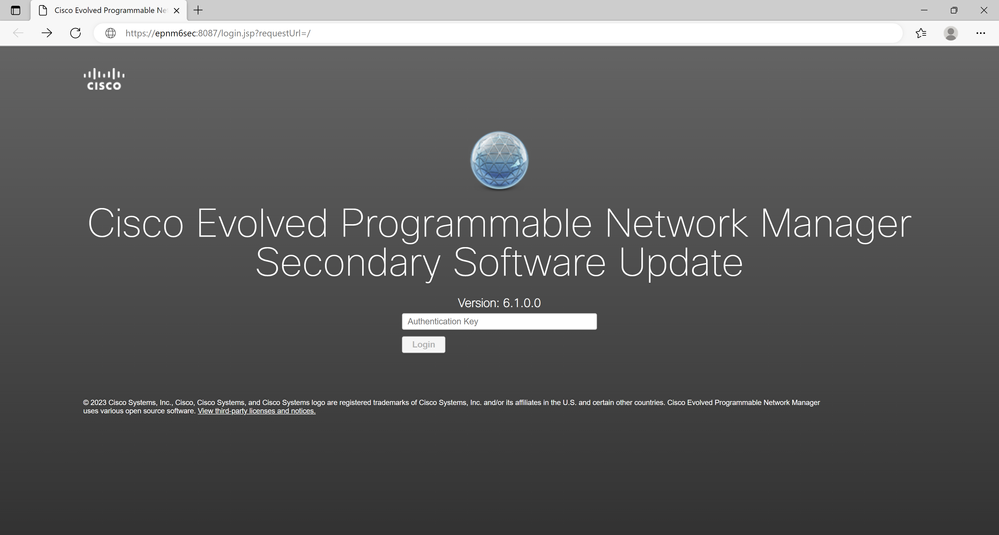 Fig 5.21 - EPNM 6.1 Secondary server Software Update page
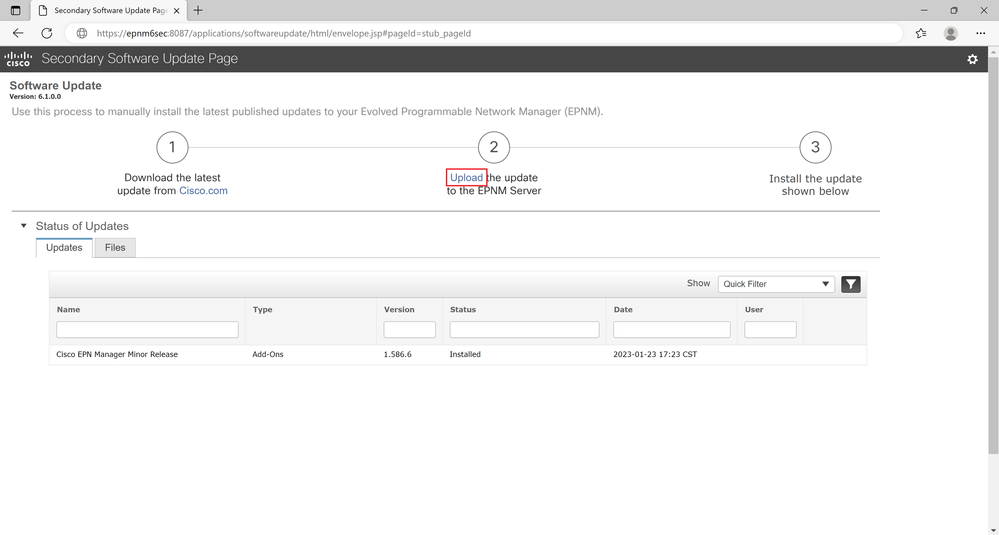 Fig 5.22 - Click the Upload hyperlink
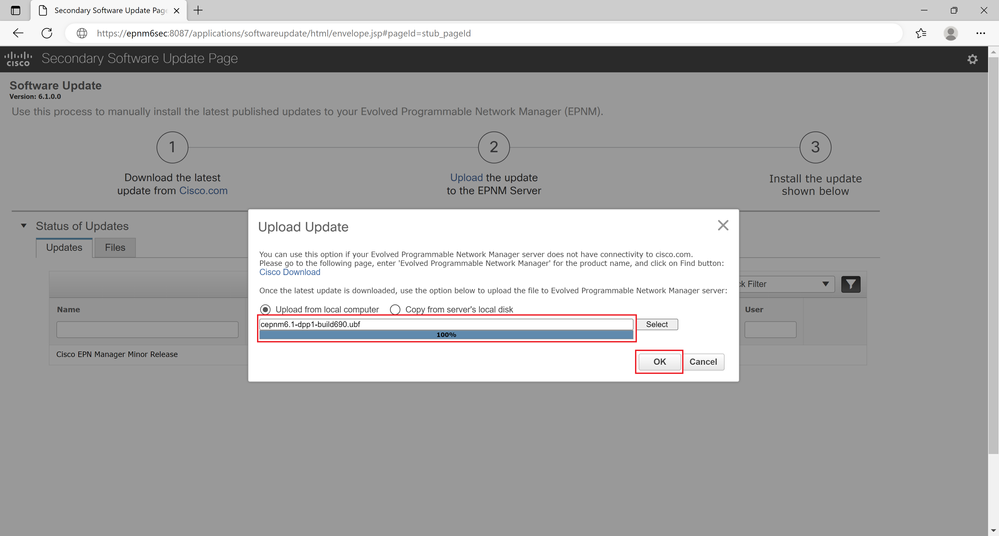 Fig 5.23 - Browse and select the 6.1.1 upgrade file cepnm6.1-dpp1-build690.ubf
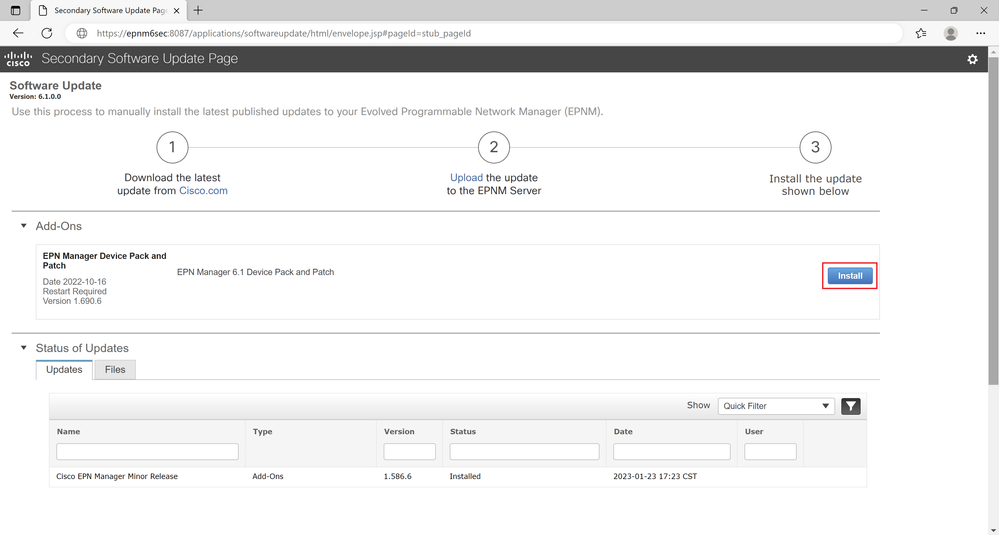 Fig 5.24 - Click the blue Install button
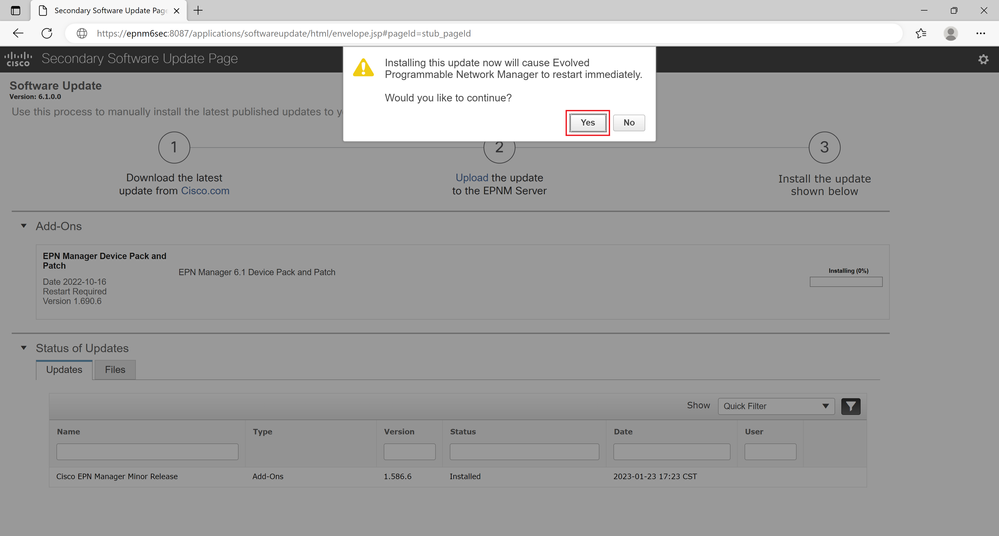 Fig 5.25 - Click "Yes" to start the Installation process
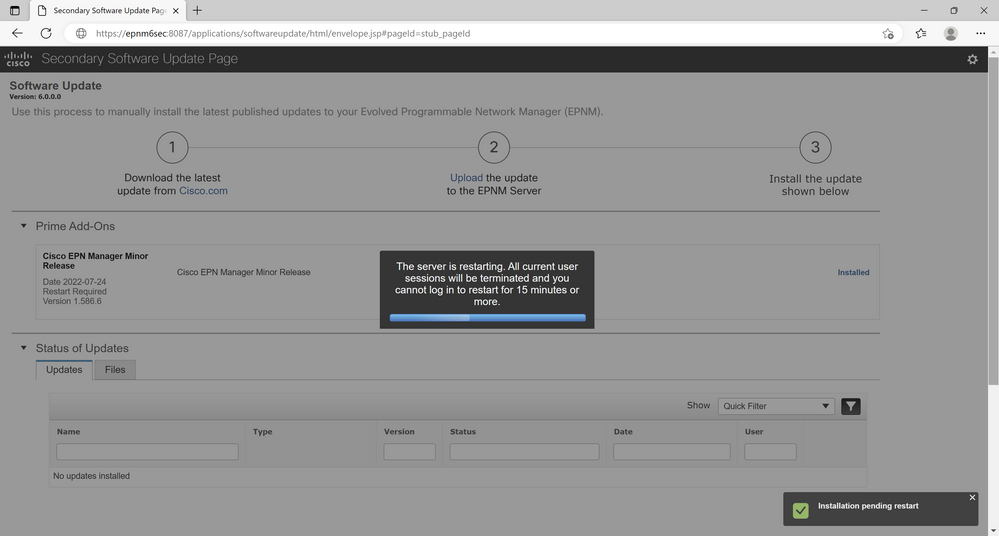 Fig 5.26 The message indicates system restarts shortly
5.3 - Reconfigure High Availability (Only required for High-Availability setup)
| Step 1 |
Log into the Primary Cisco EPN Manager web GUI as a user with Administrator privileges. |
| Step 2 |
From the left sidebar menu, chooseAdministration > Settings > High Availability. |
| Step 3 |
ClickHA Configurationon the left, then enter the secondary server’s IP address, the secondary server’s authentication key, and an email address to which Cisco EPN Manager must send HA state change notifications. |
| Step 4 |
If you use virtual IP addresses in your HA setup (if the primary and secondary servers are in the same subnet), check the Enable Virtual IP check box and enter the virtual IP address(es). |
| Step 5 |
ClickSave, then wait until the servers are synchronized. |
| Step 6 |
Verify that the Configuration Mode isHA Enabled. |
Here are the screenshots of the listed steps:
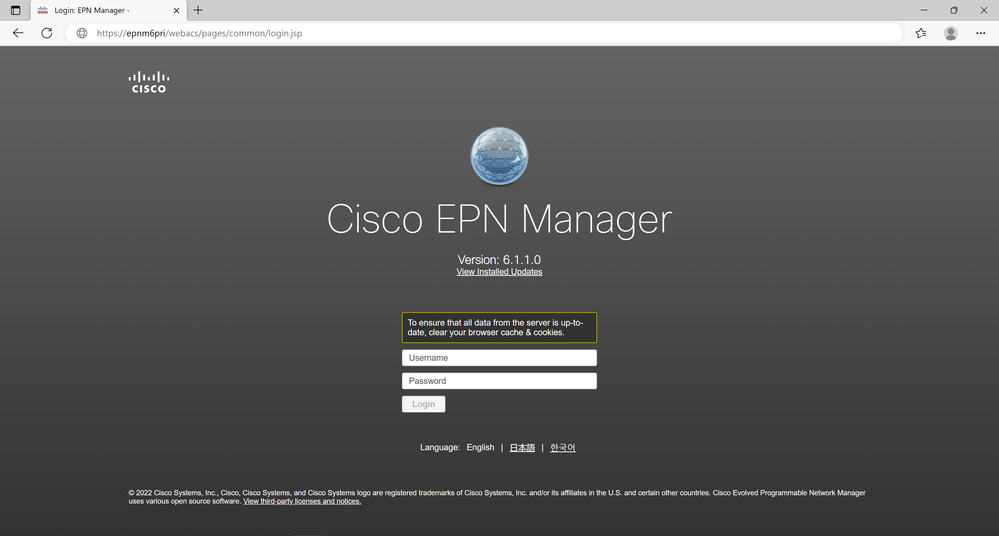 Fig 5.27 - Primary / Standalone login page
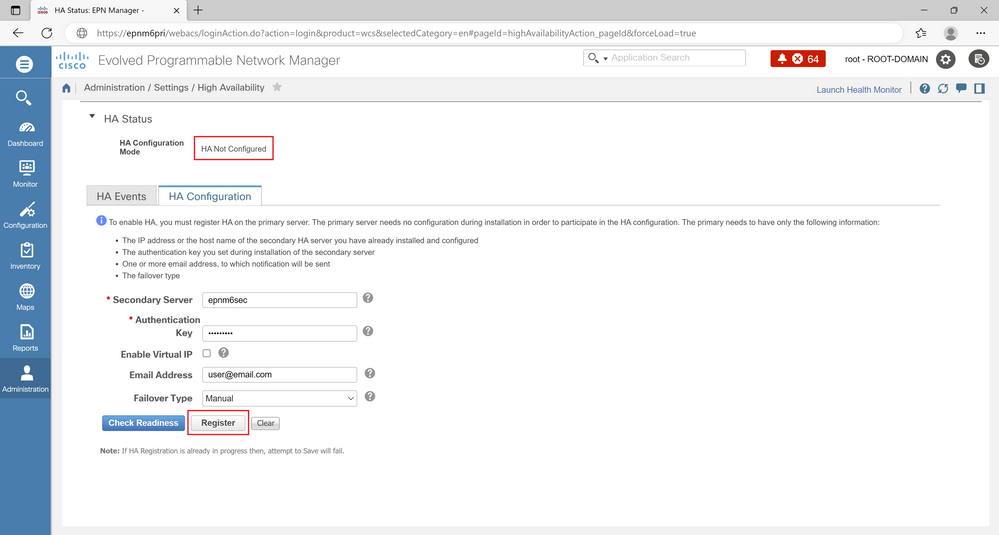 Fig 5.28 - No HA configuration present
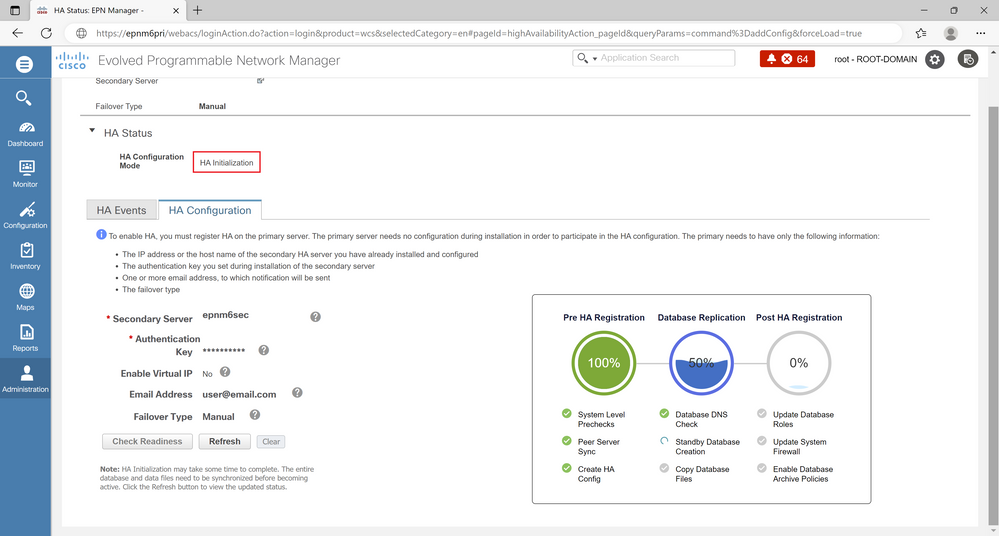 Fig 5.29 - HA Registration in progress
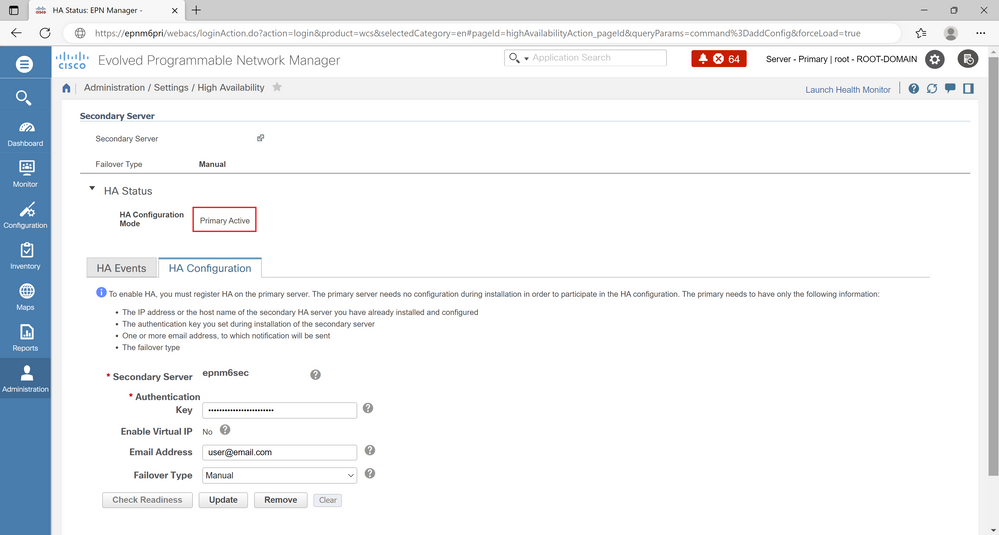 Fig 5.30 - HA Registration Completed
Verify successful HA registration with the command ncs ha status on the EPNM CLI.
5.4 - Reconfigure Smart Licensing settings
If you have Smart License, use these steps to configure it again.
Make sure you set the Transport Mode and the URL that you saved as part of the Pre-Checks section of this document.
| Step 1 |
Log into the Primary Cisco EPN Manager web GUI as a user with Administrator privileges. |
| Step 2 |
From the left sidebar menu, choose Administration > Licenses and Software Updates > Smart Software Licensing. |
| Step 3 |
ClickView / Edit in the Transport Settings section. Specify the correct mode and URL, backed up from the Pre-checks section. |
| Step 4 |
Obtain a valid Registration Token from your Smart Account / OnPrem server and specify it in the proper field. |
| Step 5 |
ClickRegister, then wait until the process is completed. |
| Step 6 |
Verify that the Smart Licensing mode, Account and License counts are updated properly. |
Here are screenshots of the pages listed:
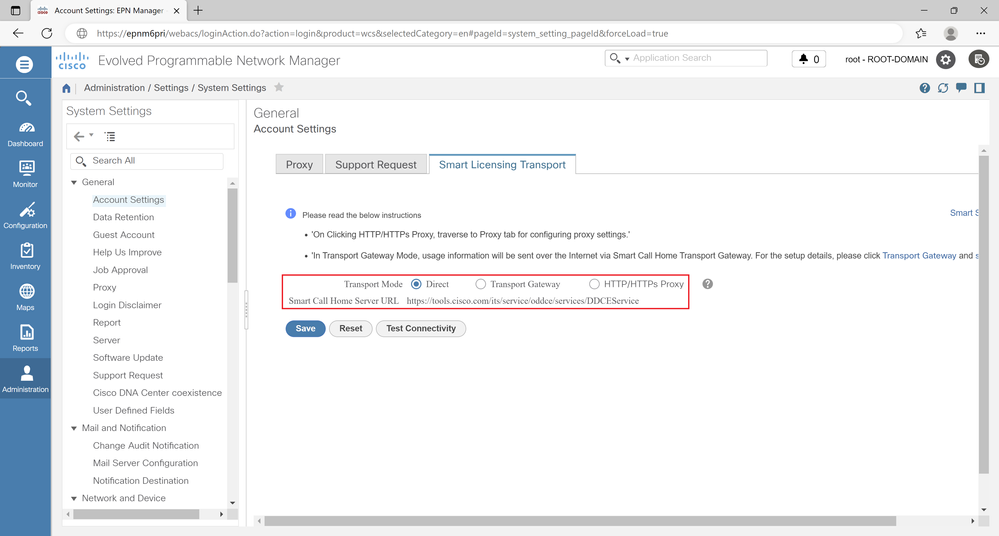 Fig 5.31 - Configure Transport Mode and URL.
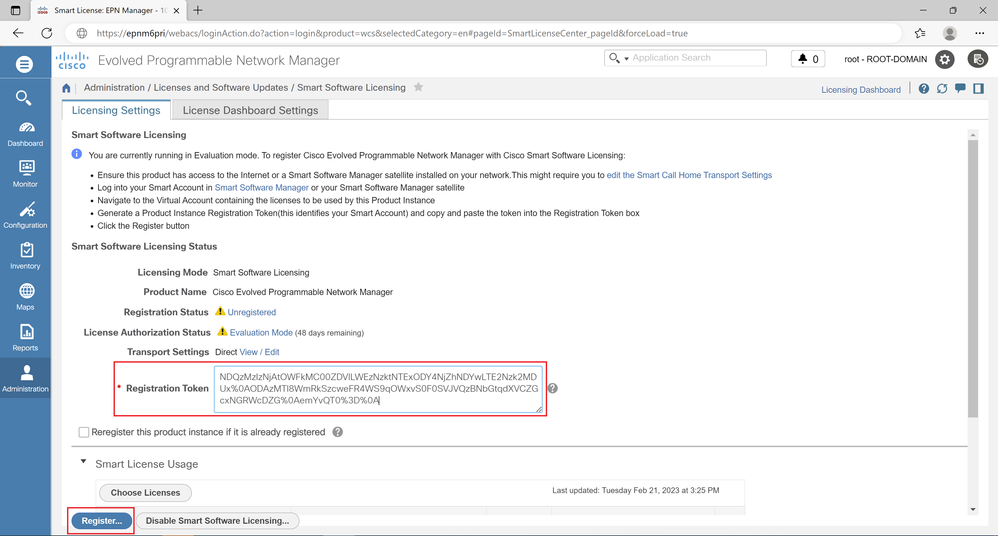 Fig 5.32 - Paste Registration Token details.
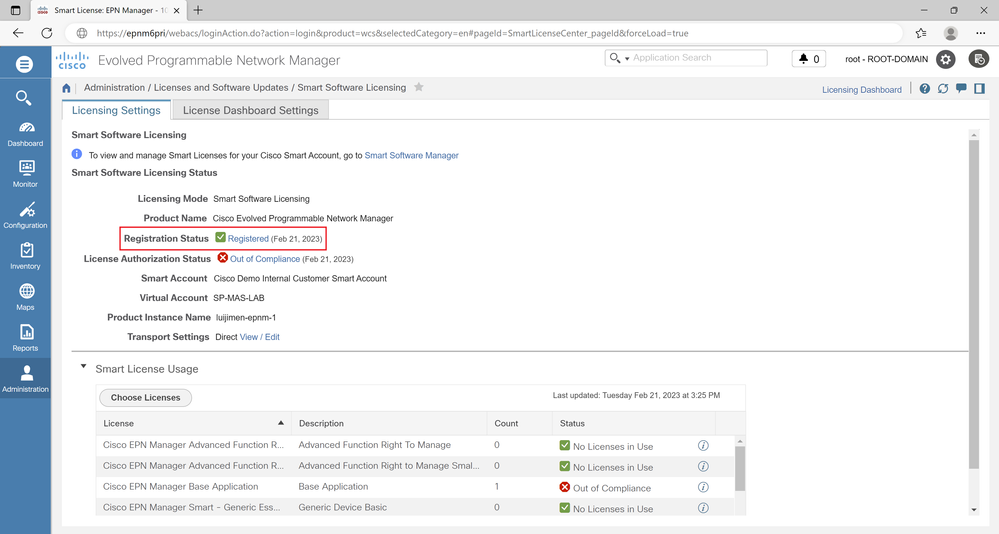 Fig 5.32 - Confirm Smart License registration status.

Note: At the end of the upgrade, perform a system health check to ensure everything is as expected. Health checks are available in the appendix section.
Appendix
System Health Checks
Check points that can be performed to validate the health of the system through Web GUI
1: Validate that all devices are added and are in sync:
Inventory > Network Devices
2: Check System Settings to confirm everything is as expected:
Administration > System settings
3: Check all users are defined correctly:
Administration > Users, Roles & AAA > Users
4: Verify that the configuration archive versions are maintained in the EPNM Server:
Inventory > Configuration Archive > Select device
5: Ensure all the Report Templates are present (if applicable):
Reports > Saved reports Templates
6: Validate License/token consumption is as expected:
Administration > Licenses and Software Updates > Licenses
7: Validate EPNM server health:
Administration > Dashboards > System Monitoring Dashboard
Logs that can be referred to Troubleshoot
Here are the logs that can be looked at to troubleshoot backup issues
/opt/CSCOlumos/logs/ dbadmin_Stdout.log
/var/log/ade/ADE.log
Here are the logs that can be looked at to troubleshoot issues encountered during the 6.0 installation steps
/opt/CSCOlumos/logs/ installPackage.log
/opt/CSCOlumos/logs/ LumosInstall.log
/opt/CSCOlumos/logs/ postinstall.log
/opt/CSCOlumos/logs/ LumosCarsPostInstall.log
/opt/CSCOlumos/logs/ncsadmin-0-0.log.lck
/opt/CSCOlumos/logs/sqlUpgrade.log
/opt/CSCOlumos/logs/db_migration.log
/opt/CSCOlumos/logs/dbadmin-0-0.log
/opt/CSCOlumos/logs/dbadmin_Stdout.log
Here are the logs that can be looked at to troubleshoot issues encountered during the 6.1 upgrade steps
/opt/CSCOlumos/logs/updates.log
Revision History
| Revision | Publish Date | Comments |
|---|---|---|
1.0 |
02-Mar-2023 |
Initial Release |
Contributed by Cisco Engineers
- Luis Jimenez TruqueCisco TAC
- Sancho FelixCisco TAC
Contact Cisco
- Open a Support Case

- (Requires a Cisco Service Contract)
 Feedback