Introduction
This document describes how to use the External Configuration Archive feature, available from Cisco DNA Center 2.3.5.x release.
Prerequisites
Requirements
Cisco recommends that you have knowledge of these topics:
- Cisco DNA Center running a 2.3.5 release
- Linux Secure File Transfer Protocol (SFTP) server
Components Used
The information in this document is based on these software and hardware versions:
- Cisco DNA Center running a 2.3.5 release or higher
- An SFTP server, on this document a Linux RedHat 8 server is used
The information in this document was created from the devices in a specific lab environment. All of the devices used in this document started with a cleared (default) configuration. If your network is live, ensure that you understand the potential impact of any command.
Configure
Configure the SFTP Settings
Step 1. Unlike File Transfer Protocol (FTP), there is no need to install additional packages in order to use SFTP. SFTP uses the SSH subsystem. Therefore, just run the command rpm -qa|grep ssh and confirm if you already have the required SSH package.
The output must be similar to this:
[admin@backup-server ~]$ rpm -qa|grep ssh
libssh-0.9.4-3.el8.x86_64
openssh-clients-8.0p1-10.el8.x86_64
openssh-8.0p1-10.el8.x86_64
libssh-config-0.9.4-3.el8.noarch
openssh-server-8.0p1-10.el8.x86_64
openssh-askpass-8.0p1-10.el8.x86_64
qemu-kvm-block-ssh-4.2.0-59.module+el8.5.0+12817+cb650d43.x86_64
Step 2. Create a new folder and assign proper permissions to it.
[admin@backup-server data]$ mkdir -p /data/sftp
[admin@backup-server data]$ chmod 700 /data
Step 3. Move to the new directory.
[admin@backup-server data]$ cd /data/sftp
Step 4. Create a group and a userin order to regulate users with SFTP access.
[admin@backup-server sftp]$ groupadd sftpusers
Step 5. Create a user, for example, digranad and bind it to both the sftpusers group and to the folder created in Step 1.
[admin@backup-server sftp]$ useradd -g sftpusers -d /data/sftp digranad
Assign a password to the user.
[admin@backup-server sftp]$ passwd digranad
Changing password for user digranad.
New password:
Retype new password:
passwd: all authentication tokens updated successfully.
Step 6. Configure the correct permissions to the directory using the group and user created in the earlier steps. Use the command sudo chown user:group directory/.
[admin@backup-server data]$ pwd
/data

[admin@backup-server data]$ sudo ls -lrt
[sudo] password for admin:
total 0
drwxr-xr-x. 2 root root       6 Feb  3 18:22 sftp

[admin@backup-server data]$ sudo chown digranad:sftpusers sftp/

[admin@backup-server data]$ sudo ls -lrt
total 0
drwxr-xr-x. 3 digranad sftpusers 38 May 18 15:04 sftp
[admin@backup-server data]$
At this point, you have successfully configured the SFTP settings. Now proceed with the configuration on Cisco DNA Center.
Configure the SFTP External Repository on Cisco DNA Center GUI
Step 1. Log into the Cisco DNA Center GUI, and navigate to System > Settings > Configuration Archive.
Step 2. In the Configuration Archive window, click the External tab.
Step 3. Click the Add icon in order to start the configuration of an External Repository.

Note: Only one SFTP server can be added.
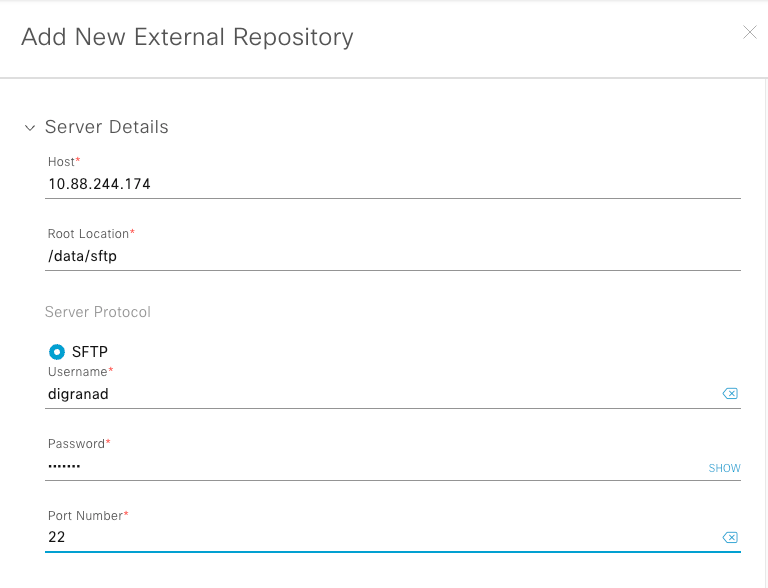
Step 4. In the Add New External Repositoryslide-in pane and complete these details:
-
Host: Enter the server IP address.
-
Root Location: Enter the location of the root folder.
-
Server Protocol: Enter the username, password, and port number of the SFTP server (port 22 is the default SFTP port).
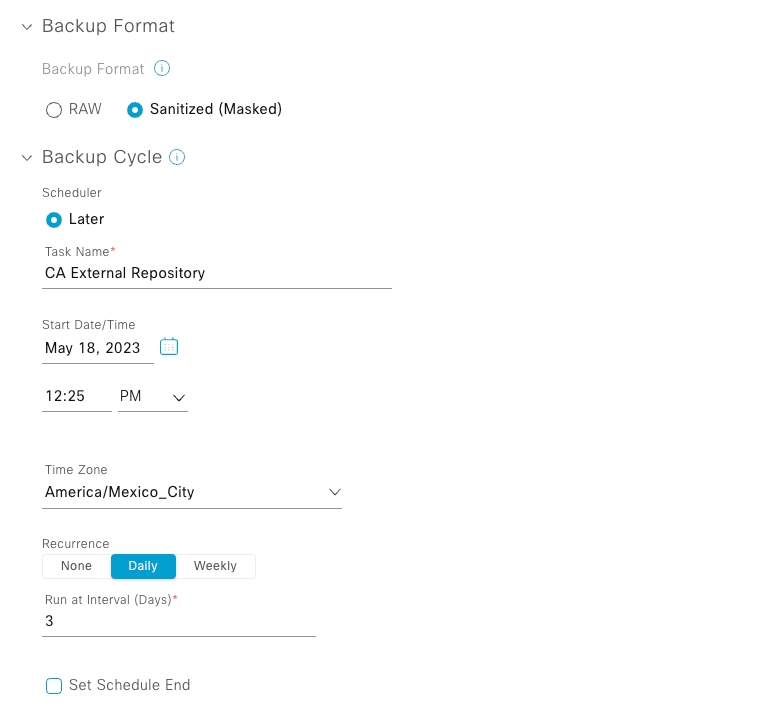
- Choose the Backup Format:
- RAW: A full running configuration is going to be disclosed. All sensitive/private configurations are unmasked in the backup data. Enter a password to lock the backup file.

Caution: File passwords are not saved on Cisco DNA Center. You must remember the password in order to access the files on the SFTP server.

Note: The password is applicable only when the raw backup format is selected.
e. Schedule the backup cycle. Enter the backup date, time, timezone, and recurrence interval.

Note: Use the settings configured on the Configure SFTP settings section of this document.
 External Repository Configuration 1

Step 5. Click Save.
Verify
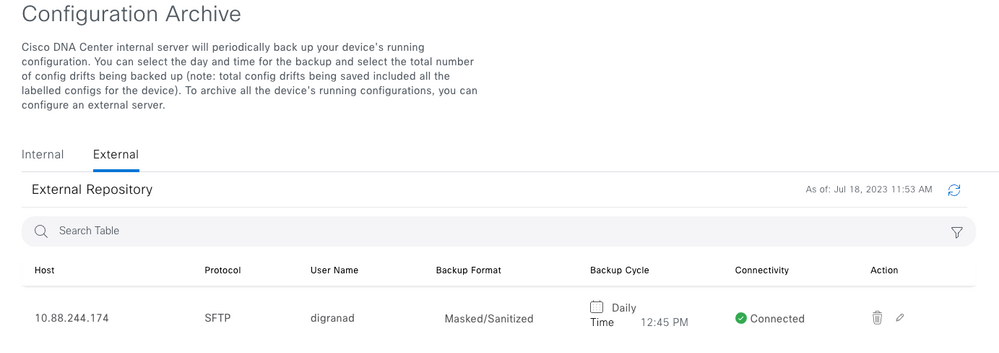
Confirm that the External Repository configuration is saved and displayed in the Configuration Archive section.

How To Consume the Data
Cisco DNA Center acts as a repository for the Network Devices configuration. These are the steps in order to visualize the configurations in the SFTP Server.
Change directory ( cd ) into the SFTP Server Root Location and run the pwd command in order to confirm.
[admin@backup-server ~]$ cd /data/sftp/

[admin@backup-server sftp]$ pwd
/data/sftp
Cisco DNA Center must have configured a directory called device_config_export. Use ls -lrt in order to list it.
[admin@backup-server sftp]$ ls -lrt
total 4
drwxr-xr-x. 25 digranad sftpusers 4096 Jul 18 20:24 device_config_export
Change the directory with cd and list the files again. You must see one directory for each cycle and the day it was executed.
[admin@backup-server sftp]$ cd device_config_export/

[admin@backup-server device_config_export]$ ls -lrt
total 0
drwxr-xr-x. 2 digranad sftpusers 61 May 18 15:31 1eeb097b-1d13-4e90-ba38-aace54dcdab5
drwxr-xr-x. 2 digranad sftpusers 61 May 19 14:45 a1a06766-feec-41b0-adf0-50e94def3901
drwxr-xr-x. 2 digranad sftpusers 61 May 22 14:45 28dd5439-c1e9-4a76-bd25-5292d46a1fe6
drwxr-xr-x. 2 digranad sftpusers 61 May 25 14:45 5dbf1ad5-a1a7-42ed-8367-ba90d09fffad
In order to check the file from May 18th, cd into that directory and list its contents in order to find the .zip file with the configurations.
[admin@backup-server device_config_export]$ cd 1eeb097b-1d13-4e90-ba38-aace54dcdab5
[admin@backup-server 1eeb097b-1d13-4e90-ba38-aace54dcdab5]$ ls -lrt
total 364
-rw-r--r--. 1 digranad sftpusers 371393 May 18 15:31 Export_Configs-17_May_2023_23_50_00_212-w8Q.zip
You have these two options in order to check the files inside the .zip file:
Option 1. UnZip the Export_Configs File
Run the unzip command for the .zip file.

Note: Sudo option is needed in the example since you are logged in with the admin username.
[admin@backup-server 1eeb097b-1d13-4e90-ba38-aace54dcdab5]$ sudo unzip Export_Configs-17_May_2023_23_50_00_212-w8Q.zip
Archive: Export_Configs-17_May_2023_23_50_00_212-w8Q.zip
This option creates a directory for every device in the inventory. Check those with the ls command.
[admin@backup-server 1eeb097b-1d13-4e90-ba38-aace54dcdab5]$ ls -lrt
total 364
-rw-r--r--. 1 digranad sftpusers 371393 May 18 15:31 Export_Configs-17_May_2023_23_50_00_212-w8Q.zip
drwxr-xr-x. 2 root root 151 Jul 19 15:45 x.x.x.x-Border2.Pod2.example.com
drwxr-xr-x. 2 root root 151 Jul 19 15:45 x.x.x.x-FIAB.Pod8.example.com
drwxr-xr-x. 2 root root 151 Jul 19 15:45 x.x.x.x-Border2.Pod8.example.com
drwxr-xr-x. 2 root root 106 Jul 19 15:45 x.x.x.x-MXC.L.11-9300
drwxr-xr-x. 2 root root 106 Jul 19 15:45 x.x.x.x-MXC.N.04-9300
drwxr-xr-x. 2 root root 151 Jul 19 15:45 x.x.x.x-Edge1.Pod8.example.com
drwxr-xr-x. 2 root root 151 Jul 19 15:45 x.x.x.x-WLC.Pod8.example.com
drwxr-xr-x. 2 root root 151 Jul 19 15:45 x.x.x.x-Edge2.Pod2.example.com
drwxr-xr-x. 2 root root 151 Jul 19 15:45 x.x.x.x-Border1_node.example.com
drwxr-xr-x. 2 root root 151 Jul 19 15:45 x.x.x.x-Border2_node.example.com
drwxr-xr-x. 2 root root 151 Jul 19 15:45 x.x.x.x-Edge-1
drwxr-xr-x. 2 root root 151 Jul 19 15:45 x.x.x.x-Interm.Pod8.example.com
drwxr-xr-x. 2 root root 151 Jul 19 15:45 x.x.x.x-Edge2.Pod8.example.com
drwxr-xr-x. 2 root root 151 Jul 19 15:45 x.x.x.x-MXC.I.12-9500
drwxr-xr-x. 2 root root 151 Jul 19 15:45 x.x.x.x-Edge1.Pod2.example.com
drwxr-xr-x. 2 root root 151 Jul 19 15:45 x.x.x.x-Border1.Pod8.example.com
drwxr-xr-x. 2 root root 151 Jul 19 15:45 x.x.x.x-Switch.Pod2.example.com
drwxr-xr-x. 2 root root 106 Jul 19 15:45 x.x.x.x-MXC.D.10-9300
drwxr-xr-x. 2 root root 106 Jul 19 15:45 x.x.x.x-Fusion_Router.example.com
drwxr-xr-x. 2 root root 151 Jul 19 15:45 x.x.x.x-Border1.Pod2.example.com
drwxr-xr-x. 2 root root 151 Jul 19 15:45 x.x.x.x-LanAauto-5.Pod8.example.com
drwxr-xr-x. 2 root root 151 Jul 19 15:45 x.x.x.x-Router-Lab.cisco
drwxr-xr-x. 2 root root 151 Jul 19 15:45 x.x.x.x-Edge-1
drwxr-xr-x. 2 root root 151 Jul 19 15:45 x.x.x.x-WLC1.Pod2.example.com
drwxr-xr-x. 2 root root 106 Jul 19 15:45 x.x.x.x-Router
drwxr-xr-x. 2 root root 151 Jul 19 15:45 x.x.x.x-Edge-2
drwxr-xr-x. 2 root root 106 Jul 19 15:45 x.x.x.x-sw2.example.com
drwxr-xr-x. 2 root root 151 Jul 19 15:45 x.x.x.x-Fusion.Pod8.example.com
drwxr-xr-x. 2 root root 151 Jul 19 15:45 x.x.x.x-9800-5-jdv.example.com
Each directory is created with the format x.x.x.x-DeviceHostname where x.x.x.x stands for the device management IP Address.
The data saved can vary depending on the device type. Here are two examples, one for x.x.x.x-Edge1.Pod8.example.com and the other for x.x.x.x-Fusion_Router.cisco.com.
In order to see the stored files, cd to the device directory and list its contents.
[admin@backup-server 1eeb097b-1d13-4e90-ba38-aace54dcdab5]$ cd x.x.x.x-Edge1.Pod8.example.com

[admin@backup-server x.x.x.x-Edge1.Pod8.example.com]$ ls -lrt
total 140
-rw-r--r--. 1 root root 556 May 17 23:50 17_May_2023_23_50_00_212_vlan.dat.bat
-rw-r--r--. 1 root root 67990 May 17 23:50 17_May_2023_23_50_00_212_STARTUPCONFIG.cfg
-rw-r--r--. 1 root root 68055 May 17 23:50 17_May_2023_23_50_00_212_RUNNINGCONFIG.cfg
[admin@backup-server 1eeb097b-1d13-4e90-ba38-aace54dcdab5]$ cd x.x.x.x-Fusion_Router.example.com
[admin@backup-server x.x.x.x-Fusion_Router.example.com]$ ls -lrt
total 32
-rw-r--r--. 1 root root 15578 May 17 23:50 17_May_2023_23_50_00_212_STARTUPCONFIG.cfg
-rw-r--r--. 1 root root 15578 May 17 23:50 17_May_2023_23_50_00_212_RUNNINGCONFIG.cfg

Note: It is expected that Router-based devices do not store VLAN data.
Finally, use the Linux cat
admin@backup-server x.x.x.x-Fusion_Router.cisco.com]$ cat 17_May_2023_23_50_00_212_STARTUPCONFIG.cfg
service timestamps debug datetime msec
service timestamps log datetime msec
service password-encryption
service call-home
...
...
...
snmp-server host x.x.x.x version 2c ********
snmp-server host x.x.x.x version 2c ********
control-plane
line con 0
stopbits 1
line aux 0
line vty 0 4
transport input ssh
destination transport-method http
event manager applet catchall
event cli pattern ".*" sync no skip no
action 1 syslog msg "$_cli_msg"
netconf-yang
end
Option 2. Navigate on the .zip using Linux Vim Tool
Vim tool allows you to navigate through the .zip file without extracting it. For this, run the vim command with the .zip file.
[admin@backup-server 1eeb097b-1d13-4e90-ba38-aace54dcdab5]$ vim Export_Configs-17_May_2023_23_50_00_212-w8Q.zip
Vim loads a browsing environment where you can navigate over all the files inside the .zip file using your arrow keys and Enter key in order to navigate the files.
" zip.vim version v28
" Browsing zipfile /data/sftp/device_config_export/1eeb097b-1d13-4e90-ba38-aace54dcdab5/Export_Configs-17_May_2023_23_50_00_212-w8Q.zip
" Select a file with cursor and press ENTER

/x.x.x.x-Border2.Pod2.example.com/17_May_2023_23_50_00_212_RUNNINGCONFIG.cfg
/x.x.x.x-Border2.Pod2.example.com/17_May_2023_23_50_00_212_STARTUPCONFIG.cfg
/x.x.x.x-Border2.Pod2.example.com/17_May_2023_23_50_00_212_vlan.dat.bat
/x.x.x.x-FIAB.Pod8.example.com/17_May_2023_23_50_00_212_STARTUPCONFIG.cfg
/x.x.x.x-FIAB.Pod8.example.com/17_May_2023_23_50_00_212_vlan.dat.bat
/x.x.x.x-FIAB.Pod8.example.com/17_May_2023_23_50_00_212_RUNNINGCONFIG.cfg
/x.x.x.x-Border2.Pod8.example.com/17_May_2023_23_50_00_212_vlan.dat.bat

Note: In order to exit from any file or from the Vim environment, use the command :q!.
Troubleshoot
Common Errors
1. Start Time is Bigger than the Current Time
After the external repository server is configured, if the configured StartTime for the backup cycle is older than the current time, this error appears:

In order to change this, simply choose a different StartTime which is greater than the current time.
2. Root Location Directory is not Empty
In case the root location folder was not created from scratch or you are reconfiguring the external repository on Cisco DNA Center, this error appears:

In order to fix this error, clean up the Root Location in the SFTP server. Log in to the SFTP server and navigate to the location with the cd command and perform a cleanup with the command sudo rm -r.
[admin@backup-server sftp]$ cd /data/sftp
[admin@backup-server sftp]$ sudo rm -r
Use the ls -lrt command in order to confirm that there are no files and use the ls -la command in order to verify if there are any hidden files left.
[admin@backup-server sftp]$ sudo ls -lrt
total 0

[admin@backup-server sftp]$ sudo ls -la
total 4
drwxr-xr-x. 3 digranad sftpusers 38 May 18 15:23 .
drwx-----x. 4 root     root      34 Feb  3 18:27 ..
drwx------. 3 digranad sftpusers 19 May 18 15:03 .config
-rw-------. 1 digranad sftpusers 16 May 18 15:03 .esd_auth
In case there are hidden files, remove them with the command sudo rm -r .* and use the ls -lacommand again in order to confirm that all files are removed.
[admin@backup-server sftp]$ sudo rm -r .*
rm: refusing to remove '.' or '..' directory: skipping '.'
rm: refusing to remove '.' or '..' directory: skipping '..'
[admin@backup-server sftp]$

[admin@backup-server sftp]$ sudo ls -la
total 0
drwxr-xr-x. 2 digranad sftpusers  6 May 18 15:25 .
drwx-----x. 4 root     root      34 Feb  3 18:27 ..
[admin@backup-server sftp]$
3. Root Location Folder does not Exist or Permissions were not Granted Correctly
In case the root location folder is missing in SFTP Server, or in case it exists without the proper permissions, this error is displayed:

Track the permissions starting from the top to the bottom. In this example, check the permissions or the existence of the /sftp /data directory.
Use the command pwd in order to know the location of the current folder.
[admin@backup-server data]$ pwd
/data
With the ls -lrt command confirm that the /sftp folder exists and verify its permissions.
[admin@backup-server data]$ ls -lrt
total 0
drwxr-xr-x. 2 root root       6 Feb  3 18:22 sftp
The directory /sftp has permissions set to root. In case a different user was used in Step 4. of the Configure SFTP server on Cisco DNA Center GUI section, then you must change the username in the GUI Settings or the permissions in the SFTP Server. You can use Step 6. of the Configure SFTP Settings section for reference.


 Feedback