RateMux - No Video Output and the Significance of NIT PID PassThru and CASysID
Available Languages
Contents
Introduction
In an MPEG II digital video network that utilizes Motorola Integrated Receiver Transcoder (IRT) equipment and Motorola DigiCipher II based encryption system, it is important that all the relevant components of the network have access to the system clock. Access to the system clock is conveyed by the Network Information Table (NIT) Packet ID (PID).
Additionally, each video program needs to have a special parameter set in its Program Map/Management Table (PMT). This parameter, called the CA SysID, needs to be set to 47 49 (the ASCII codes for the letters G and I in hexadecimal) in order for Motorola IRTs to recognize that the video stream should be processed as part of an encryption function.
If the appropriate equipment does not have proper access to the system clock conveyed by the NIT PID, and if individual programs do not have the CA SysID correctly set, then program encryption or decryption may not occur properly, and loss of video results.
By default, the Cisco RateMux 6920 Advanced MPEG-2 Multiplexer does not pass the NIT PID through from input ports to output ports. This document explains how to configure the RateMux 6920 multiplexer to achieve this. The document also discusses some of the most common pitfalls that can cause video output to fail on the RateMux multiplexer.
Before You Begin
Conventions
For more information on document conventions, see the Cisco Technical Tips Conventions.
Prerequisites
There are no specific prerequisites for this document.
Components Used
The information in this document is based on the software and hardware versions below.
-
Cisco RateMux 6920 Advanced MPEG-2 Multiplexer
-
Cisco RateMux Software Build Version 255
Note: If your RateMux 6920 multiplexer is running an earlier software build than 255, you must upgrade it to build 255 or later by following the instructions in the document How to Upgrade the Software on the RateMux C6920, or by following the instructions in the release notes of the version to which you are upgrading. The procedures in this document do not work properly in software build versions earlier than 255.
The information presented in this document was created from devices in a specific lab environment. All of the devices used in this document started with a cleared (default) configuration. If you are working in a live network, ensure that you understand the potential impact of any command before using it.
Why the NIT PID Needs to be Passed Through
When a digital video stream is received at a head end, the stream is typically in an encrypted format. In Motorola-based systems, the proprietary DigiCipher II Encryption System is used as the means of encrypting the Digital Video to guard against unauthorized access to the content in each channel.
The RateMux 6920 multiplexer is unable to perform any remultiplexing or compression on encrypted video streams, so an incoming MPEG video stream from a satellite feed (such as Headends In The Sky (HITS)) must be unencrypted before being fed to the RateMux 6920 multiplexer. This can be done by a Motorola IRT device connected to the input of the RateMux multiplexer. If DigiCable Headend Expansion Interface (DHEI) interfaces are used, then a DHEI output cable must be connected between the output of the Motorola IRT and the input of the RateMux multiplexer.
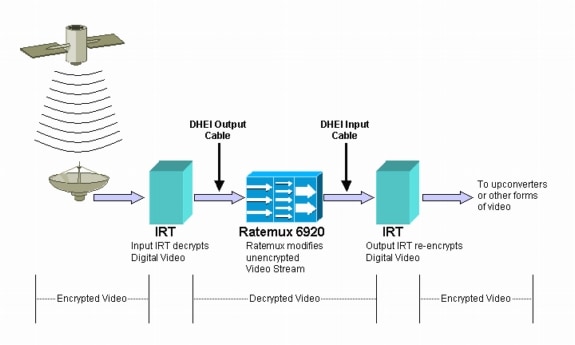
After the RateMux multiplexer performs remultiplexing or compression on the input video streams, the resulting video stream must be re-encrypted so that it can be securely distributed to customers. This re-encryption is normally performed by another Motorola IRT device. If DHEI interfaces are being used between the output of the RateMux multiplexer and the input of the Motorola IRT, then a DHEI input cable should be used.
In order to properly perform the re-encryption, the output IRT needs to have access to the correct system clock information. This information is conveyed in the MPEG stream sent by the satellite via the NIT PID. However, by default the RateMux 6920 multiplexer does not pass this NIT PID through from an input port to output ports. This means that the output IRT is unable to re-encrypt the video channels that it receives on its DHEI input port.
Why the CA SysID Needs to be Set to 47 49
The PMT PID is a table that conveys information about which PIDs are associated with a program. The diagram below shows a partial PMT for program number 7.
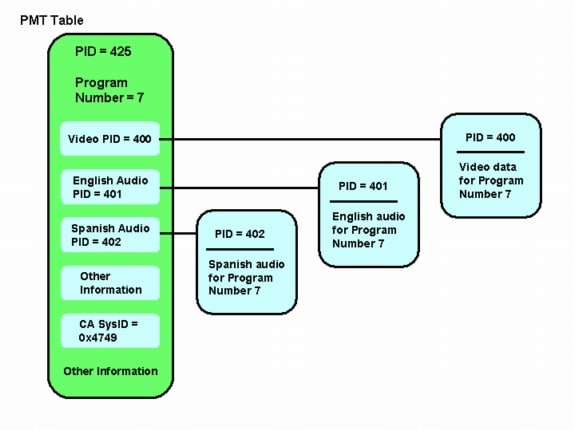
There are three PIDs associated with this program; one for video, and two for audio. In addition to PID and other information, the PMT also contains a parameter called the Conditional Access System ID (CA SysID). In order for a Motorola IRT device to be able to encrypt an MPEG program, the CA SysID for that program needs to be set to the hexadecimal value 47 49. These values correspond to the ASCII characters G and I, respectively.
Note: There must be a space between the 47 and the 49. In addition, make sure that 47 49 is the ONLY text in the boxes. If there are any dashes (-), extra spaces, or other characters, the setting fails.
Configuring the RateMux to Passthru the NIT PID
The following steps describe configuring the RateMux multiplexer to passthru the NIT PID.
-
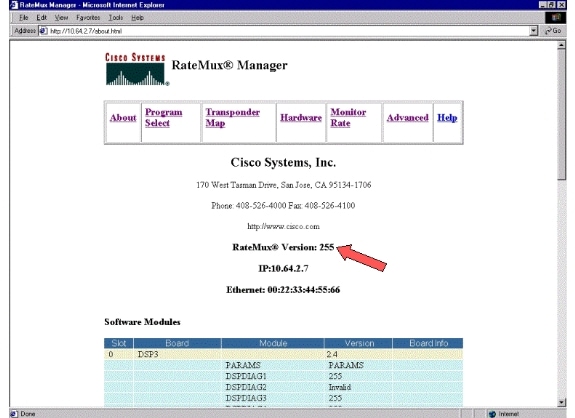
Launch the RateMux Manager application by opening a web browser to the IP address associated with the RateMux multiplexer you intend to configure. In following example, the IP address of the RateMux multiplexer is 10.64.2.7. Click the About menu to show a page that looks like the one in the diagram below. The first thing that needs to be verified is that your RateMux multiplexer is running software build version 255 or later.
-
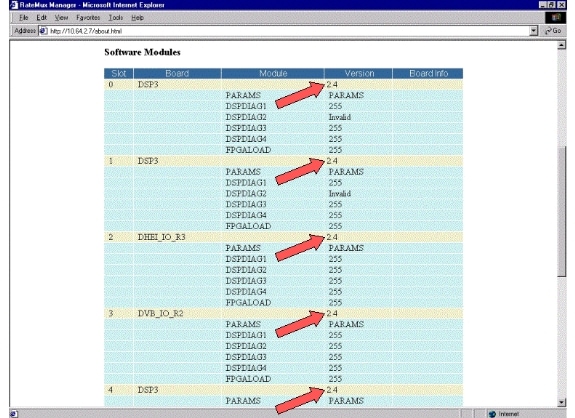
In addition to the software build version being 255 or later, the software versions on each card in the RateMux 6900 multiplexer should be at version 2.4 or later. You must also make sure that the version number on all the RateMux cards are the same.
The software version numbers on each card can be viewed by scrolling down on the About page, as seen in the diagram below.
-
Go to the Program Select page. To do this:
-
Click Program Select at the top of the web page.
-
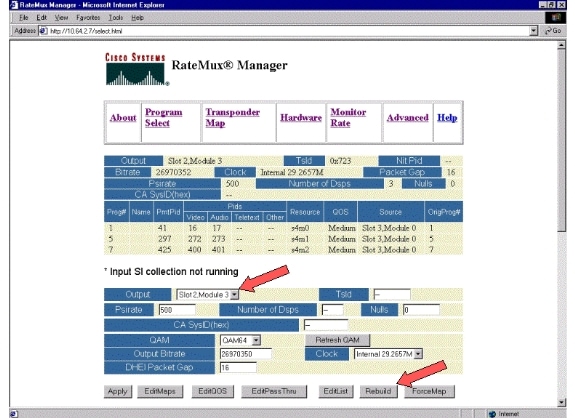
Make sure that the correct output port is selected in the Output drop down box.
-
Click the Rebuild button to refresh the configuration page.
Note: It is important that you click Rebuild before making any changes to the configuration of the RateMux multiplexer; otherwise, any previous configuration entered is lost.
-
-
If you have already configured the RateMux multiplexer to remap some programs, the display looks similar to the figure below. If you have not yet configured the RateMux multiplexer to remap programs, then refer to the RateMux Software Release Notes for your running version of software for instructions.
-
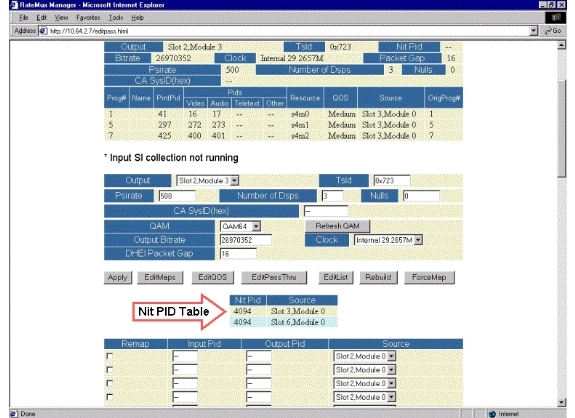
Click the EditPassThru button and scroll down to the middle of the displayed web pages. You should see something similar to the following figure:
-
Toward the bottom of the page, the RateMux multiplexer shows a table indicating the PID number and input ports on which NIT PIDs are present. In this case, input ports Slot3, Module 0 and Slot 6, Module 0 have NIT PIDs present. The number of the NIT PID is usually 4094.
-
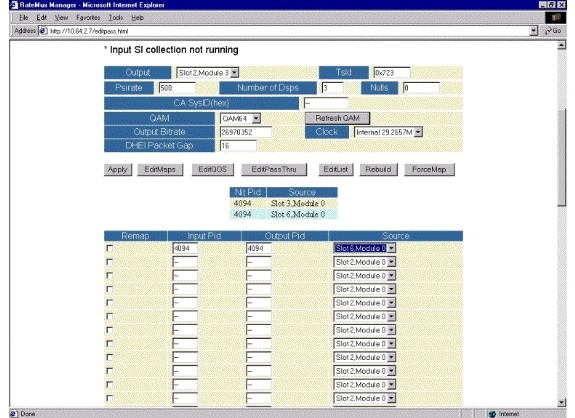
At this stage, you must decide which input port to pass the NIT PID from to our selected output port. In the case shown in the diagram below, it has been decided to pass through the NIT PID from Slot 6, Module 0 because the stream coming in from this input port tends to be more reliable. The Input PID and Output PID numbers are the same as those seen in the NIT PID table.
-
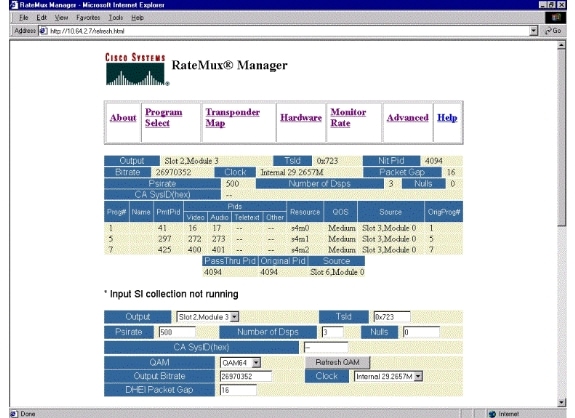
After the NIT PID has been selected for PassThru, click the Apply button and a page similar to the following appears. Now the Passed Thru NIT PID appears at the top of the displayed web page.
-
At this point the Output IRT should be receiving the NIT PID. The Output IRT now needs to be reconfigured to accept the DHEI stream coming from the RateMux multiplexer rather than accepting input from the Satellite Stream. This can be done by using the DHEI Control menu on the IRT. The value DHEI In field should be changed from Not Selected to Selected. Doing so allows the IRT to accept Video, Audio, Data, and the NIT stream from the DHEI input port rather than the default K-band satellite input. Refer to the IRT documentation for more information.
Configuring the RateMux to Set the CA SysID to 47 49
The following steps describe configuring the RateMux multipler to set the CA SysID to 47 49.
-
Launch the RateMux Manager application by opening a web browser and browsing to the IP address associated with the RateMux multiplexer you wish to configure. As per the last section, the RateMux multiplexer needs to be running software build 255 or later in order for this procedure to work properly, so use the About page to confirm that the RateMux multiplexer is running the right version of software.
-
In order to set the CA SysID, go to the Program Select page and click the Rebuild button.
Note: It is important that you click Rebuild before making any changes to the configuration of your RateMux multiplexer, otherwise any previous configurations entered is lost.
-
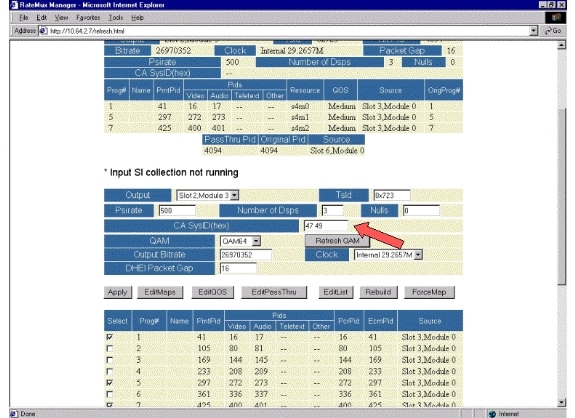
In the blank field labeled CA SysID(hex) near the bottom of the page, enter the hexadecimal values 47 49. Your RateMux Manager page should look similar to the one in the diagram below.
Note: There must be a space between the 47 and the 49.
-
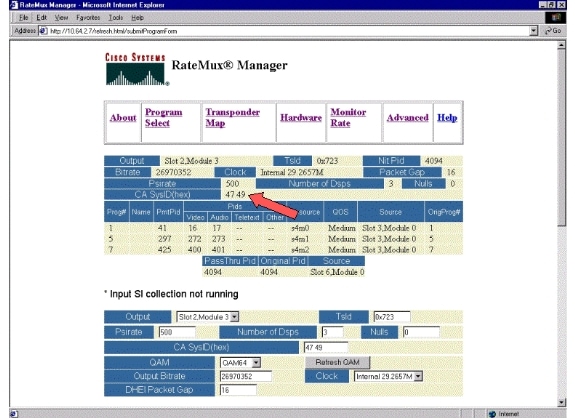
At this stage click Apply to save the change. The RateMux Manager should now show the CA SysID set to 47 49 in the top part of the display.
-
The CA SysID is now being set to 47 49 (GI) by the RateMux multiplexer on the output MPEG stream. You may also need to power cycle the Output (transmit) IRT if there is no Video output.
Troubleshooting FAQs
I have tried to pass through the NIT PID and set the CA SysID to 47 49; however, I am still unable to receive any video channels from this RateMux. What should I do?
-
Confirm that you can see the desired video channels in the Program Select page in the RateMux Manager.
-
Confirm that you are running software build 255 or later.
-
Confirm that your output IRT is set to accept input from the input DHEI port rather than the K-band Satellite input.
-
Make sure that you use a DHEI Input cable to connect the output of the RateMux multiplexer to the INPUT port of the transmit IRT and a DHEI Output cable to connect the input of the RateMux multiplexer to the OUTPUT port of the receive IRT.
-
You may also need to power cycle the Output (transmit) IRT if all the above fails.
Note: If, after power cycling the Output IRT there is still no video output, try reseating those video cards.
 Caution: Make sure you power off the RateMux multiplexer before pulling out or inserting any cards, as the cards are not hot-swappable.
When I passed through the NIT PID, or set the CA SysID to 47 49, all my programs disappeared from the RateMux configuration. What should I do?
You may have forgotten to click the Rebuild button before making a configuration change. At this stage you must manually re-enter your programs and mappings back into the RateMux multiplexer.
You may also need to power cycle the Output (transmit) IRT if all the above fails.
I cannot see any NIT PIDs to pass through on the Edit Pass Thru screen. What should I do?
If you cannot see any NIT PIDs displayed on the Edit Pass Thru page, then confirm that you are running software build 255 or later, and that the provider sending you a feed is sending a NIT PID with system clock through your video feed.
You may also need to power cycle the Output (transmit) IRT if all the above fails.
Which component is responsible for providing the clock?
There are a number of different, normally asynchronous clocks that are part of the transport stream. They are:
-
The transport stream clock
-
For DHEI output, the transport stream clock must be sourced from the DHEI IO card for 256 Quadrature Amplitude Modulation (QAM) output.
-
For DHEI output at 64 QAM, the transport stream clock may be sourced by a DHEI input transport stream to the RateMux multiplexer, or maybe sourced by the DHEI IO card if this is being output by a DHEI-I/O-C card. This is selectable at the GUI.
-
For ASI output the transport stream clock is sourced by the RateMux multiplexer.
-
-
The PCR clock—The PCR clock is passed through by the RateMux multiplexer and normally is sourced by the MPEG encoder. The RateMux multiplexer does adjust PCR time stamps while remultiplexing transport streams.
Note: The PCR is used to lock the reference 27MHz clock at the MPEG decoder to the 27MHz clock at the MPEG encoder.
-
The time of day clock—When the output of the RateMux multiplexer is connected to a transmit IRT, the RateMux multiplexer must be configured to pass through a NIT PID from one of the input bitstreams (as explained in this document). This NIT PID contains time-of-day info that the IRT needs for authorization.
-
The 270Mbps ASI clock (ASI streams)—This clock is sourced by the ASI I card.
Related Information
Contact Cisco
- Open a Support Case

- (Requires a Cisco Service Contract)


 Feedback